Toad provides multiple ways to publish and share information with your business community. Use the following methods to publish and share information from the Project Manager, Reports Manager, and Automation.
You can use the following methods to publish and share information:
|
To email from... |
Do this... |
|
Automation |
Drag the Send Email activity to the Automation workflow and attach files as needed. The email is sent when the automation script executes. See Use System Automation Activities for more information. |
|
To publish to a central location from... |
Do this... |
|
Project Manager, |
Right-click a report or file and select Send To | Toad Shared. The file is sent to the Toad shared folder specified in Tools | Options | Environment | Network Share. |
|
Automation |
Drag the Copy File activity to the Automation workflow. Specify the file to copy or move and a destination folder. This can be any folder, including the Toad shared folder, or a network folder. The file is copied or moved when the automation script executes. See Use File Automation Activities for more information. |
|
To send to a zip file... |
Do this... |
|
Automation |
Drag the Zip File activity to the workflow. Add reports and files to the Zip file and specify a file name with a .zip extension. The ZIP file can then be emailed with the Send Email activity or copied with the Copy File activity. See Use File Automation Activities for more information. |
| To publish to Intelligence Central from... | Do this... |
|
Project Manager, |
Right-click a file and select Send To | Publish File. See Publish Toad Documents to Intelligence Central for more information. |
|
Automation |
Drag the Publish Files activity to the Automation workflow. Add reports and files created previously in the script or add other existing files. See Use File Automation Activities for more information. |
Tips:
To export a Toad report to a file that can be read by other applications, double-click a report in the Reports Manager, click 
To capture report results in a file, add the Toad Report automation activity. This activity runs a Toad report and saves the results in a file format you select. Share or publish the file using the Automation functions. See Use Database Automation Activities for more information.
To execute and save a query in a file, add the Select To File automation activity. This activity runs a query or SQL script and exports the results to an Excel spreadsheet. Share or publish the spreadsheet using the Automation functions. See Use Database Automation Activities for more information.
Summary
This tutorial helps you get started with Automation by giving you an overview of the Automation module and then guiding you through the process of creating a basic script.
In this tutorial you will learn:

Note: The Automation module is disabled if Toad was installed with the Prohibit saving passwords option selected.
Toad provides an Automation utility that allows you to easily script database activities and schedule them using the windows scheduler. In this way, database tasks can be automated to save you time. Toad Automation can increase your productivity by allowing you to automate tasks that you perform repeatedly.
The Benefits of Using Automation
* Did You Know *Opening the Automation WindowThere are several ways to open an Automation window.
|
To get started with Automation, open an Automation window by selecting Tools | Automation.
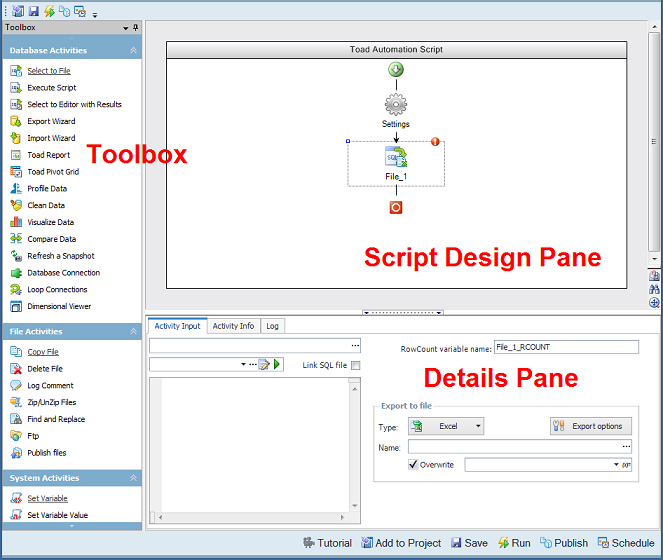
The Automation window consists of a Toolbox pane (along the left side of the window), a design pane (top half of the window), and a details pane (bottom half of the window).

Toolbox—Stores the Automation activities. Click an activity in the Toolbox to add it to the script design pane. Activities are listed by category: Database, File, or System.
Script Design Pane—Graphically displays the script as a workflow. Use the script design pane to build an Automation script. Drag an activity to the design pane to add the activity to a script.
Note: You must drag the activity to anAdd Activity icon 
Details Pane—Displays an activity’s settings. Click an activity in the design pane to display its configurable settings in the details pane. Use the details pane to specify the settings for each activity in the script.
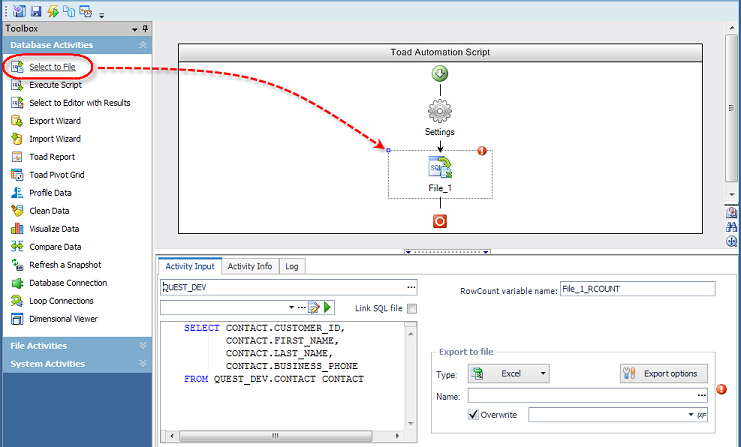
With the Select to File activity still selected in the script design pane, view the details pane. The details pane allows you to configure settings for the selected activity. The input fields change depending on which activity is currently selected in the design pane.
Note: The Activity Input tab is the tab where you will specify most of an activity's settings.
Click 
Note: This icon is also used to indicate a validation error, for example, when referencing a variable that has not been created yet.
Now click the Settings icon in the design pane. The details pane changes to display input fields for the script’s settings. You can use this area to specify script error handling, logging level, and run environment settings.

Click the Stop on Error button, if not already selected. This instructs the script to stop if an error is encountered.
Note: You can also enable or disable the Stop on Error option for each individual activity. If you know that a particular activity will have an error, you can disable the Stop on Error option for just that activity. This option is located on the Activity Info tab for each activity.
In addition to selecting the Stop on Error option, enabling the Send email when error occurs and Attach log file to email options is also preferred. This can be very useful if your script encounters an error. Enabling your script to send an email notification on error, as well as on success, helps you to feel confident that your processes are running as expected.
If you choose to enable these options, you must specify email settings. To specify email settings, click the Compose Email button.
In the Activity Input tab, in the first text box, select a database connection, or use the default. The default database connection for each database activity is always the currently-active open connection. To select a different database connection, click 
Note: If you schedule a script to run against a password-protected database for which you did not save the password in Toad, the script will error. To save the password, right-click the connection in the Connection/Navigation Manager and select Properties. Enter the password and select the Save Password option.
Tip: For Snowflake connections, it is considered best practice to use only the Snowflake user account authentication when creating Automation scripts to avoid unnecessary workflow interruptions.
 to browse to and select a SQL file.
 to browse to and select a SQL file. This option retains a link to the SQL file.
 to open the SQL file (you previously selected) in the Editor where you can modify the SQL.
 in the Name field and select a location and enter a name for your new Excel file.
 to build an expression. You can use this method to add a variable or a custom datetime stamp. Appending a datetime stamp to the file name allows you to create a unique file with each script execution.
You now have a complete activity, with input, output, and database connection specifications. You can save and reuse this activity in other scripts by saving the activity as a template. To do this, right-click the activity (after configuring all the settings) and select Save As Template. Enter a name for your template and click OK to save it.
Your template now appears in the Toolbox in the Templates category.

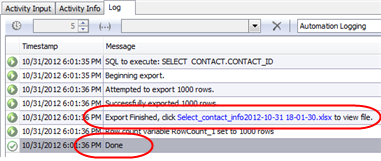
While the script is running, Toad displays your script’s execution progress in the Log tab. The message “Done” indicates script execution is finished.

If you require a more detailed Log, you can change the logging level. In the Settings Activity Input tab, select Verbose from the Logging level drop-down list to create a more detailed log.
Note: If you want to change the location of the Log file, select a new location in the Logging folder input field.
Toad allows you to specify both a Test database connection and a Production database connection for each script. Toad also allows you to specify which connection to run your script against when the script executes. Both of these settings are made in the script’s settings. This feature allows you to easily test your script in a test environment before running your script in the production environment.
To specify a test and a production database, make the selections in the Connection text box under Test environment and Production environment in the Settings Activity Input tab. To select which of these databases to run your script against, select Test or Production from the Select environment drop-down list.
If you remember from the overview of the Automation window, Toad allows you to enable or disable each activity in a script. This can be helpful when building a script, as it allows you to test one particular activity at a time by disabling the other activities.
In the Activity Info tab, click Disabled to disable the Select to File activity. Notice that the activity now appears shaded in the design pane. To enable the activity again, click Enabled, or right-click the activity in the design pane and select Enabled.
Once you have thoroughly tested your script, you can schedule it.
The Job Manager window opens and a task properties dialog displays. The task properties dialog is pre-populated with the information required to run your script as a scheduled task. You only need to schedule it. (The Job Manager uses the Windows Scheduler.)

 and select the task to update. Click OK and then enter your password when prompted.
Now you have learned how to increase your productivity by using Toad Automation to handle your repetitive reporting and deployment tasks!
Other Toad Automation tutorials are available. To see more examples and to learn how to build other types of scripts to automate everyday tasks, start with the following:
Summary
This tutorial walks you through the process of automating the task of exporting query results to simple Excel reports. You will create three different, and very useful, simple Excel reports.
In this tutorial you will learn:

After creating a result set in Toad, you may need to send the results to your end users. The easiest way to create a report containing query results is to export the data to an Excel file by right-clicking the data grid and selecting Quick Export | File | Excel File. This action creates a basic Excel spreadsheet containing the result set from the data grid.
If you want to create more than a basic spreadsheet and automate the process, Toad Automation helps you build a variety of Excel reports, from simple worksheets to complex and attractive Excel reports.
In this introduction to automating Excel reports, you will learn how to automate the process of exporting data to a variety of simple Excel reports.
Note: To learn how to get started with Automation, see Getting Started with Automation.
Click the Select to File activity in the Database Activities pane of the Toolbox, or drag the activity from the Toolbox to the Automation design window.

 to browse to and select a SQL file.
 to browse to and select a SQL file.
 to open the SQL file (you previously selected) in an editor where you can modify the SQL.
Click 
Note: To specify more-detailed options for the Excel file, click the Export options button.
 to build an expression.
Select Overwrite if you want to overwrite the file.
Note: If you did not add a suffix, you can deselect Overwrite to append a new worksheet to the Excel file with each script execution.
That was simple, wasn't it. Now move on to the next example to learn how to create a slightly more complex Excel report.
Suppose you want to create a new report each week from the same query while retaining the previous week’s results. In this case, you want to append each week’s results as a new worksheet to a single Excel file. This is an excellent option if you want to compare the results each week (or each day, month, etc.) to see how the data is changing. (And Toad has several data compare features in the application to let you do that.)
 to select a location and enter a name for your file.
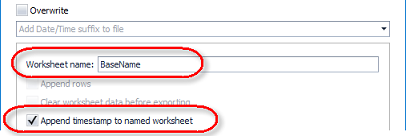
Select Append timestamp to named worksheet. This will append the date and time (that the data was exported) to the base worksheet name. Click OK to save your settings and close the dialog.

Click
The output of this script is one Excel file containing multiple worksheets. Each worksheet contains a result set from one execution of the script. And each worksheet name records the date and time the result set was exported.
Another variation of the multi-page Excel report is to export the results of multiple queries. Each worksheet in the Excel file will be populated with the result set of a different query. This can be accomplished by using a SQL file that contains multiple SQL statements as the input file.
 in the Name field to select a location and enter a name for your new Excel file.
Click Export options and make sure the Worksheet name field is blank.
Note: If the Worksheet name field is not blank, your script will export both result sets into the named sheet, and the second result set will overwrite the first.
Click
The output of this script is one Excel file containing multiple worksheets. Each worksheet contains the result set of a different query.
Note: To learn how to export the result sets of multiple queries into a single worksheet (using Automation), see Automate Complex Excel® Reports.
As you can see, with Toad Automation you can easily create basic Excel reports, but with a few more script configurations and the use of templates, you can also create attractive and more complex reports. To learn how, see the following tutorials on Automating Excel Reports.
See Schedule Your Script to learn how to schedule the Automation script.