If versioning is enabled on the document library, the previous versions are accessed by selecting the version in the dropdown of the StoragePoint Large File Details window, and clicking the Download link.
When a user who has access selects the StoragePoint Details menu item, they are presented with a dialog that will indicate whether or not the content associated with the list item is externalized and how it is externalized if applicable. Additionally, there are links that allow this user to externalize, recall, or migrate individual content, down to the version level.
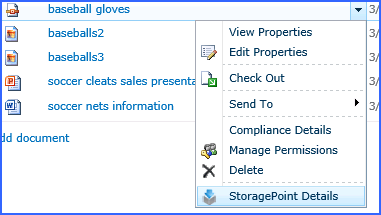
Access to the StoragePoint details is found on the context menu:

Externalized Sample
Non-Externalized Sample
The Copy Info button allows a copy of the information in the StoragePoint Details screen to be saved to the clipboard.
|
|
NOTE: For Large File Uploads, the StoragePoint Details page shows the size of the aspx file (stub). To see the true size of the file, open the Large File Upload details. |
|
|
NOTE: In SharePoint 2013, the Site Owner may see the StoragePoint Details link in the context menu, but the page displayed will be a message saying that it hasnt been shared with them. |
|
|
NOTE: In SharePoint 2019 and Subscription Edition, the pop-up blocker needs to be disabled to view the StoragePoint Details. |
There is a StoragePoint Folder Details and StoragePoint menu option that applies to folders and entire libraries or lists. If the context menu for a folder is selected, there would be a StoragePoint menu at the bottom that would open a dialog where BLOBs can be externalized, recalled, and migrated within the scope of the selection. This will schedule a manual timer job instance of the requested operation.
In order for these timer jobs to complete, the web app pool account should have access to the SharePoint configuration database (as well as the StoragePoint configuration database) to create the timer job.
|
Folder Menu |
|
SharePoint 2013 and SharePoint 2016 List Ribbon |
The StoragePoint software licenses are activated during the installation of the software. There are a few times when the software may need to be activated.
·If the number of servers in a farm is changed or an existing server is re-provisioned, the software must be re-activated to obtain a new license key. Make sure there are enough available licenses if adding servers to the farm. Contact support to purchase additional licenses.
·If the license was activated via Offline Activation during installation, the license needs to be reactivated every 6 months using Offline Activation. Online activations can be kept in synch by using the License Verification timer job.
|
|
NOTE: If activating a Trial license key, all StoragePoint features except deleting storage profiles and the Recall timer job will stop working at the end of the trial period. |
1.Open SharePoint Central Administration:
2.Navigate to the Application Management page.
3.Click the License Management link in the StoragePoint section of the page.
4.If taken to the License Management page start here: 
One or more Application licenses will display, depending on what StoragePoint products are installed. To activate or reactivate a license, click the Activate/Reactivate link associated with the product that needs to be activated.
|
|
NOTE: If the License Status is Valid and more servers are not being added to the farm or correcting a corrupt license key, no action is necessary. Go directly to Planning the StoragePoint Implementation. |
The following sections will go through the Automatic and Manual activation processes.