This section reviews solutions to other replication problems.
If the issue you are experiencing is not listed in this documentation, search the SharePlex Knowledge Base at:
https://support.quest.com.
The Knowledge Base provides filtering options and links to other resources that can help you use and troubleshoot SharePlex.
SharePlex does not run on a Windows system
SharePlex uses the MKS Toolkit® (also known as NuTCRACKER) operating environment from Parametric Technology Corporation (PTC) to run on Windows systems. If the NuTCRACKER service is stopped or disabled, or if the NuTCRACKER files have been removed or relocated, there will be errors when you try to run SharePlex.
Solution:
- Run the Windows Task Manager, then click the Processes tab.
- Check to see if the NuTCRACKER service is running. The process name is nutsrvx, where x is the version of the NuTCRACKER software.
-
If the process is not running, start the NuTCRACKER service by using the Services panel of the Administrative Tools Control Panel.
- If you do not see the NuTCRACKER service, re-install SharePlex.
-
If the NuTCRACKER service started, but SharePlex still returns errors, check to see if the NuTCRACKER files were relocated. To determine the correct installed location, look at the following in the Windows Registry:
HKEY_LOCAL_MACHINE\SOFTWARE\Data Focus\Runtime
- The InstallDir string in the right pane of the Runtime node shows the correct location for the files. Search for the MKS Toolkit folder and restore the files to the location specified in the InstallDir entry.
If you cannot locate the files or cannot restore them to the correct location, do the following:
-
Stop the SharePlex and NuTCRACKER services, if running.
-
Run regedit to open the Registry Editor.
- Delete the Data Focus and Mortice Kern Systems registry folders under HKEY_LOCAL_MACHINE\SOFTWARE\.
- Close the Registry Editor.
- Restart the system.
- Reinstall SharePlex. Make certain to reinstall SharePlex in the same location, and make certain to install the NuTCRACKER component when prompted.
- Restart the system to make the new NuTCRACKER environment effective.
A “Can’t unlink file” error occurs on Windows systems
A nuisance error similar to the ones below sometimes occur on Windows systems. The files eventually unlink.
Text file busy Unlinking file: 'r:\splex2102/rim/o.SERV+C+0.0000000
Or...
System call error: sp_ordr.exe(osp) (for o.SERV queue o.SERV) Text file busy 17003 - Can't unlink file R:\Splex2100/state/o.SERVlog_ sp_ordr.30
Common connection errors
The following are solutions to common errors when starting sp_ctrl, or with forming a connection with the host, port or [on host] commands in sp_ctrl.
Explanation of connection error messages
| Host unknown: cannot form connection |
Appears when either the host command or [on host] option is issued. |
Verify that the system to which you want to connect is running and that you are using the correct system name. |
| Network unreachable |
The network is down. |
Find out how long the network administrator expects it to last. If the downtime could cause the SharePlex queues to exceed their disk space, take measures to avoid having to resynchronize the data. For more information, see How to resolve disk space shortage. |
|
Export cannot connect to import on hostname: timeout waiting for ack |
Export cannot connect to the target because its connection was timed out by the network configuration. This can occur when there is little replication activity and the network has a timeout setting. |
Set the SP_XPT_KEEPALIVE parameter to 1. This setting tells the Export process to send a "hello" message to Import at regular intervals to prevent the TCP timeouts. |
| User is not authorized as a SharePlex user -- check /etc/group |
You do not have user permissions to execute the operation. |
SharePlex users must be listed in the /etc/group file (Unix and Linux) or in the Users list (Windows) under one of the SharePlex user groups: SharePlex Admin, spoper, spview. |
| unauthorized connection attempt from host hostname. net |
A connection from a remote machine was denied because its name is not listed in the auth_hosts file. |
See the error message for the name of the system. To allow that system to connect to the sp_cop on the local system, add its name to the auth_hosts file. |
Common command errors
| Deactivate/flush a nonactive datasource |
You are attempting to flush a configuration that is not active. |
None required. |
| Bad routing specification |
The syntax in the routing map is incorrect. |
For more information, see Routing specifications in a configuration file. |
| Status db file is corrupt. |
The Status Database has been damaged. |
Shut down SharePlex and remove the statusdb file, which resides in the data subdirectory of the SharePlex variable-data directory. SharePlex will create another one when you start sp_cop again. |
| Parameter does not exist in database. |
You tried to set a parameter, and you entered the wrong name or the parameter is deprecated for your SharePlex version. |
Use the list param command to view the SharePlex parameters for your version and to verify the spelling. |
| Parameter type checking failed - look in param - defaults file. |
You might have entered the wrong data type for the parameter. |
Use the list param command to determine the valid data type. |
|
Unknown service specified.
or...
No such module.
or...
Service may be only one of: post, read, import, export, capture, all. |
Valid service (process) names are capture, read, export, import, post. |
Issue the command again with the correct name. |
|
Command was called with an invalid argument.
or…
Unknown keyword used in command. |
The command contains invalid input. |
Issue the help command to view valid input for the command. |
| Permission denied for command - check your authorization level. |
You are not a member of the user group that can issue this command. |
Issue the authlevel command to view your authorization level. |
| Default host is not defined: use the ‘host’ command or [on host] option. |
SharePlex cannot to determine which system you want the command to affect. |
Either establish a default host with the host command or use the [on host] option with the command that you want to issue (if available). |
The following instructions help you decide how to resynchronize out-of-sync tables.
Manually patch out-of-sync tables
Valid for: All database types
If the number of synchronization errors is small, you can try to repair out-of-sync tables manually. When the Post process detects an out-of-sync condition, it ignores the error and continues to apply the next operations in the post queue. However, Post logs source SQL statements that cause out-of-sync errors to an error file calleID_errlog.sql. (ID is the identifier that SharePlex uses for the target instance, such as the ORACLE_SID or the database name.) You can apply those SQL statements to a target table through the native SQL interface of the database. Because this procedure bypasses the comparison made by Post, the operations should succeed assuming the structure of the target table did not change.
SharePlex stores ID_errlog.sql in the data sub-directory of the variable-data directory on the target system. The entries in the file are similar to the following example:
-- Host (irvlabua) Sid (al920u64)
-- session 2, 1 error --
--
-- [1] Tue Dec 11 13:31:32 2007
-- redolog seq#/offset 26622/26980368
-- redolog timestamp 641050290 (12/11/15 13:31:30)
-- original rowid AAE0m8AAWAAAAFEAAA
-- -- NOT FOUND
delete from “SP_5”.”QA_LOB_DISABLE_INROW” t where rownum = 1 and “KEY”='01';
To apply the SQL manually
- Stop user access to the affected source table.
- On the target system, open the ID_errlog.sql file.
- Apply the SQL statement(s) to the target table.
-
Reactivate the configuration if you had to make any changes to it.
sp_ctrl> activate config filename
- Allow user access to the source table.
Resynchronize by copying the source tables
Valid for: All database types
This procedure restores synchronization to out-of-sync target tables by applying a copy of the source tables. You only need to resynchronize the tables that are out of synchronization, so users can continue accessing all other tables.
Important! Before you start, review this procedure and see the SharePlex Reference Guide for more information about the commands that are used.
- On the source and target systems, make sure sp_cop is running.
- On the target system, run sp_ctrl.
-
[If necessary] On the target system, issue the show sync command to identify the tables that are out of synchronization.
sp_ctrl> show sync
- On the source system, stop activity for the out-of-sync tables.
- On the source system, run sp_ctrl.
-
On the source system, issue the flush command. Note: This command has additional options for use with named queues or multiple targets. See the SharePlex Reference Guide for more information about this command.
sp_ctrl> flush datasource
- On the source system, copy the tables.
-
On the source system, reactivate the configuration file if you had to make any changes.
sp_ctrl> activate config filename
- On the source system, allow users back onto the source tables.
-
On the target system, issue the status command until it shows that Post stopped.
sp_ctrl> status
-
On the target system, restore the tables.
- On the target system, disable or modify triggers, referential integrity constraints and check constraints according to the requirements of your replication strategy.
-
On the target system, determine the status ID of each message by viewing the Status Database.
sp_ctrl> show statusdb detail
-
On the target system, clear each message with the following command.
sp_ctrl> clear status statusID
-
On the target system, start the Post process.
sp_ctrl> start post
Resynchronize with Oracle transportable tablespace
Valid for: Oracle database
The transportable tablespace feature enables you to resynchronize numerous out-of-sync tables quickly and with minimal downtime. To use the transportable tablespace feature, follow the instructions in the Oracle documentation for generating a tablespace set, moving the tablespace set to the target database, and plugging the set into the database. The following instructions contain steps only for using this feature to resynchronize data. It assumes familiarity with using the transportable tablespace feature.
Important! Before you start, review this procedure and see the SharePlex Reference Guide for more information about the commands that are used.
-
On the source system, set the source tablespace to READ ONLY.
SQL> ALTER TABLESPACE name READ ONLY;
- On the source system, run sp_ctrl.
-
On the source system, issue the flush command in sp_ctrl. Note: This command has additional options for use with named queues or multiple targets. See the SharePlex Reference Guide for more information.
sp_ctrl> flush datasource
- Export the metadata to an export file according to the Oracle documentation.
- When the export is finished, copy the datafiles to a secondary location on the source system. This minimizes the impact on the source database of copying the files to the target system.
-
On the source system, set the source tablespace(s) to READ WRITE mode.
SQL> ALTER TABLESPACE name READ WRITE;
- On the target system, drop the existing datafiles and tablespaces from the target database so that the copied files can be applied.
- Copy the files from the secondary location on the source system to the target system.
- On the target system, use the Oracle import utility to import the metadata and the tablespace definitions.
-
On the target system, set the tablespace(s) to READ WRITE mode.
SQL> ALTER TABLESPACE name READ WRITE;
Note: SharePlex must be the only user permitted to have write access to the target tables, unless you are using peer-to-peer replication.
-
On the source system, reactivate the configuration file if you had to make any changes to it.
sp_ctrl> activate config filename
- On the target system, run sp_ctrl.
-
On the target system, start the Post process.
sp_ctrl> start post
Resynchronize with an Oracle hot backup on an active database
Valid for: Oracle database
When you use an Oracle hot backup and the reconcile command to resynchronize a target instance, users can continue to access the production data while the backup is made and applied.
Important:
- To resynchronize centralized reporting, such as a data warehouse, you cannot use a hot backup from all source systems. One backup would override the data from the previous one. You can use a hot backup of one of the source instances to establish the target instance, and then use another method such as export/import or transportable tablespaces to copy the tables from the other instances.
- To resynchronize peer-to-peer replication, you must quiet all of the secondary source systems for the duration of this procedure. Move all users to the primary system, and then follow the procedure. After the procedure has been performed on all of the secondary systems, users can resume activity on them.
- Before you start, review this procedure and see the SharePlex Reference Guide for more information about the commands that are used.
To resynchronize with a hot backup
- On the source and target systems, run sp_ctrl.
-
On the target system, stop the Post process. This allows the replicated data to accumulate in the post queue until the target instance has been recovered and reconciled.
sp_ctrl> stop post
- On the source system, run the Oracle hot backup.
-
On the source and target systems, verify that sp_cop, sp_ctrl and all SharePlex processes (Capture, Read, Export, Import, Post) are running.
sp_ctrl> status
-
Switch log files on the source system.
-
Recover the target database from the hot backup:
- If recovering to a sequence number, recover the database from the hot backup using the UNTIL CANCEL option in the RECOVER clause, and cancel the recovery after Oracle has fully applied the log from the previous step.
- If recovering to a SCN, recover the database from the hot backup using the UNTIL CHANGE SCN option in the RECOVER clause, and cancel the recovery after Oracle has applied the logs matching the SCN from the previous step.
-
Open the database with the RESETLOGS option.
-
On the target system, issue the reconcile command. If you are using named post queues, issue the command for each one. Issue the qstatus command if you are unsure of the queue name.
-
If recovering to a sequence number, substitute the sequence number of the log that you noted in step 5.
sp_ctrl> reconcile queue queuename for datasource-datadest seq sequence_number
Example: reconcile queue SysA for o.oraA-o.oraA seq 1234
-
If recovering to a SCN, substitute the SCN that you noted in step 5.
sp_ctrl> reconcile queue queuename for datasource-datadest scn scn_number
Example: reconcile queue SysA for o.oraA-o.oraA scn 0123456789
The reconcile process retains control of sp_ctrl until it is finished, and then the sp_ctrl prompt returns.
-
On the target system, log onto SQL*Plus as the Oracle user for SharePlex, and run the cleanup.sql script located in the bin sub-directory of the SharePlex product directory. This script truncates and updates the SharePlex tables, which are owned by the SharePlex user. If you are running multiple instances of sp_cop with multiple variable-data directories, there is a SharePlex Oracle user for each one. Make sure you run this script as the SharePlex user that owns the tables you want to restore. The script prompts you for the SharePlex user name and password.
SQL> @/productdir/bin/cleanup.sql
-
On the target system, disable or modify the following according to your replication strategy:
- triggers
- foreign key constraints
- cascading delete constraints (or configure SharePlex to ignore them)
- check constraints
- scheduled jobs that perform DML
-
On the source system, reactivate the configuration file if you had to make any changes to it.
sp_ctrl> activate config filename
-
On the target system, start the Post process. The two instances are now in synchronization, and SharePlex will continue replicating.
sp_ctrl> start post
If you decide to restore the archive logs to enable SharePlex to resume capture and replication, use the following procedure to determine the required archive logs.
-
Determine the sequence number that Capture needs to resume processing from. Capture stops when it encounters a log wrap and prints a message to the Event Log (event_log) containing the redo log sequence number it needs. You also can find out this number by querying the SHAREPLEX_ACTID table and looking at the SEQNO column, as shown in the following example:
SQL> select * from splex.shareplex_actid;
| ACTID |
SEQNO |
OFFSET |
AB_FLAG |
QUE_SEQ_NO_1 |
QUE_SEQ_NO_2 |
COMMAND |
| ----- |
------ |
-------- |
-------- |
------------- |
-------------- |
------------ |
| 14 |
114 |
9757200 |
0 |
672101000 |
0 |
|
-
Query the Oracle V$LOG_HISTORY table to find out when that sequence number was archived, then copy the logs from that point forward to the source system.
SQL> select * from V$LOG_HISTORY;
| RECID |
STAMP |
THREAD# |
SEQUENCE# |
FIRST_CHANGE# |
FIRST_TIM NEXT_CHANGE# |
| ----- |
------ |
-------- |
-------- |
------------- |
-------------- |
| 111 |
402941650 |
1 |
111 |
2729501 |
14-JUL-00 2729548 |
| 112 |
402941737 |
1 |
112 |
2729548 |
14-JUL-00 2729633 |
| 113 |
402941930 |
1 |
113 |
2729633 |
14-JUL-00 2781791 |
| 114 |
402942019 |
1 |
114 |
2781791 |
14-JUL-00 2836155 |
| 115 |
402942106 |
1 |
115 |
2836155 |
14-JUL-00 2890539 |
If database corruption or other system problem forced you to shut down SharePlex, verify that SharePlex released the semaphores and shared memory that it was using.
To verify and release semaphores
-
Look for any SharePlex processes that did not shut down, and kill them.
$ ps -ef | grep sp_
$ kill -9 PID
-
Change directories to the rim sub-directory of the SharePlex variable-data directory, then issue the od -x command for the shmaddr.loc and the shstinfo.ipc files.
# od -x shmaddr.loc
0000000 0000 00e1 ed40 0000 4400 9328 0080 0000
0000020 0002 0021
0000024
# od -x shstinfo.ipc
0000000 0000 00e0 ee90 0000 4100 9328 0010 0000
0000020 0002 0020
0000024
-
Make a note of the following values:
- The first 32-bit word of each of the files above reveals the hexadecimal equivalent of the ID of the shared memory segment. Convert this value to decimal. For example, in the shmaddr.loc file shown in step 2, the first word is 0000 00e1, which equates to a decimal value of 225. In the shstinfo.ipc file, the first word is 0000 00e0, which equates to a decimal value of 224.
- The third word of the shmaddr.loc and the shstinfo.ipc files reveals the hexadecimal equivalent of the KEY of the shared memory segment and the semaphore. (Each set has the same key value.) Do not convert this value to decimal. For example, in the shmaddr.loc file, the third word is 4400 9328. In the shstinfo.ipc file, the third word is 4100 9328.
- The fifth word of each file is the SEMAPHORE ID. Convert this value to decimal. The semaphore IDs in the examples are hex 0002 0021 and 0020 0020, which in decimal are 131105 and 131104, respectively.
-
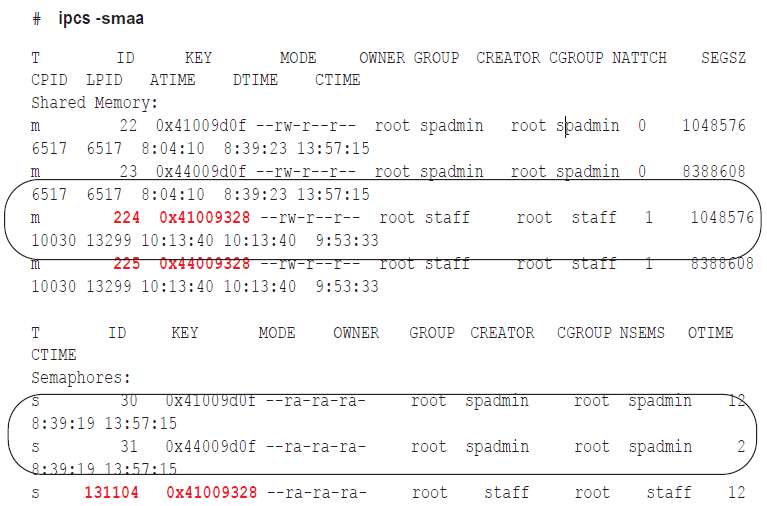
Issue the ipcs -smaa command to view all of the shared memory segments and semaphores. (Shared memory segments are listed first and are denoted with an “m.” Semaphores are denoted with an “s.”) The display looks similar to the following, but will be more extensive.
-
Verify that the shared memory IDs from the shmaddr.loc and shstinfo.ipc are in the list and that the keys match.
-
For each shared memory segment, verify that the value in the NATTCH column is 0. This ensures that the SharePlex processes that you killed released their memory segments.
-
For the semaphores, verify that the semaphore IDs and keys match the file values.
-
As root, issue the ipcrm -m command for the ID values (224 and 225 in the examples) to remove the memory segments.
# ipcrm -m 224
# ipcrm -m 225
-
As root, issue the ipcrm -s command for the key values (131104 and 131105 in the examples) to remove the semaphores.
# ipcrm -s 131104
# ipcrm -s 131105
