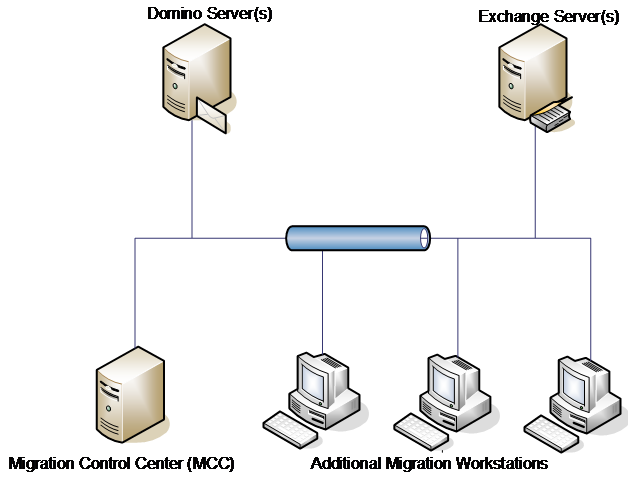
Installation of the migration worker can be done via two methods, via GPO MSI installer or through the CMTMonitor web page.
The migration worker installation will not install the requirements software, these should be installed separately prior to completing the migration worker install.
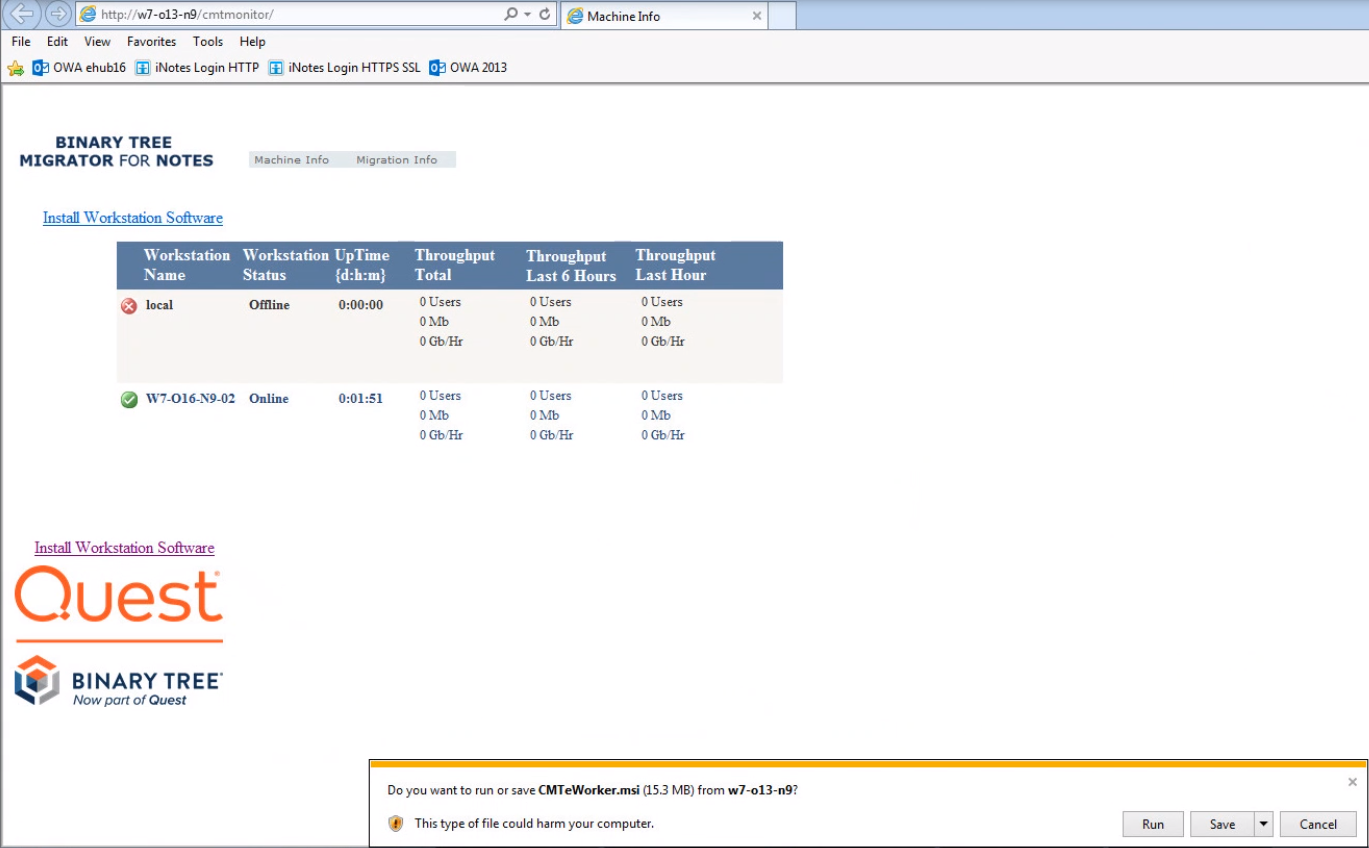
On one of designated Migration Workstations, (not the Migration Control Center), launch Internet Explorer and go to the Migration Control Center/CMTMonitor website.
Click the Install Workstation Software link and then Run
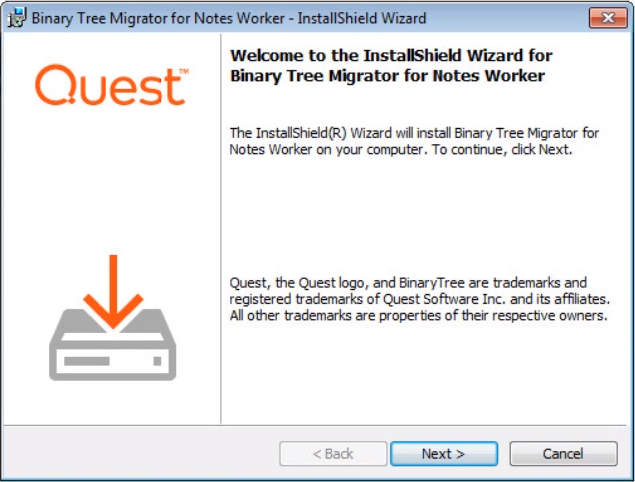
Click Next on the Welcome screen
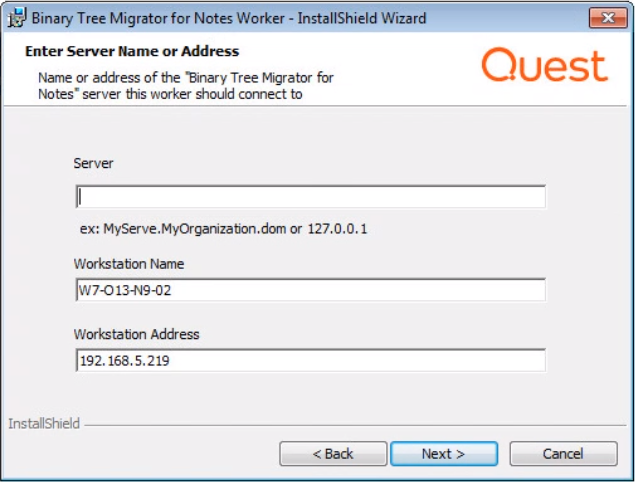
Enter the Migrator for Notes server name, workstation name, and workstation address and click Next.
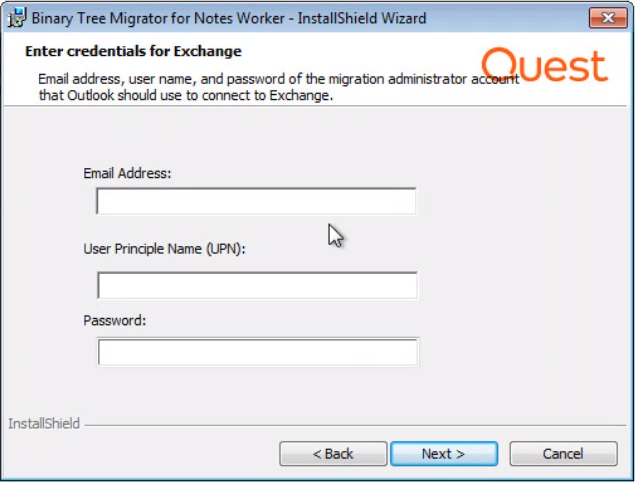
Entering user account information is optional on this screen. In smaller farm scenarios, you can continue to use the Migration Administrator account distributed by the MCC. If you wish to use another Migration Administrator account, enter the information in this screen.
This information is encrypted and cached on the Worker.
|
|
|
Click Install
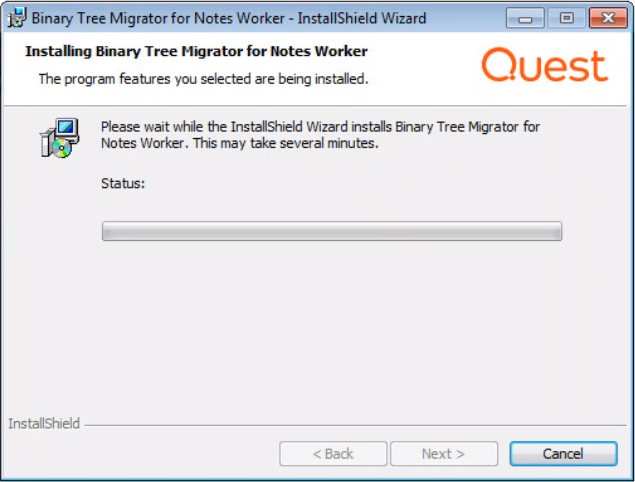
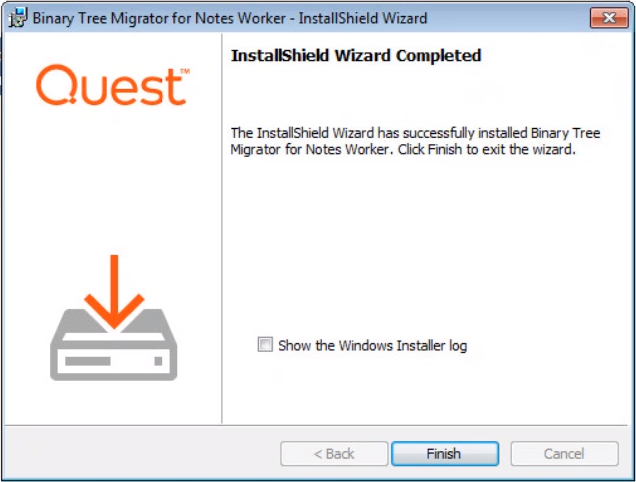
Click Finish
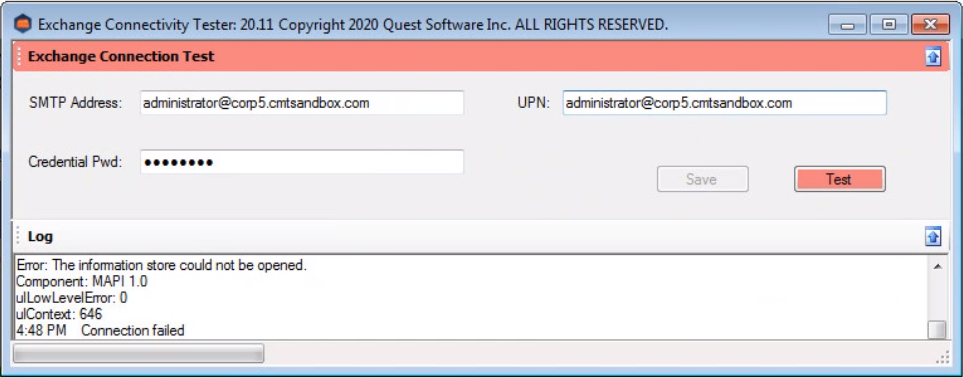
The Exchange Connectivity Tester will launch with the information you entered in the installer. Press the Test button to verify the account credentials can connect to Exchange.
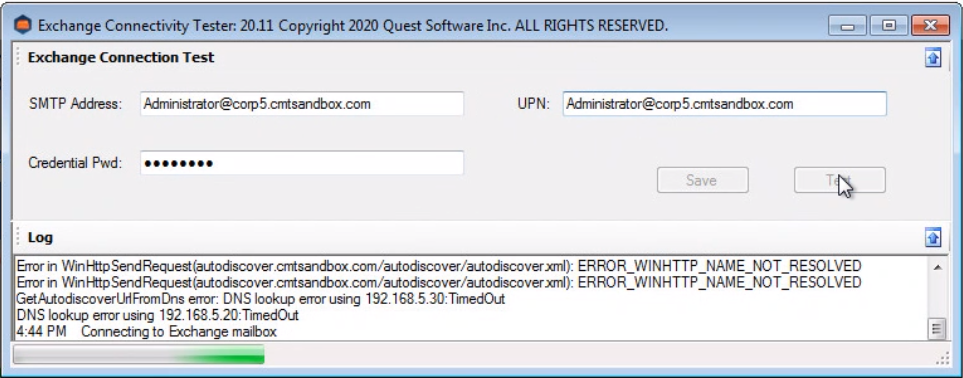
IMPORTANT: If the cached password is incorrect, a Windows Security dialog will be displayed. It is critical that you press Cancel and allow the test to fail. Entering the correct password in the Windows Security popup will allow the test to pass but will not change the cached credential information.
|
|
|
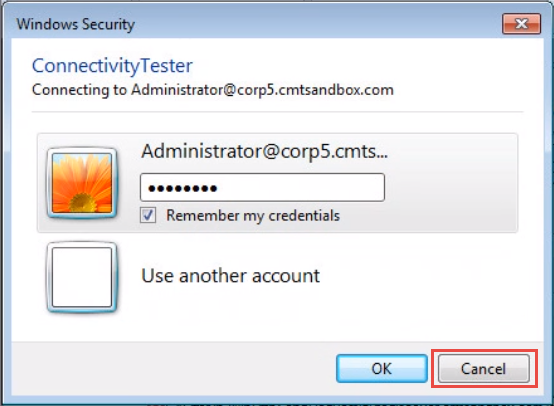
Enter a new password and press Test again.
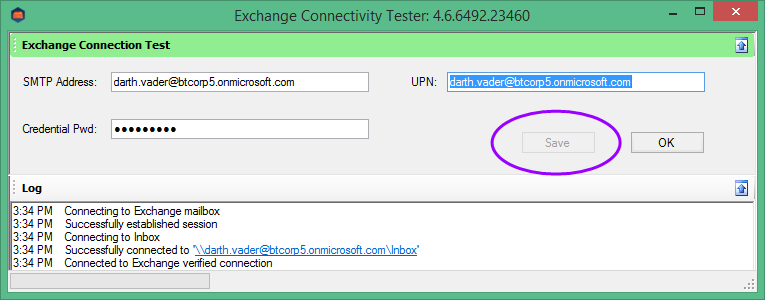
When the account information is correct and verified, the Save button will be enabled to allow you to update the information cached on this Worker.
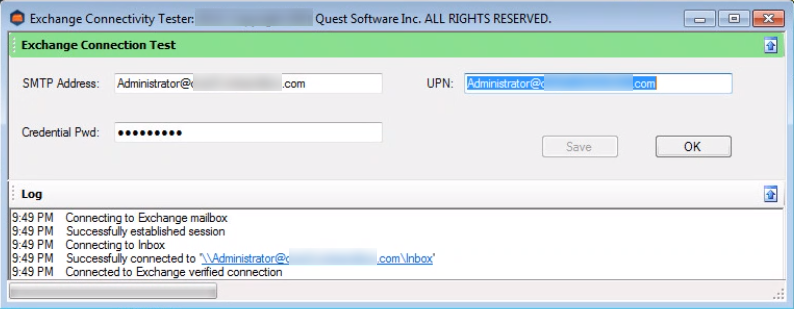
Press OK to exit the application.
The Exchange Connectivity Tester is added as a desktop shortcut and to the Start menu on the Worker. You can launch the application to change the cached account information in the Worker.

Note that the Save button will only be enabled after a successful test, and the credential information is different than the credentials that are cached in the Worker. Testing the existing cached account will not enable the Save button.
For automated deployment, send a command line with the following arguments:
SERVICEURL The FQDN or IP Address of the CMT_XMLServer. Normally, this is the same machine where the MCC is installed.
EXCREDDIALOG_EMAIL: The SMTP address of a MAPI Migration Administrator account.
EXCREDDIALOG_UPN: The “User Principal Name” of the MAPI Migration Administrator account. NETBIOS format (domain\user) is not supported.
EXCREDDIALOG_PASSWORD: The password for the MAPI Migration Administrator account.
Example:
msiexec /i “CMTeWorker.msi” SERVICEURL=”mcchost.org.dom” EXCREDDIALOG_EMAIL=migadmin@org.dom EXCREDDIALOG_UPN=migadmin@org.dom EXCREDDIALOG_PASSWORD=”Migration admin password” /qn
|
|
The “EXCREDDIALOG_xxx” arguments are not needed if you wish to continue using the account distributed by the MCC. |
|
|
The .MSI installer does not check the workstation environment meets the minimum requirements, and does not install the missing components needed for a successful migration. |

Installation of the migration worker can be done via two methods, via GPO MSI installer or through the CMTMonitor web page.
The migration worker installation will not install the requirements software, these should be installed separately prior to completing the migration worker install.
On one of designated Migration Workstations, (not the Migration Control Center), launch Internet Explorer and go to the Migration Control Center/CMTMonitor website.
Click the Install Workstation Software link and then Run

Click Next on the Welcome screen

Enter the Migrator for Notes server name, workstation name, and workstation address and click Next.

Entering user account information is optional on this screen. In smaller farm scenarios, you can continue to use the Migration Administrator account distributed by the MCC. If you wish to use another Migration Administrator account, enter the information in this screen.
This information is encrypted and cached on the Worker.

|
|
|
Click Install

Click Finish

The Exchange Connectivity Tester will launch with the information you entered in the installer. Press the Test button to verify the account credentials can connect to Exchange.

IMPORTANT: If the cached password is incorrect, a Windows Security dialog will be displayed. It is critical that you press Cancel and allow the test to fail. Entering the correct password in the Windows Security popup will allow the test to pass but will not change the cached credential information.
|
|
|

Enter a new password and press Test again.

When the account information is correct and verified, the Save button will be enabled to allow you to update the information cached on this Worker.

Press OK to exit the application.
The Exchange Connectivity Tester is added as a desktop shortcut and to the Start menu on the Worker. You can launch the application to change the cached account information in the Worker.

Note that the Save button will only be enabled after a successful test, and the credential information is different than the credentials that are cached in the Worker. Testing the existing cached account will not enable the Save button.

For automated deployment, send a command line with the following arguments:
SERVICEURL The FQDN or IP Address of the CMT_XMLServer. Normally, this is the same machine where the MCC is installed.
EXCREDDIALOG_EMAIL: The SMTP address of a MAPI Migration Administrator account.
EXCREDDIALOG_UPN: The “User Principal Name” of the MAPI Migration Administrator account. NETBIOS format (domain\user) is not supported.
EXCREDDIALOG_PASSWORD: The password for the MAPI Migration Administrator account.
Example:
msiexec /i “CMTeWorker.msi” SERVICEURL=”mcchost.org.dom” EXCREDDIALOG_EMAIL=migadmin@org.dom EXCREDDIALOG_UPN=migadmin@org.dom EXCREDDIALOG_PASSWORD=”Migration admin password” /qn
|
|
The “EXCREDDIALOG_xxx” arguments are not needed if you wish to continue using the account distributed by the MCC. |
|
|
The .MSI installer does not check the workstation environment meets the minimum requirements, and does not install the missing components needed for a successful migration. |

Installation of the migration worker can be done via two methods, via GPO MSI installer or through the CMTMonitor web page.
The migration worker installation will not install the requirements software, these should be installed separately prior to completing the migration worker install.
On one of designated Migration Workstations, (not the Migration Control Center), launch Internet Explorer and go to the Migration Control Center/CMTMonitor website.
Click the Install Workstation Software link and then Run

Click Next on the Welcome screen

Enter the Migrator for Notes server name, workstation name, and workstation address and click Next.

Entering user account information is optional on this screen. In smaller farm scenarios, you can continue to use the Migration Administrator account distributed by the MCC. If you wish to use another Migration Administrator account, enter the information in this screen.
This information is encrypted and cached on the Worker.

|
|
|
Click Install

Click Finish

The Exchange Connectivity Tester will launch with the information you entered in the installer. Press the Test button to verify the account credentials can connect to Exchange.

IMPORTANT: If the cached password is incorrect, a Windows Security dialog will be displayed. It is critical that you press Cancel and allow the test to fail. Entering the correct password in the Windows Security popup will allow the test to pass but will not change the cached credential information.
|
|
|

Enter a new password and press Test again.

When the account information is correct and verified, the Save button will be enabled to allow you to update the information cached on this Worker.

Press OK to exit the application.
The Exchange Connectivity Tester is added as a desktop shortcut and to the Start menu on the Worker. You can launch the application to change the cached account information in the Worker.

Note that the Save button will only be enabled after a successful test, and the credential information is different than the credentials that are cached in the Worker. Testing the existing cached account will not enable the Save button.

For automated deployment, send a command line with the following arguments:
SERVICEURL The FQDN or IP Address of the CMT_XMLServer. Normally, this is the same machine where the MCC is installed.
EXCREDDIALOG_EMAIL: The SMTP address of a MAPI Migration Administrator account.
EXCREDDIALOG_UPN: The “User Principal Name” of the MAPI Migration Administrator account. NETBIOS format (domain\user) is not supported.
EXCREDDIALOG_PASSWORD: The password for the MAPI Migration Administrator account.
Example:
msiexec /i “CMTeWorker.msi” SERVICEURL=”mcchost.org.dom” EXCREDDIALOG_EMAIL=migadmin@org.dom EXCREDDIALOG_UPN=migadmin@org.dom EXCREDDIALOG_PASSWORD=”Migration admin password” /qn
|
|
The “EXCREDDIALOG_xxx” arguments are not needed if you wish to continue using the account distributed by the MCC. |
|
|
The .MSI installer does not check the workstation environment meets the minimum requirements, and does not install the missing components needed for a successful migration. |

Installation of the migration worker can be done via two methods, via GPO MSI installer or through the CMTMonitor web page.
The migration worker installation will not install the requirements software, these should be installed separately prior to completing the migration worker install.
On one of designated Migration Workstations, (not the Migration Control Center), launch Internet Explorer and go to the Migration Control Center/CMTMonitor website.
Click the Install Workstation Software link and then Run

Click Next on the Welcome screen

Enter the Migrator for Notes server name, workstation name, and workstation address and click Next.

Entering user account information is optional on this screen. In smaller farm scenarios, you can continue to use the Migration Administrator account distributed by the MCC. If you wish to use another Migration Administrator account, enter the information in this screen.
This information is encrypted and cached on the Worker.

|
|
|
Click Install

Click Finish

The Exchange Connectivity Tester will launch with the information you entered in the installer. Press the Test button to verify the account credentials can connect to Exchange.

IMPORTANT: If the cached password is incorrect, a Windows Security dialog will be displayed. It is critical that you press Cancel and allow the test to fail. Entering the correct password in the Windows Security popup will allow the test to pass but will not change the cached credential information.
|
|
|

Enter a new password and press Test again.

When the account information is correct and verified, the Save button will be enabled to allow you to update the information cached on this Worker.

Press OK to exit the application.
The Exchange Connectivity Tester is added as a desktop shortcut and to the Start menu on the Worker. You can launch the application to change the cached account information in the Worker.

Note that the Save button will only be enabled after a successful test, and the credential information is different than the credentials that are cached in the Worker. Testing the existing cached account will not enable the Save button.

For automated deployment, send a command line with the following arguments:
SERVICEURL The FQDN or IP Address of the CMT_XMLServer. Normally, this is the same machine where the MCC is installed.
EXCREDDIALOG_EMAIL: The SMTP address of a MAPI Migration Administrator account.
EXCREDDIALOG_UPN: The “User Principal Name” of the MAPI Migration Administrator account. NETBIOS format (domain\user) is not supported.
EXCREDDIALOG_PASSWORD: The password for the MAPI Migration Administrator account.
Example:
msiexec /i “CMTeWorker.msi” SERVICEURL=”mcchost.org.dom” EXCREDDIALOG_EMAIL=migadmin@org.dom EXCREDDIALOG_UPN=migadmin@org.dom EXCREDDIALOG_PASSWORD=”Migration admin password” /qn
|
|
The “EXCREDDIALOG_xxx” arguments are not needed if you wish to continue using the account distributed by the MCC. |
|
|
The .MSI installer does not check the workstation environment meets the minimum requirements, and does not install the missing components needed for a successful migration. |