Granting Full Control on Exchange Servers
The Target Exchange Account should have the Full Control permission on Exchange servers in the target Exchange 2007 organization, including the Send As and Receive As permissions.
To grant the required permissions to the account, do the following:
- From the Start menu, select Run. In the Run dialog box, type ADSIEdit.msc. Click OK.
|

|
NOTE: If you have a Windows 2003 domain controller, then the ADSIEdit utility, which is part of the Windows 2003 Support Tools, may not be installed. In this case install the Support Tools by running the Support\Tools\Suptools.msi file located on the Windows 2003 CD. |
- In the ADSIEdit snap-in, open the CN=Servers,CN=Exchange Administrative Group (FYDIBOHF23SPDLT),CN=Administrative Groups,CN=<ExchangeOrganizationName>,CN=Microsoft Exchange,CN=Services,CN=Configuration,DC=<…>,DC=<…> container.
- For each Exchange server in this container that is involved in migration, complete the following steps:
- Right-click the server object and select Properties.
- In the Properties dialog box, click the Security tab.
- On the Security tab, click Advanced.
- In the Advanced Security Settings dialog box, click Add.
- In the Select User, Computer, or Group (or similar) dialog box, select the administrative account (in our example, QMM_Trg_Ex) and click OK.
- In the Permission Entry for dialog box, select This object and all child (descendant) objects from the Apply onto drop-down list.
- Allow Full Control permission for the administrative account, including the Send As and Receive As permissions.
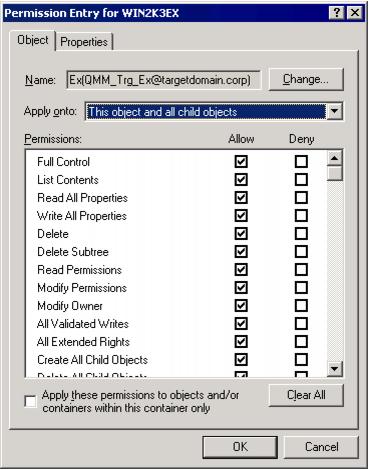
- Close the dialog boxes by clicking OK.
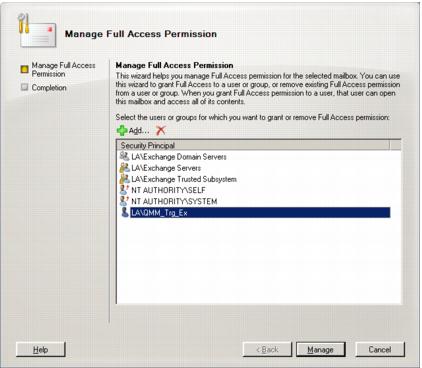
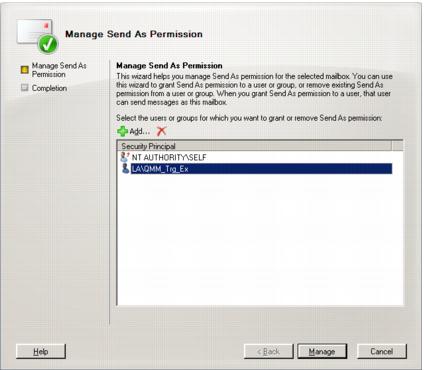
To make sure the above actions were performed correctly, please view the Manage Full Access and Manage Send As dialogs in Exchange Management console. You should see the Target Exchange Account in both of the dialogs below.
Granting Full Control on the Microsoft Exchange System Objects Organizational Unit
The Target Exchange Account used by Migration Manager for Exchange agents needs the Full Control permission on the Microsoft Exchange System Objects organizational unit (OU) in all domains in which target Exchange 2007 servers involved in public folder synchronization reside.
- In the Active Directory Users and Computers snap-in, right-click the Microsoft Exchange System Objects OU and click Properties.
-
|
|
NOTE: If there is no Microsoft Exchange System Objects OU, you should select View | Advanced Features in the Active Directory Users and Computers snap-in. |
- On the Security tab, click Add, and select the Target Exchange Account (in our example, QMM_Trg_Ex).
- Select the account name, and then enable the Allow option for the Full Control permission in the Permissions box.
- Click the Advanced button. In the Advanced Security Settings dialog box, select the account you specified on step 2, and click Edit.
- In the Permission Entry dialog box, select This object and all child (descendant) objects from the Apply onto drop-down list.
- Close the dialog boxes by clicking OK.
To make sure the above actions were performed correctly, please view the Manage Full Access and Manage Send As dialogs in Exchange Management console. You should see the service account in both of the above dialogs.
Granting the Exchange Public Folder Administrator Role
The Target Exchange Account requires the Exchange Public Folder Administrator role.
To grant it, complete the following steps:
- Launch the Exchange Management Console.
- Click the Organization Configuration node. Exchange Administrators tab will appear on in the right pane.
- Right-click anywhere in the Exchange Administrators tab and select Add Exchange Administrator from the shortcut menu.
- In the Add Exchange Administrator dialog box click Browse, select the Target Exchange Account (in our example, QMM_Trg_Ex) and click OK.
- Select the Exchange Public Folder Administrator role option and click Add.
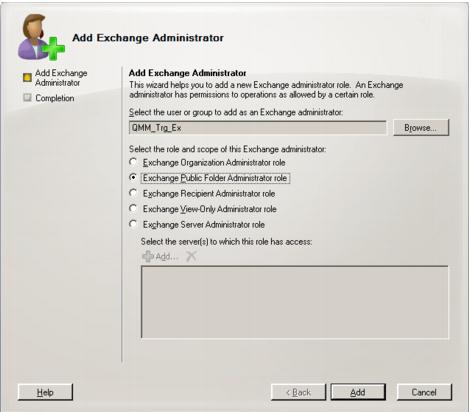
- Click Finish to exit the wizard and apply your changes.
|

|
Caution: If the Target Exchange Account is located in another trusted forest, you cannot assign the Exchange Public Folder Administrator role to this account. In this case grant the following permissions for the Exchange Administrative Group (FYDIBOHF23SPDLT) container and its child objects to the account in the Configuration partition using the ADSIEdit snap-in:
- Modify public folder replica list permission
- Modify public folder deleted item retention permission
- Modify public folder quotas permission
|
Setting Up the Target Active Directory Account
This section describes how to set the required permissions for the Target Active Directory Account used by Migration Manager for Exchange agents. This account is used for the following:
The required permissions for the Target Active Directory Account are as follows:
- Read access to the target domain
- Full Control permission on the organizational units (OUs) (and their child objects) where the target synchronized objects are located.
- Read permission for the Microsoft Exchange container in the target Active Directory
To set up the Target Active Directory Account, perform the steps described in the related subtopics.
|
|
NOTE: Note that these steps are given only as an example of a possible Target Active Directory Account setup. |
