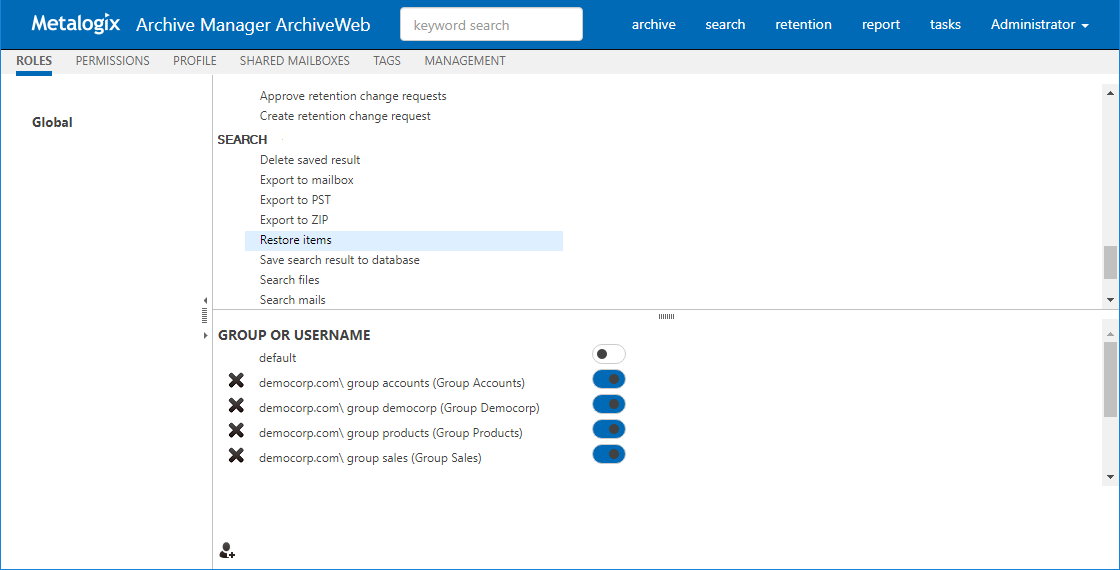
The Roles page displays permissions categorized by roles. These permission sets can be granted to users and groups either globally or by server and location. The Roles page helps you revoke or grant a specific permission to one or more users and groups. See the Permissions page to revoke or grant one or more permissions to a specific user or group.
Steps to access the Permissions page
1.Log in to ArchiveWeb.
2.From the main menu, click the username dropdown and then select Manage settings.
3.From the local toolbar, click Roles.
Steps to grant a permission to users or groups:
|
|
NOTE: If the UseGlobalPermissionsForAllServers key is set to true or this key does not exist in the web.config file, the Roles page lists Global settings. In this case permissions for users and groups are set globally and are applicable to all servers. If the UseGlobalPermissionsForAllServers is set to false in the web.config file, all available servers will be listed and permissions can be set for users or groups for a selected server or location. Using this option can slow down the login process because all accessible servers and locations must be searched for role assignments. |
1.Either click Global or select a server to display the permissions in the right-hand pane.
2.Select a permission from the right-hand pane. In the Group and Username section, Default indicates the default settings for this permission. Specific users and groups can be added to this section to change their default permissions setting.
3.To add a user or group:
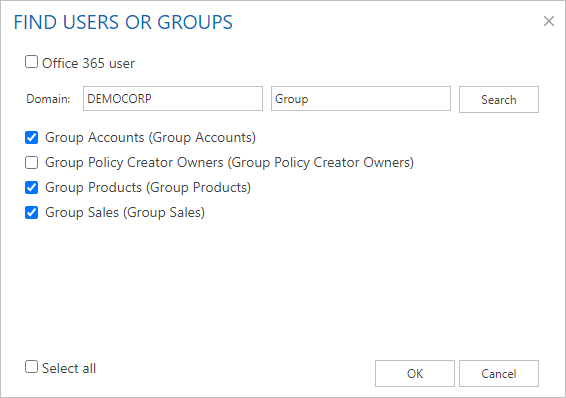
a.Click 
b.In the Find Users or Groups window, enter the Domain name and specify a search expression. User can be searched by user-name, logon-name or display-name. You can use the asterisk (*) as a wildcard in the search criteria. To search for Microsoft 365 users, select Office 365 user and then search for the user.
c.Select the users or groups to add. You can use Select all to add all users and groups in the search result.
d.Click OK to add the selected users and groups to the permission.
4.Set the toggle switch to 

5.To remove a user or group, click 
The Permissions page helps you to revoke or grant one or more permissions to a specific user or group.
Steps to access the Permissions page
1.Log in to ArchiveWeb.
2.From the main menu, click the username dropdown and then select Manage settings.
3.From the local toolbar, click Permissions.
Steps to add users or groups:
1.Click
2.In the Find Users or Groups window, enter the Domain name and specify a search expression. User can be searched by user-name, logon-name or display-name. You can use the asterisk (*) as a wildcard in the search criteria. To search for Microsoft 365 users, select Office 365 user and then search for the user.
|
|
NOTE: Microsoft 365 users must be imported into Archive Manager for Exchange. |
3.Select the users or groups to add. You can use Select all to add all users or groups in the search result.
4.Click OK to add the selected users and groups to the Permissions page.
To remove users or groups:
1.Click 
2.In the Remove users or groups window, select the users or groups to remove. You can remove only users or groups that have been modified. If you want to remove all user or groups that were not modified after being added, you must log out and log in again.
3.Click OK.
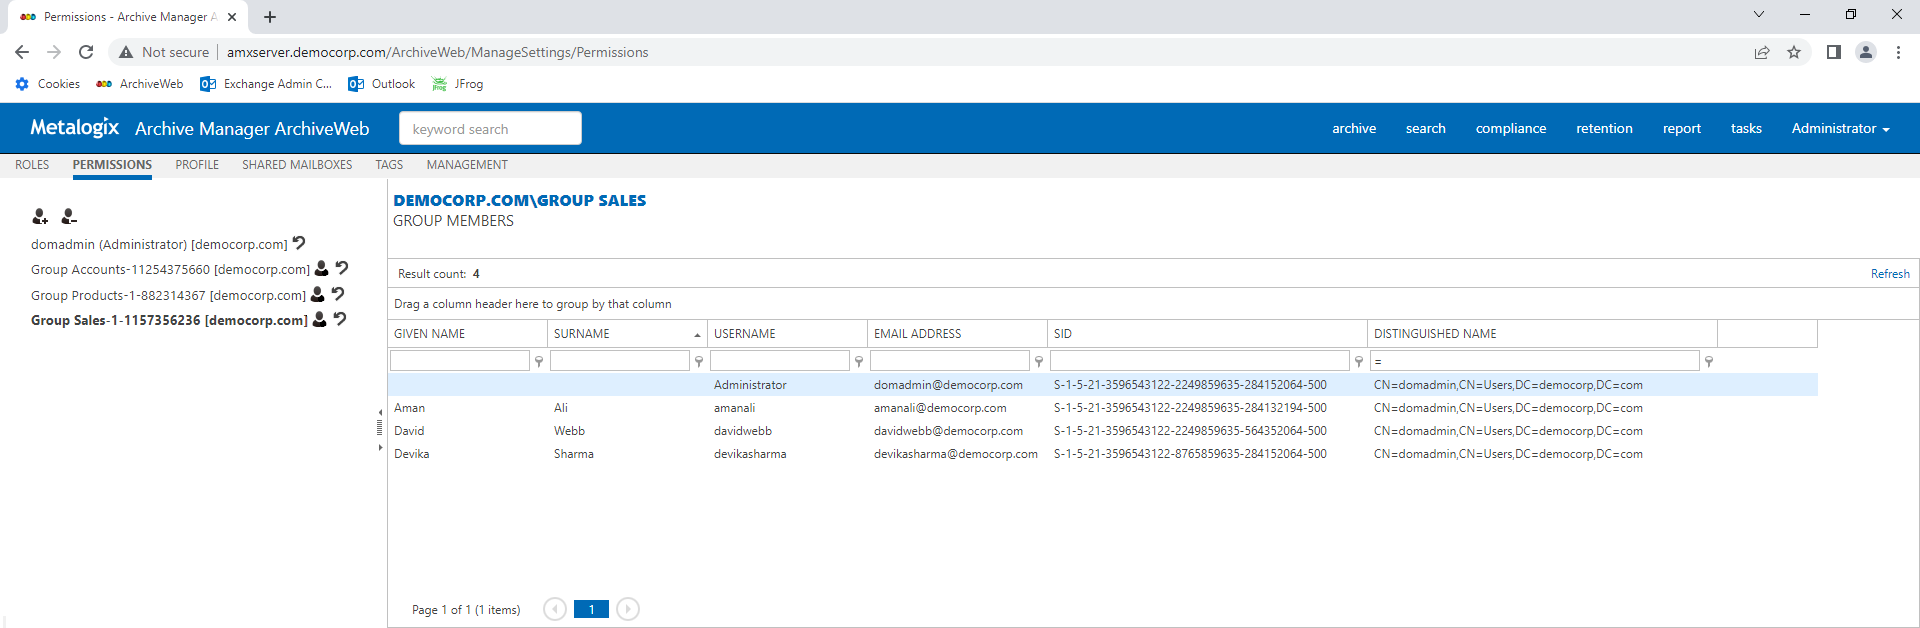
To view group members:
1.Click 
2.Enter a search criteria for any of the columns and click the search filter 
3.Click Refresh to get the latest list of members if users are added or removed from the group in active directory while you are logged in to ArchiveWeb.
4.If groups have more members than can be displayed on the page, they are presented in multiple pages. You can use the scroll buttons at the bottom of the right-hand pane to scroll through multiple pages.
To grant permissions to users and groups:
1.Select the user or group from the left-hand pane. If the user or group is not listed, click
2.The permissions available for the user or group are listed in the right-hand pane. They are categorized for ease of use.
3.Locate the permission that you want to grant or revoke. Set the toggle switch to
4.You can grant or revoke all permissions for a user or group by setting the Allow all permissions toggle switch at the bottom of the right-hand pane.
5.You can reset the permissions to default settings when you click 
The table below lists default ArchiveWeb permissions categorized by roles. Allow all permissions is not granted to users or groups by default.
|
Permission |
Default value |
|
Auditing | |
|
Access all mailboxes |
Denied |
|
Apply tags |
Denied |
|
Auditor access |
Denied |
|
Export auditing logs |
Denied |
|
Export results to ZIP |
Denied |
|
Show auditing logs |
Denied |
|
Compliance | |
|
Allow policy managed download |
Denied |
|
Compliance management |
Denied |
|
Exchange | |
|
Add comments to mails |
Denied |
|
Apply tags |
Allowed |
|
Compare mailbox with archive |
Allowed |
|
Delete item |
Denied |
|
Restore items |
Denied |
|
Set "Legal Hold" flag |
Denied |
|
Show "Legal hold" flag |
Denied |
|
Show comments |
Denied |
|
Show lost data |
Allowed |
|
Show own mailbox |
Allowed |
|
Show public folders |
Allowed |
|
Show shared mailbox |
Allowed |
|
File |
|
|
Add comments to files |
Denied |
|
Apply tags |
Allowed |
|
Compare file system with archive |
Denied |
|
Delete files |
Denied |
|
Find files without shortcut |
Denied |
|
Restore files |
Denied |
|
Set "Legal Hold" flag |
Denied |
|
Show "Legal hold" flag |
Denied |
|
Show comments |
Denied |
|
Show files server |
Allowed |
|
Journaling | |
|
Access journal |
Denied |
|
Management | |
|
Configure Files servers |
Denied |
|
Extend retention time |
Denied |
|
File management |
Denied |
|
Logon in ArchiveWeb |
Allowed |
|
Manage scheduler |
Denied |
|
Search servers management |
Denied |
|
Retention |
|
|
Approve retention change requests |
Denied |
|
Create retention change request |
Denied |
|
Search | |
|
Delete saved result |
Allowed |
|
Export to mailbox |
Denied |
|
Export to PST |
Denied |
|
Export to ZIP |
Denied |
|
Restore items |
Denied |
|
Save search result to database |
Allowed |
|
Search files |
Allowed |
|
Search mails |
Allowed |
|
Statistics | |
|
Export statistics |
Allowed |
|
Files - Show statistics |
Denied |
|
Mails - Show statistics |
Denied |
Journals in Exchange Server are used to enforce legal, regulatory, and organizational compliance in organizations by recording all or targeted email messages. In addition to journals, mailbox audit logs are also used to track who logs on to the mailboxes in your organization and what actions are taken by delegate users.
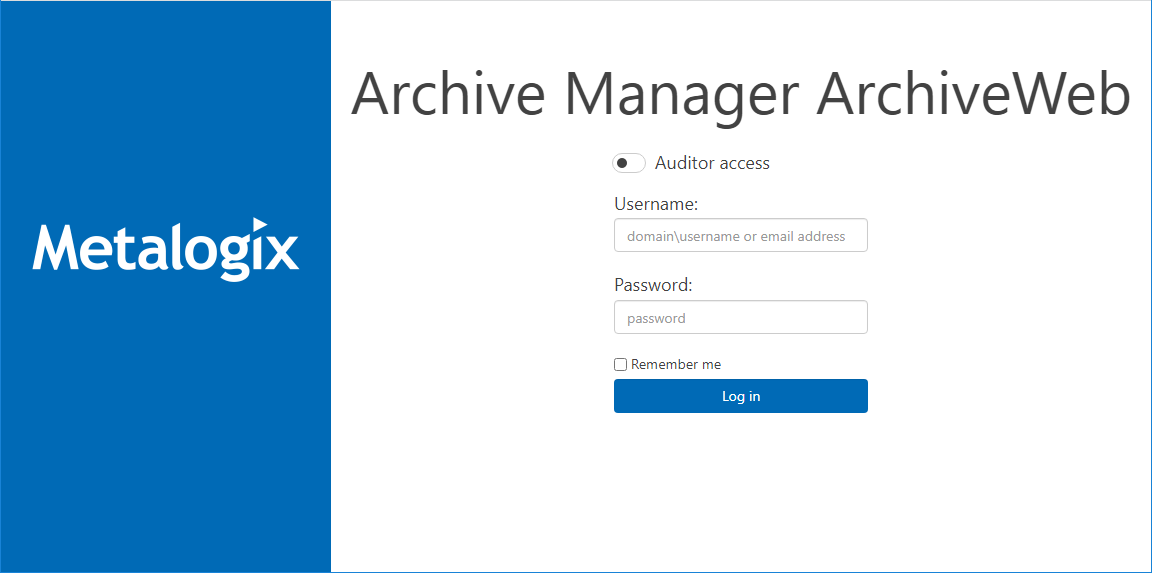
Auditor Access grants users the ability to view all mailbox journals that are imported, audit logs, retentions and search. Use this powerful feature with discretion.
To use this feature you must grant Auditor access permissions to at least two users. The two-user authentication mechanism works as follows: If John wants to log in as an auditor, he must have the Auditor access permission, and he must able to specify the user name of another user who has the Auditor access permission, before he can successfully log in as an auditor.
Steps to grant the Auditor access permission to a user
1.Log in to Metalogix Archive Manager ArchiveWeb with the credentials of a user who has the ability to grant permissions to other users.
2.From your account name dropdown, select Manage Settings.
3.Select the Permissions tab.
4.Click the Add User icon and locate the user from the Find Users or Groups search window.
5.Select the user from the user list on the left to display the permission set in the right-hand pane.
6. Set the toggle switch to
|
|
NOTE: No user is granted this permission by default. As a result auditor access is denied to all users including the super-user or the administrator. |
7.In the confirmation dialog that appears, click Yes to grant the Auditor access permission.
|
|
NOTE: Granting the Auditor access permission automatically grants all permissions of type Auditing. |
8.Repeat the above steps to grant the Auditor access permission to at least one or more users as needed.
Steps to log in as an auditor
1.If you have the Auditor access permission, enter your user name and password in the ArchiveWeb log in page.
2.Toggle the Auditor access button to turn on the feature. Notice that the user name field label changes to Auditor 1 user name. This is the account that will be used to log in as an auditor.
3.Click sign in. The Auditor 2 user name field appears.
4.Enter the user name of another user who has the Auditor access permission.
5.Click sign in again.
6.If the two-user authentication succeeds, the Metalogix Archive Manager workspace appears.
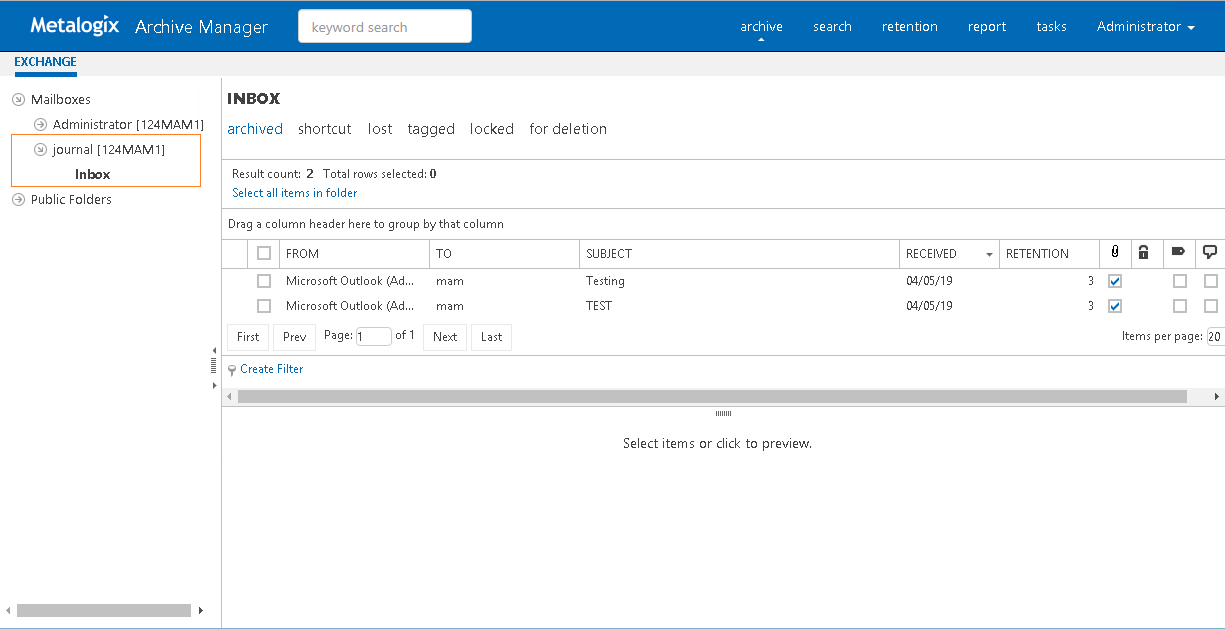
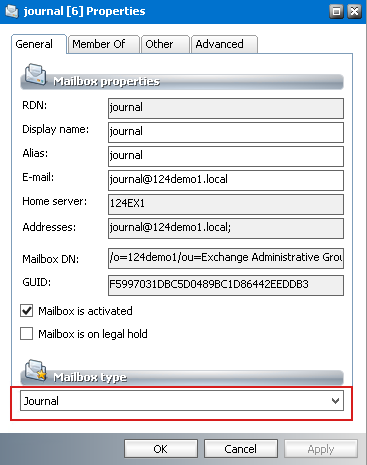
7.From the top bar, click archive to open the archive view.
8.Click the Exchange tab.
9.Expand the Mailboxes node and select a journal to view its contents.
|
|
NOTE: If you have added a journal mailbox but cannot see its contents, check the Mailbox type property of the mailbox. To specify a journal type mailbox follow the steps below: 1.Select the journal mailbox, and right-click to open the context menu 2.From the context menu select Properties to open the Properties window. 3.In the General tab, locate the Mailbox type property. 4.Set this value to Journal by selecting the value from the dropdown. 5.Click OK to confirm the change and return to the mailbox. |