Configuring InTrust Connector for Operations Manager
Before You Begin: Preparing a Custom Alert State
This section describes an optional procedure you can follow if you want the full range of InTrust alert resolution states to be represented in Operations Manager Console.
By default, the alerts displayed in the Operations Manager Console can have one of the following states:
- New
State ID= 0
- Acknowledged
State ID= 249
- Closed
State ID = 255
The InTrust alert status also can be New, Acknowledged, or Closed.
You may want to assign a custom state that will represent the Acknowledged InTrust alerts displayed in the Operations Manager console. Otherwise, both New and Acknowledged states of InTrust alerts will appear in the Operations Manager Console as New.
Running Configuration Wizard
To help you set up InTrust Connector for Operations Manager, the Configuration Wizard is launched automatically if you select the Run configuration wizard now check box during the setup. Alternatively, you can run the Configuration Wizard using the InTrust Connector for Operations Manager shortcut at Start | Programs | Quest | InTrust | InTrust Connector for OpsMgr.
To configure InTrust Connector for Operations Manager
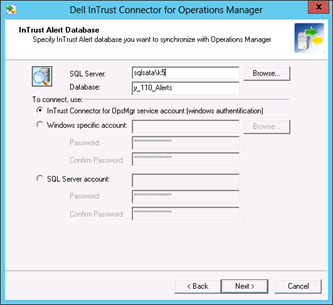
- On the InTrust Alert Database step of the Configuration Wizard, specify the Alert database location and name, and the account that should be used for connection. You can use either the InTrust Connector service account (specified during its setup) or another account with sufficient rights (see the Software Requirements and User Rights topics).
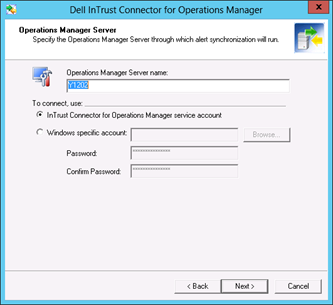
- On the Operations Manager Server step of the wizard, specify the following:
- The Operations Manager Server to connect to.
- The account to be used for connection. You can use either the InTrust Connector service account (specified during its setup) or another account with sufficient rights. If you select the Windows specific account option, then you can click Browse to look for the account you need (otherwise, this button is inactive).
- Next, specify the InTrust Connector operation mode:
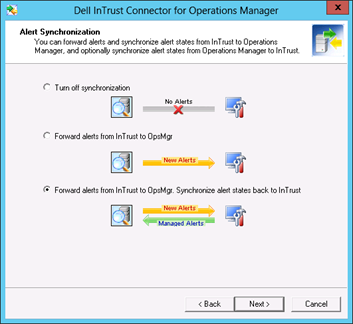
- Select Forward alerts from InTrust to OpsMgr. Synchronize alert states back to InTrust to receive the alert state back into InTrust.
- Select Forward alerts from InTrust to OpsMgr if you want to have InTrust alerts forwarded to Operations Manager (alert states will not be synchronized back to InTrust).
- Select Turn off synchronization if you want to cancel alert forwarding to Operations Manager.
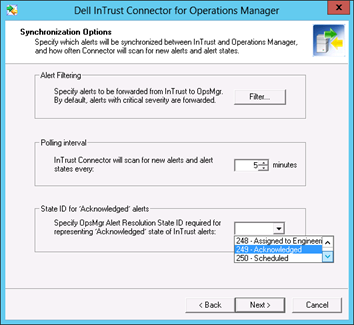
- On the next step, specify the synchronization options.
Click Filter to configure the criteria for selecting alerts to be forwarded to Operations Manager. The Filtering Properties dialog box is displayed:
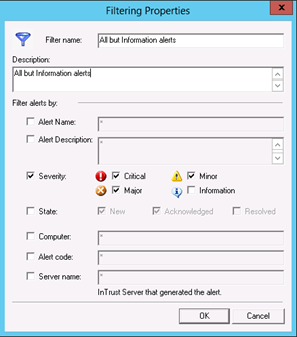
Here you can select which alerts to synchronize. Consider using wildcards (asterisks or question marks) in the filtering criteria, as well as Transact-SQL wildcard characters (described in the LIKE (Transact-SQL) MSDN article).
InTrust Connector will forward any alert containing a custom field with the field name ForwardToMOM, regardless of the filter settings.
After setting the filters, click OK to save them and return to the Synchronization Options.
- Specify how often InTrust Connector will scan the InTrust Alert database for new alerts to be forwarded to Operations Manager.
- Specify which Operations Manager State ID will be used to represent the Acknowledged state of InTrust alerts. By default, this value is set to 0 (i.e., the Acknowledged alert will be represented as New in Operations Manager Console). If you configured a custom value for it before starting the wizard (as described in the Before You Begin: Preparing a Custom Alert State topic), select it from the list.
- On the next step, review your configuration settings:
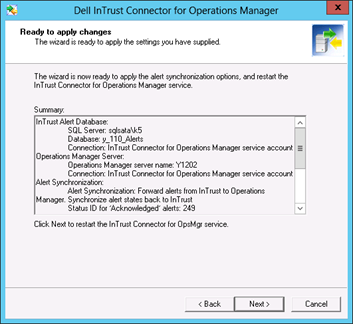
- Click Next to apply the configuration; wait until the service is restarted, and then finish the wizard.
Working with Alerts


