|
• |
For WebSphere 8.x/9.0.0.x — click Servers > Server Types > WebSphere Application servers. |
|
3 |
Under Performance, click Performance Monitoring Infrastructure (PMI). |
|
4 |
Select the Enable Performance Monitoring Infrastructure (PMI) check box. |
|
5 |
Optional — Select or clear the Use sequential counter update check box to enable or disable precise statistic update. |
|
7 |
|
8 |
In the Messages pane, click Save to apply your changes. |
|
9 |
You can use the Java EE Integration Agent to integrate the Java EE agent with WebSphere® Startup Scripts. Specify the WAS Home and WAS Profile type for the application server that you want to integrate with.
|
1 |
On the navigation panel, under Dashboards, click Application Servers > Administration. |
|
2 |
|
3 |
|
4 |
On the Setup Options page, select the type of integration. This example describes how to Setup a new application server integration (the default selection). |
|
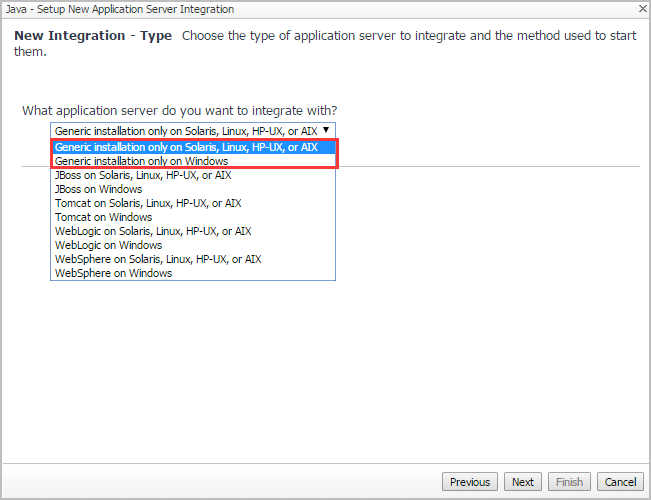
5 |
On the New Integration — Type page, select the type of Java application server you want to integrate with. In this case, select WebSphere on Solaris, Linux, HP-UX, or AIX, or WebSphere on Windows. |
|
Startup Scripts for a non-federated WebSphere Application Server | |
|
IMPORTANT: If your WebSphere Windows Service uses encoded parameters (for example, if you provided the ‑encodeParams option when the service was created, or if you ran the ‑encodeParams <service_name> command sometime after service creation) you cannot use the integration method described here. Instead, use the instructions in Manual integration with IBM WebSphere Application Server . |
|
c |
Click Next. |
|
b |
Optional — If your application server uses startup scripts with customized names, click the arrow beside Other Options to open a list of script paths and names. Type the custom names in the appropriate boxes. |
|
c |
Optional — Click the arrow beside Command Line Options to show the agent and pre-instrumentor option boxes. Use these boxes to provide command-line parameters for the agent or pre-instrumentor. |
|
• |
To add agent options, type them in the Agent Options box. |
|
• |
To add pre-instrumentation options, type them in the pre-instrumentor Options box. |
|
d |
Click Next. |
|
• |
Click New log configuration. The New Log Configuration dialog box opens. |
|
TIP: If you are uncertain about how to adjust these settings, click Help for an overview of log targets and their purposes. For details, see Creating or editing logging properties . |
|
• |
To accept the default directory, leave the Directory name box blank. |
|
a |
By default, the instrumentation script is assigned a name based on the integration type. For example: WebSphere on Windows: StandaloneServerScripts. |
|
b |
Click Finish. |
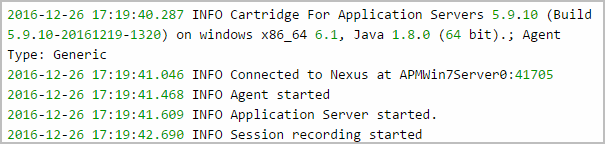
The agent starts collecting data after the application server has restarted and the agent is successfully integrated. Use the Application Servers Monitor dashboard to view the application servers status. For more information about the Application Servers Monitor dashboard, see the Foglight for Application Servers User Guide.
You can use the Java EE Integration Agent to integrate the Java EE agent with an IBM® WebSphere® Liberty on Windows and Linux.
|
1 |
Create a Generic installation only integration on Linux or Windows. For more information, see Creating a Generic Installation for Manual Java EE Agent Integration. |
|
• |
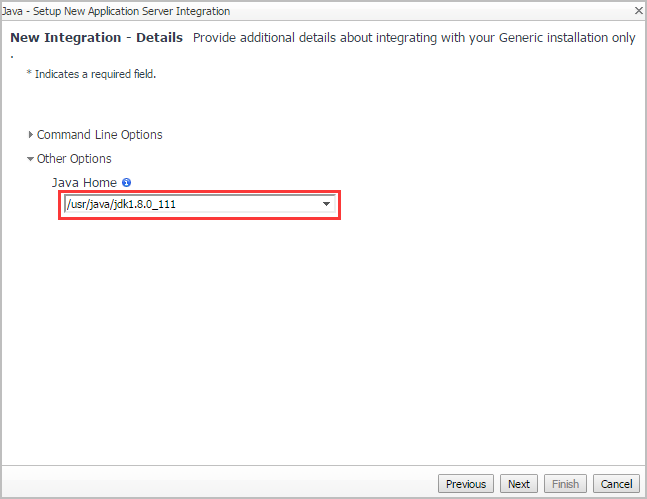
New Integration - Type: Select Generic installation only on Solaris, Linux, HP-UX, or AIX for Linux, or select Generic installation only on Windows for Windows. |
|
• |
New Integration - Details: Type your Java Installation directory in the Java Home field. |
|
2 |
After the generic installation is complete, create a new file named jvm.options under the <Liberty Home>/usr/servers/<Server Name> directory. |
|
3 |
|
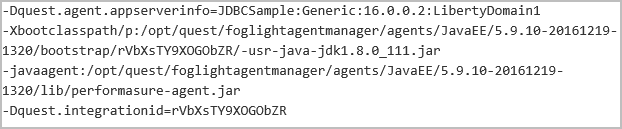
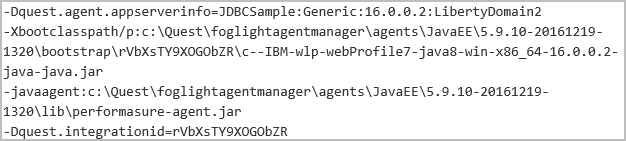
IMPORTANT: During the integration, change the variables inside “<>” to the actual values used in your environment.
|
|
NOTE: The value of quest.integrationid is generated during the agent setup, and this value is a part of bootclasspath. For example, if the bootclasspath is "/opt/quest/foglightagentmanager/agents/JavaEE/5.9.10-20161219-1320/bootstrap/rVbXsTY9XOGObZR/-usr-java-jdk1.8.0_111.jar", then the value of quest.integrationid will be "rVbXsTY9XOGObZR". |
|
• |
Linux: Assume Liberty is installed under “/opt/IBM/wlp-webProfile7”, Java EE agent directory is “/opt/quest/foglightagentmanager/agents/JavaEE/5.9.10-20161219-1320”, and the Liberty server to be monitored is “JDBCSample”. Then add the following contents into jvm.options under “/opt/IBM/wlp-webProfile7/usr/servers/JDBCSample/”. |
|
• |
Windows: Assume Liberty is installed under “C:\IBM\wlp-webProfile7-java8-win-x86_64-16.0.0.2”, Java EE agent directory is “C:\Quest\foglightagentmanager\agents\JavaEE\5.9.10-20161219-1320”, and the Liberty server to be monitored is “JDBCSample”. Then add the following contents into jvm.options under “C:\IBM\wlp-webProfile7-java8-win-x86_64-16.0.0.2\usr\servers\JDBCSample\”. |
|
4 |
Save jvm.options. |
In OracleAS 10g R3, the cluster name is implicitly set to default whether a server is running in a cluster or in a standalone environment. However, the Java EE agent can only detect a cluster if the cluster name is explicitly set to something other than default.
In Oracle 10g R3, you can set the cluster name in the file <oracle_home>/opmn/conf/opmn.xml by adding the cluster-name attribute to the ias-instance tag for each server in the cluster and setting this attribute to the desired value. For example: <ias-instance id="ID" name="name" cluster-name="mycluster1">. You must add the cluster-name attribute and set it to the same value for each application server in your cluster.
|
1 |
Create a Generic installation only integration on the host, with the JAVA_HOME specified for pre-instrumentation. For more information, see Creating a Generic Installation for Manual Java EE Agent Integration. |
|
TIP: Make a backup copy of your original <oracle_home>/opmn/conf/opmn.xml file before completing the next step. |
|
3 |
Open <oracle_home>/opmn/conf/opmn.xml in a text editor. |
|
4 |
Add the following environment variable definitions at the <ias-instance> level. |
|
• |
|
• |
Replace <oracle_jdk14_bootstrap_jar> with the file name of the bootstrap JAR file created in the <VERSIONED_SUBDIRECTORY>/bootstrap/<INTEGRATIONID> directory by the pre-instrumentation task in step 1, for your JDK 1.4 installation (for example, C--AppServers-oracle-10gR2_10.1.2-jdk.jar). |
|
• |
|
• |
Replace <JDK15_INTEGRATIONID> with the name of the directory created in step 1 by the pre-instrumentation task for your 1.5 JDK. |
|
• |
Replace <oracle_jdk15_bootstrap_jar> with the file name of the bootstrap JAR file created in the <VERSIONED_SUBDIRECTORY>/bootstrap/<INTEGRATIONID> directory by the pre-instrumentation task in step 1, for your JDK 1.5 or 1.6 installation (for example, C--AppServers-oracle-10gR3_10.1.3-jdk.jar). |
|
e |
Replace <VERSIONED_SUBDIRECTORY> with the path to the Java EE agent installation directory created in step 1. |
|
NOTE: The " characters surrounding <VERSIONED_SUBDIRECTORY> are required to enable the use of spaces in the value. Do not remove them. |
|
f |
Append the $PERFORMASURE_JDK14_OPTIONS or $PERFORMASURE_JDK15_OPTIONS, according to the version of the JDK you are using, to the value attribute of the java-options tag that is enclosed in the start-parameters tag for each OC4J component that you want instrumented. Employ the JDK version that was used for that OC4J instance. |
|
5 |
Save opmn.xml. |
|
6 |
If opmn is running, you must reload the modified opmn.xml file by launching opmnctl reload. If opmn is not running, start it now. |
