Chat now with support
Chat mit Support

Foglight for Infrastructure 6.0.0 - User Guide

Using Foglight for Infrastructure Monitoring log files with Foglight Log Monitor Monitoring IBM PowerVM environments
Before you begin Managing PowerVM HMC agents Monitoring your PowerVM environment
Advanced system configuration and troubleshooting Reference
Foglight for Infrastructure views Foglight Log Monitor views Rules Metrics
Appendix: Building regular expressions in Foglight

Advanced system configuration for WinRM

Even though the local user will now have access to Windows Remote Management (WinRM), not all performance monitoring classes allow non-administrative users to access their instances. Some performance classes will still need advanced configuration for the non-administrative user to be able to perform queries/execute methods on their object instances. To perform the advanced configuration for non-administrative users, make sure to log into the remote machine using the Administrator account.

The advanced configuration for non-administrative users includes the following steps:

The non-administrative users must be added into the Performance Monitor Users group that enables the access to the object instances and the Event Log Readers group that grants the permission for reading event logs.

To add a non-administrative user to the above user groups:

1
Run lusrmgr.msc.
2
From the Local Users and Groups (Local) > Users list, right click the non-administrative user who you want to add, and then click Properties from the context menu.
3
In the <non-administrative user> Properties dialog box, click Member of.
4
Click Add.
The Select Groups dialog box appears.
5
In the Select Groups dialog box, type Performance Monitor Users;Event Log Readers in the Enter the object names to select field, and then click Check Names.
6
Click OK to return to the <non-administrative user> Properties dialog box.

After adding a non-administrative user to the needed user groups, you will see the following result if the user permission is not allowed through SDDL.

To grant the WinRM RootSDDL permission to a non-administrative user:

After setting WinRM RootSDDL for a non-administrative user, log into the remote machine using the administrative user credentials and execute the following command:

You will see the following result, if the non-administrative user does not have the permission to the namespace.

To grant the permission to the namespace for the current non-administrative user:

9
Repeat Step 3 to Step 8 to grant all permissions for Security > Root and Security > Root > mscluster.

Most services data can be collected if the Performance Monitor Users group has been granted the permission to services. If you still fail to collect some service data because of permission issues, on the remote machine, execute the following command where <service_name> is the Service name in the Service Property dialog box:

The permissions of the Built-in Administrator (BA) will appear after executing the above command. Execute the following command to grant the additional permissions, as needed.

The following sample demonstrates how to grant permission to the SCMANAGER service:

3
Add “(A;;CCLCRPRC;;;S-1-5-32-558)” between “D:” and “(A;;CC;;;AU)”, and execute the sc sdset command to grant the permission to the SCMANAGER service. For example, execute the following command:

Foglight for Infrastructure WindowsAgent supports to establish Windows Remote Management (WinRM) connections in FIPS-compliant mode. However, when establishing the WinRM connection using Negotiate authentication scheme in FIPS-compliant mode, the password of the credential is required to be no less than 14 characters, otherwise, the connection will be rejected.

If you figured out that your agent’s WinRM connection is not working, check below list to see if it is caused by the password length restriction issue:

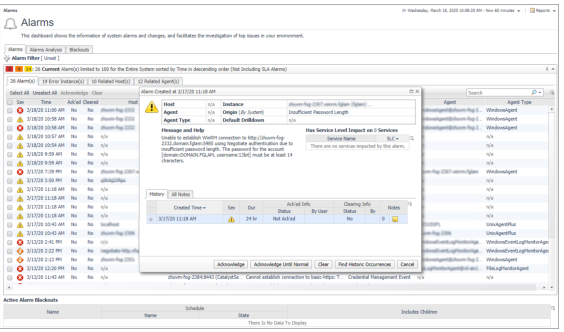
Access the Foglight Management Server’s Homes > Alarms dashboard and check if there is an “Insufficient Password Length” alarm related to your monitored host. See the example as below:

If either of above cases exists, you need to change your monitored host password to no less than 14 characters in order to successfully monitor your host with WinRM connection using Negotiate authentication scheme in FIPS-compliant mode.

Configuring default local user credentials for Infrastructure Agents

To monitor target hosts, Infrastructure Agent instances require user credentials to get access to the system resources. If the Foglight Agent Manager is physically located on the host being monitored, default local user credentials are automatically created while deploying the Infrastructure cartridge.

However, under certain circumstances, such as the default lockbox cannot be found in the server, the cartridge deploying process will not create local user credentials. Then, if you want to do local monitoring with Infrastructure Agents, you will have to manually add the credentials to the server.

2
On the navigation panel, under Dashboards, click Administration > Credentials.
3
On the Credentials page that appears in the display area, click Manage Credentials.
4
On the Manage Credentials dashboard that appears in the display area, click Add.
The Select the Type of Credential to Add list appears.
5
In the Select the Type of Credential to Add list, click User Client’s Login At Connection Time.
The Add A New “User Client’s Login At Connection Time” Credential wizard appears.
6
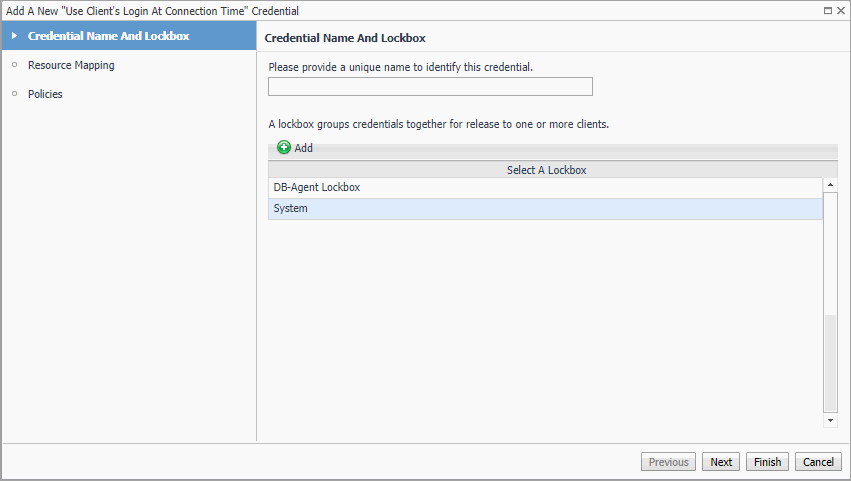
On the Credential Name and Lockbox page, select the lockbox in which you want to store the local user credential, and specify a unique credential name. Click Next.
The Resource Mapping page appears.
a
On the Resource Mapping page, click Add.
The New Resource Mapping Condition dialog box appears.
b
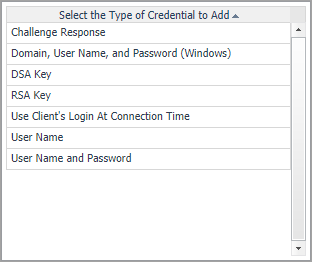
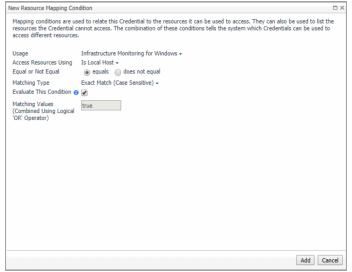
Select the appropriate Usage according to your operating system. To open the Usage drop-down list, click the down-facing arrow on the right. Select either of the following:
Local Unix machine - Infrastructure Monitoring for Unix
Local Windows machine - Infrastructure Monitoring for Windows
c
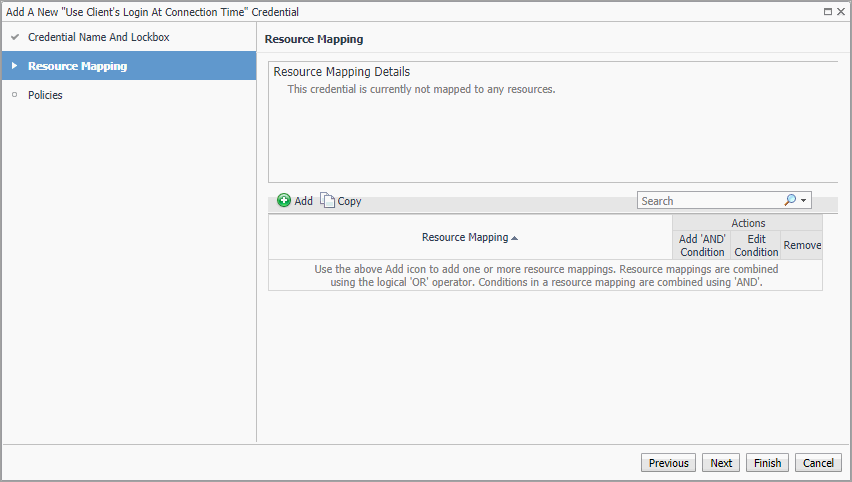
Click the down-facing arrow on the right to open the Access Resources Using drop-down list. Select the Is Local Host.
d
Ensure that equals and Evaluate This Condition are selected. Click Add.
e
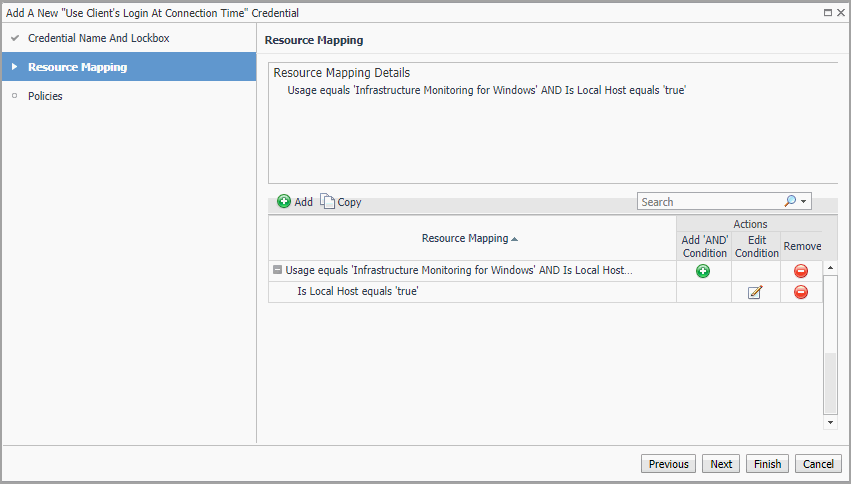
The New Resource Mapping Condition dialog box closes and the Resource Mapping page refreshes. The newly specified resource mapping is displayed.
f
Optional—you can refine your credential settings. For example, to specify the time during which the credential is valid, the number of failed attempts after which the credential will be locked, the number of times the credential can be used, or the period of time during which the credential data is cached on the server. For complete information, see the Administration and Configuration Help.
8
Click Finish.
The Add A New “User Name and Password” Credential wizard closes and the Manage Credentials dashboard refreshes. The newly added local user credential is displayed in the list.


Reference

Foglight displays monitoring data in views that group, format, and display data. The main types are described below.

Dashboards are top-level views that contain lower-level views. The dashboards supplied with Foglight, as well as those created by users, are accessible from the navigation panel.

Lower-level views in Foglight can be added to dashboards or can be accessed by drilling down from a dashboard. They receive and display data directly from the Management Server or from other views. Some views filter or select data that appears in other views in the same dashboard. Some are tree views with expandable nodes for selecting servers, applications, or data.

For more details, see these topics:

Foglight for Infrastructure views

Foglight for Infrastructure ships with several predefined views, to help you monitor your infrastructure environment:

Verwandte Dokumente

The document was helpful.

Bewertung auswählen

I easily found the information I needed.

Bewertung auswählen