To monitor a desired SOFS server, ensure the SOFS Agent’s Configuration properties are set up as required.
|
1 |
Locate the SOFS Agent’s Configuration properties. |
|
2 |
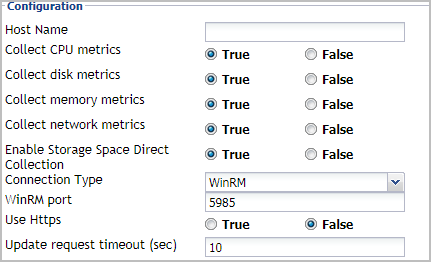
Set the Configuration properties as follows: |
|
• |
Host Name: Type the fully qualified host name of the machine on which the monitored Hyper-V Server is running. |
|
• |
Collect CPU metrics: Select this option if you want to collect CPU metrics from the monitored SOFS environment. |
|
• |
Collect disk metrics: Select this option if you want to collect disk metrics from the monitored SOFS environment. |
|
• |
Collect memory metrics: Select this option if you want to collect memory metrics from the monitored SOFS environment. |
|
• |
Collect network metrics: Select this option if you want to collect network metrics from the monitored SOFS environment. |
|
• |
Enable Storage Space Direct Collection. Select this option if you want to collect Storage Space Direct (S2D) metrics from the monitored Hyper-V environment. |
|
• |
Connection Type. Specify the connection type. Quest recommends using WinRM as the connection type, as DCOM will be removed in future release. |
|
• |
WinRM port. Type the port number of WinRM. |
|
• |
Use HTTPs. Select this option if you want to use the HTTPS protocol. |
|
• |
Update request timeout (sec): Type the number of seconds after a collection times out. |
Use the Data Collection Scheduler properties to adjust how frequently the Hyper-V, SCVMM, or SOFS Agent collects data from the monitored server.
|
1 |
Locate the Hyper-V, SCVMM, or SoFS Agent Data Collection Scheduler properties. |
|
If you want to clone a list and associate it with the agent instance whose properties you are editing, select it and click Clone. When prompted, enter a name for the cloned list. For more information on cloning, see the Administration and Configuration Help. |
|
a |
|
• |
Collector Name: Contains the name of the default collector, Data Collection. |
|
• |
Default Collection Interval: Contains the length of the default collection interval. |
|
• |
Time Unit: Contains the time unit for measuring the default collection interval: milliseconds, seconds, minutes, hours, or days. |
|
• |
Fast-Mode Collection Interval: Contains the length of the collection interval when the agent is running in fast mode. |
|
• |
Fast-Mode Time Unit: Contains the length of the collection interval when the agent is running in fast mode. |
|
• |
Fast-Mode Max Count: Contains the maximum count of entries when the agent is running in fast mode. |
|
d |
Save your changes to the list by clicking Save Changes in the dialog box. |
|
4 |
|
• |
<foglight_home> is a placeholder that represents the path to the Foglight Management Server installation. |
|
• |
<foglight_agent_mgr_home> is a placeholder that represents the path to the Foglight Agent Manager installation. This can be the location of the Foglight Agent Manager installation on a monitored host, or the home directory of the Foglight Agent Manager that comes embedded with the Foglight Management Server. For example: |
All the certificate-related command line options require that FglAM be up and running.
bin/fglam --add-certificate "user alias 1"=/path/to/certificate/file
|
• |
FglAM requires the Base64 format. To verify if the certificate file is encoded with Base64, open the certificate with a notepad and the certificate should be similar to the following example: -----BEGIN CERTIFICATE----- XXXXXXXX= -----END CERTIFICATE----- |
|
NOTE: If the certificate is not Base64 format, use openssl command to convert the certificate file into a Base64 file. Use either of the following commands depending on the source form: openssl x509 -inform DER -in xxx.cer -out xxx.crt or openssl x509 -inform PEM -in xxx.cer -out xxx.crt |
|
• |
The alias is required and is used in the list and delete operations to refer to the certificate. It can be anything. |
Print out a list of certificates and the aliases that refer to them.
Refer to the example output below:
Remove a certificate referred to by an alias.
bin/fglam --delete-certificate "user alias 1"
Use the keytool utility shipped with Foglight to create, import, or export certificates. This utility can be found at: <foglight_home>\jre\bin\keytool.
There are two FMS running modes:
The KeyStore Foglight used under non-FIPS mode is located at: <foglight_home>/jre/lib/security/cacerts (default password: changeit)
Use the keytool command in FMS JRE located in <foglight>/jre/bin
|
• |
<alias>: The alias is required and is used in the list and delete operations to refer to the certificate. It can be anything. |
|
• |
<foglight_home>: The folder path where the Foglight is installed. |
|
• |
<certificate path>: Your custom certificate path. |
keytool -list -keystore <foglight_home>/jre/lib/security/cacerts -storepass changeit
Remove a certificate referred to by an alias.
The KeyStore Foglight used in FIPS-compliant mode is located at: <foglight_home>/config/security/trust.fips.keystore (default password: nitrogen)
Use the keytool command in FMS JRE located in <foglight>/jre/bin.
|
• |
<alias>: The alias is required and is used in the list and delete operations to refer to the certificate. It can be anything. |
|
• |
<Foglight_home>: The folder path where Foglight is installed. |
|
• |
<certificate path>: Your custom certificate path. |
Prints out a list of certificates and the aliases that refer to them.
Refer to the example output below:
Remove a certificate referred to by an alias.
Issuer: CN=CA, DC=ca, DC=local
Valid from: Sun Jan 06 23:07:06 CST 2019 until: Wed Apr 06 23:07:06 CST 2022
Trust this certificate? [no]: yes
Certificate was added to keystore
Explore the Instances and Limits view to see the existing Hyper-V object types. To access this view, on the Hyper-V Environment dashboard, open the Administration tab, and click Review Instances and Limits.
The Instances and Limits view displays the list of the existing Hyper-V object types, and for each type it shows the type name, instance limit, instance count, instance limit utilization, and the type status given as the highest severity level associated with an instance of that type. This information can give you insight into the size of your database and whether additional adjustments are required to improve your system performance. For example, if an object type results in a high number of object instances, this may result in performance bottlenecks. To prevent them, check if any of these are updated recently and, if not, delete them from the database, as described below.
To view the list of existing registry variables or to edit them, click Edit Registry Variable in the top-left corner. For complete information about registry variables in Foglight, see the Administration and Configuration Help.
For reference information about this view, see Instances and Limits view .
|
1 |
On the Hyper-V Environment dashboard, open the Administration tab. |
|
2 |
|
3 |
In the Expired Data View and Removal dialog box, select a category of object type that you want to review, and type the number of days during which the object instances were not updated. |
|
4 |
Click Next. |
|
• |
If you want to modify your search, click Previous, make your changes, and observe your results again. For example, to show fewer instances, click Previous, and increase the time period. When satisfied, click Next. |
|
7 |
Click Finish. |