
Getting Started
This section provides instructions for logging in to Foglight and describes the Welcome page you see when you log in with the Operator or Advanced Operator role. It also introduces you to navigating the Foglight browser interface and discusses best practices for navigation.
Perform these steps before following the instructions in this section:
Logging in to Foglight
This topic describes how to log in to the Quest Foglight browser interface.
|
NOTE: The appearance of the Welcome page and the range of dashboards you can access from this page vary depending on your user role. If you have Administrator-level permissions, you can access advanced dashboards and configuration workflows. See the Administration and Configuration Guide. Users with the Operator role (but not the Administrator role) have permission to access a smaller set of dashboards.
|
Starting from the Welcome Page
An Operator’s welcome page lists the following commonly-performed tasks:
|
• |
View, Acknowledge, and Clear Recent Alarms: View the state of all alarms across the entire Quest Foglight installation in the Alarms dashboard so you can take immediate action on them. The Alarms dashboard shows alarm counts by time, allowing you to identify excessive alarm counts or outage events. This link takes you to the Alarms dashboard. Another way to access this dashboard is by choosing Alarms under Homes on the navigation panel. See Viewing, Acknowledging, and Clearing Alarms on page 46. |
|
• |
View Enterprise Health Organized by Monitoring Domain: View an end-to-end, top-level summary of all domains in the Domains dashboard and drill down to view their managed instances. This link takes you to the Domains dashboard. Another way to access this dashboard is by choosing Domains under Homes on the navigation panel. See Monitoring Your Domains on page 52. |
|
• |
View the Health of Critical Services: Choose a level of service as a focal point by subscribing to services of interest and viewing their dependencies. This link takes you to the Service Operations console. Another way to access this dashboard is by choosing Services Operations Console under Homes on the navigation panel. For more information, see Monitoring Your Services on page 55. |
|
• |
View the Health of the Monitored Hosts in Your Enterprise: View alarms and a high-level summary of performance on your monitored hosts. This link takes you to the Hosts dashboard. Another way to access the Hosts dashboard is by choosing Hosts under Homes on the Navigation panel. For more information, see Monitoring Your Hosts on page 62. |
|
• |
Report on Your Enterprise: View reports that are scheduled, run a report using a report template, create a custom report, schedule a report to run at a specific time, and manage reports. This link takes you to the Reports dashboard. Another way to access this dashboard is by choosing Reports under Homes on the navigation panel. For more information on reports, see Reporting on Your Enterprise on page 66. |
|
• |
Tap into the Foglight Community: Takes you to the foglight.org Web site, which discusses topics related to Application Management and Foglight. |
The Welcome to Foglight page is your default home page. For instructions on changing your home page to a dashboard of your choice, see Choosing a Home Page.
When you log in to Foglight Evolve for the first time, the Getting Started tab of the Environment Overview page appears in the display area.
This tab displays tiles based on the products that are installed.
From this tab, you can quickly perform a number of activities:
|
• |
Explore Hyper-V—access the Hyper-V Environment Overview page. |
|
• |
Explore VMware—access the VMware Environment Overview page. |
|
• |
Add Monitoring—add Hyper-V or VMware agents to your environment. |
You can also obtain information about the status of your license for Quest Foglight. This status is indicated by messages displayed on the tile of the installed products. For more information on licenses, see the Administration and Configuration Guide.
In addition, the Getting Started provides several video tutorials and the Evaluation Guide which is intended for anyone who wants to perform a quick evaluation of the power and ease-of-use of Quest Foglight.
To access the Perspective views for any of the installed vFoglight cartridges, open the navigation panel, expand the Dashboard module, and click Perspective Selector > Perspective.
Each perspective contains an Explore button. Click Explore to investigate the full details displayed in the VMware Environment dashboard.
Navigating Foglight
|
TIP: Visit http://eDocs.quest.com to watch our learning videos. See Introduction to the Foglight User Interface. |
Use the left-hand navigation panel to move between dashboards. This panel lists all dashboards that are available to you based on your roles. Expand a module and select a dashboard to view it in the display area (for example, Dashboards > Services > Service Levels).
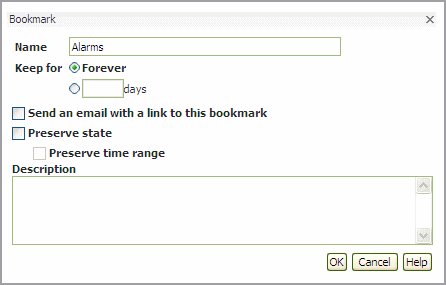
You create a bookmark by navigating to the dashboard you want to bookmark, selecting Bookmark from the action panel, and then selecting options from the Bookmark dialog box. See the online help for the Bookmark dialog box for details.
|
2 |
Select Email from the action panel. An email window opens, containing a link to the bookmark. |
|
1 |
|
3 |
On the confirmation dialog, click Delete to delete the bookmark. |
|
1 |
Click the New Window link in the action panel to open a new browser window and change the URL to create a sub-session. |