Chat now with support
Chat mit Support

Enterprise Reporter 3.5.1 - Quick Start Guide

Introducing Quest® Enterprise Reporter Key Features of Enterprise Reporter Enterprise Reporter Components System Requirements Overview of Enterprise Reporter communications and required credentials Installing Enterprise Reporter Step-By-Step Walkthroughs

Port Requirements

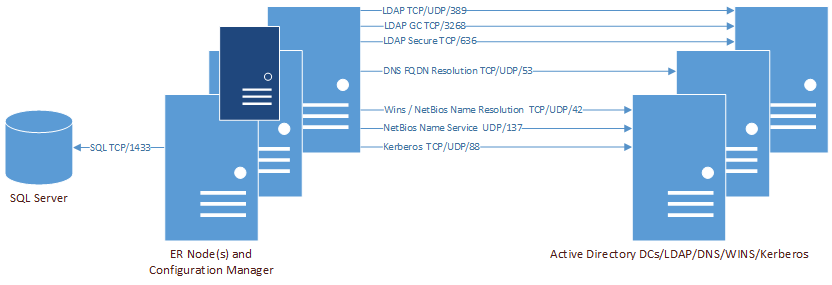
For the Enterprise Reporter components to communicate, some ports must be open.

The following figure shows the ports that are used by the various Enterprise Reporter components.

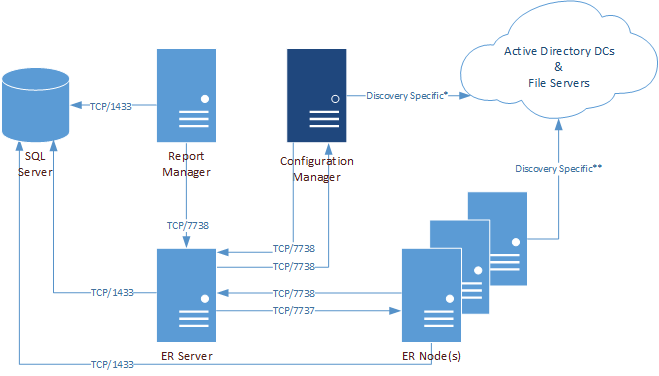
*For more information on ports used when creating a discovery, see Table 17.

**For more information on ports used during data collections, see Table 18.

The following table shows the ports used by all of the Enterprise Reporter components.


FTP

20, 21

TCP


X


SMTP

25

TCP

X

X


X


WINS / NetBiOS Name Resolution

42

TCP
UDP


X


DNS FQDN Resolution

53

TCP
UDP

X

X


X


Kerberos

88

TCP
UDP

X


X


RPC Service & Endpoint Mapper / WMI

135

TCP
UDP

X


NetBIOS Name Service

137

UDP


X


NetBIOS Datagram (browsing)

138

UDP

X


LDAP

389

TCP
UDP

X


SQL

1433

TCP


X

X

X

X

SQL Server Browser Service

1434

TCP
UDP

X

X


Enterprise Reporter Node

7737

TCP


X

X

Enterprise Reporter Server

7738

TCP

X

X


X

X

The following table outlines the ports used by all of the Enterprise Reporter discoveries.

WINS / NetBiOS Name Resolution

42

TCP
UDP

X


X

X


X


X


X


X

DNS FQDN Resolution

53

TCP
UDP

X


X

X


X


X


X


X

HTTP

80

TCP


X

X


X*

X


X


X


X

X

Kerberos

88

TCP
UDP

X


X

X*


X


X


X


X

RPC Service & Endpoint Mapper / WMI

135

TCP
UDP


X


X


X


X


X

NetBIOS Name Service

137

UDP

X


X

X


X


X


X


X

Remote Registry

139

TCP


X

X


X


X


X


ICMP


X


X


X


X


X

LDAP

389

TCP
UDP

X


X

X


X


X


X


X

HTTPS

443

TCP
UDP


X

X


X


X


X

X

SMB / Remote Registry

445

TCP

X


X


X


X


X


X

LDAP Secure

636

TCP

X


DCOM on XP/2003 and below
(uses an open port in this range)

1024
- 5000

TCP
UDP


X

X


X


X


X

SQL

1433

TCP

X

X

X

X

X

X

X

X

X

X

X

X

X

SQL Server Browser Service

1434

UDP


X

LDAP GC

3268

TCP

X


X


WinRM

5985
5986

TCP
UDP


X

X


X

DCOM on Vista/2008 and above
(uses an open port in this range)

49152
- 65535

TCP
UDP


X

X

X

X


X


X


X

*Exchange 2013 and higher

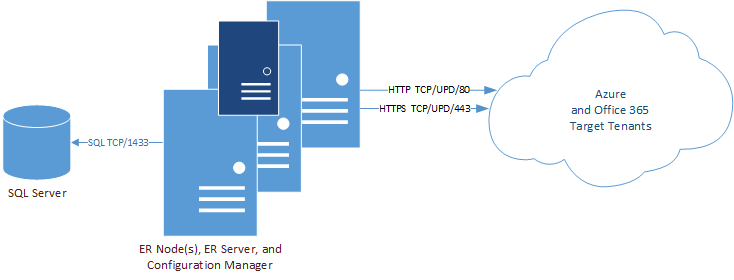
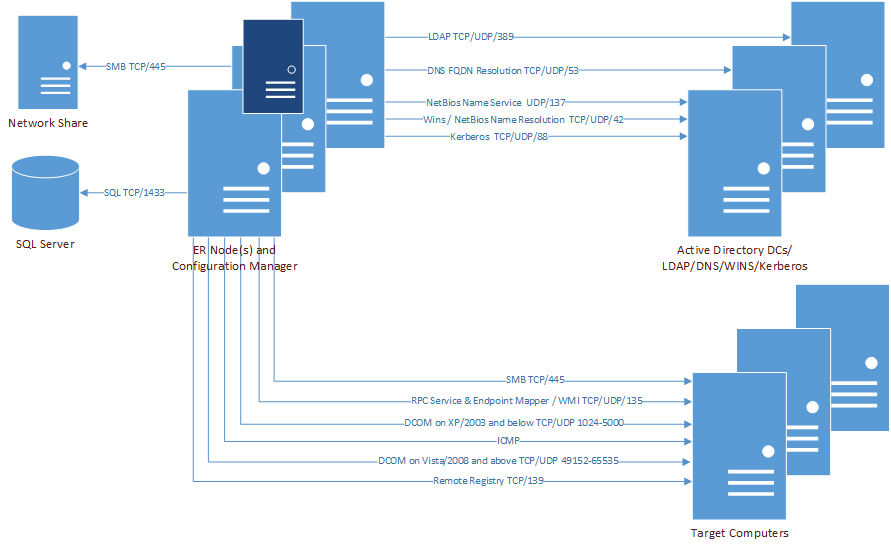
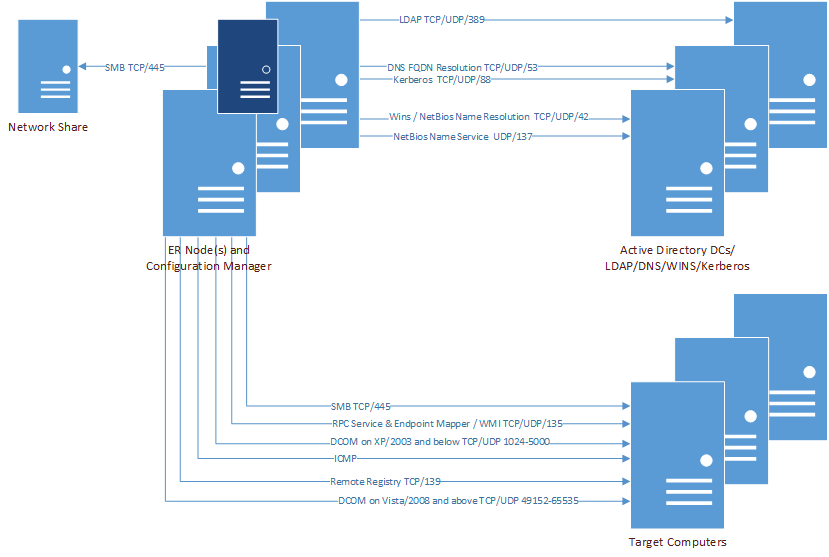
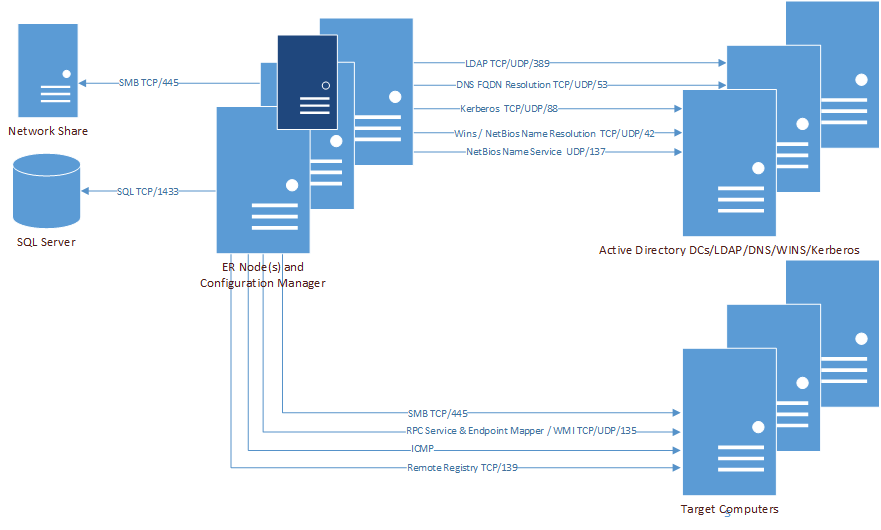
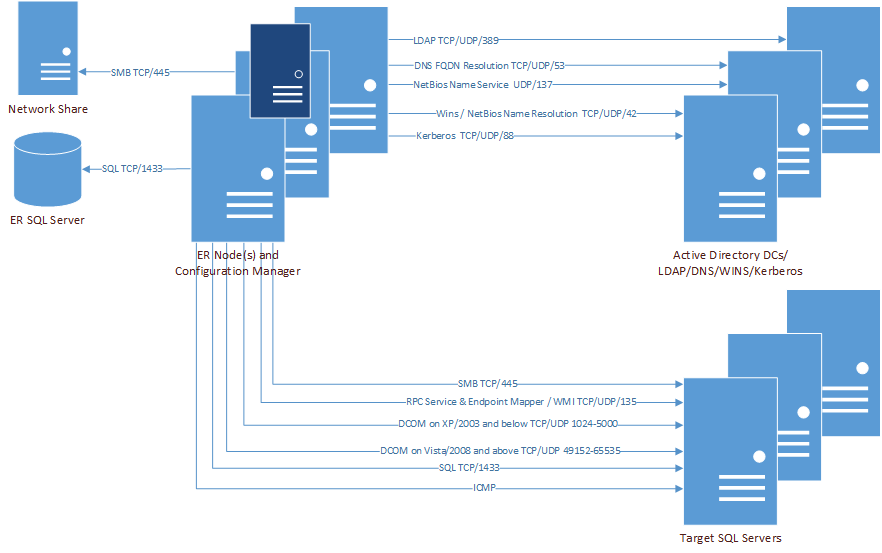
The following figures outline the ports used by the Enterprise Reporter discoveries.

Additional ports for Azure and Microsoft 365 discoveries to be set on the Node:


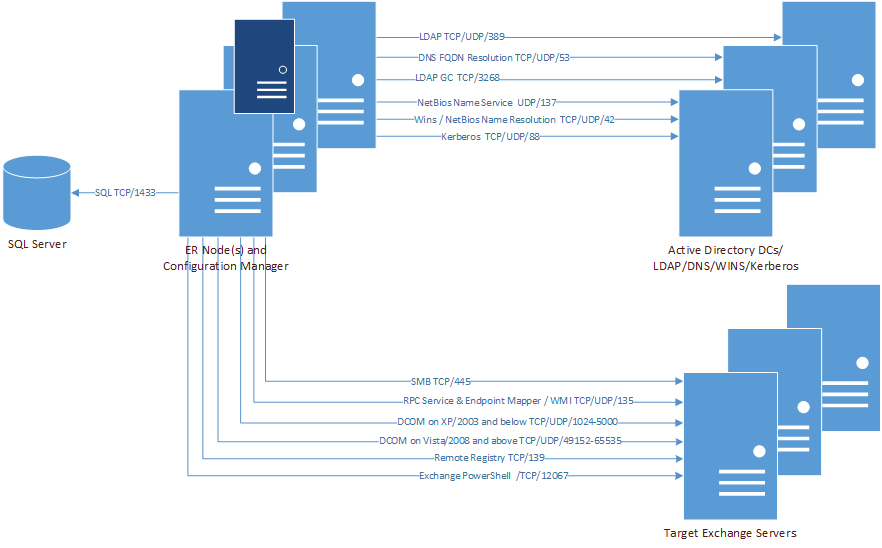
Additional port for Exchange discovery to be set on the Node:


Installing Enterprise Reporter

Once you have ensured that your computers meet the system requirements, you can install the Enterprise Reporter server and consoles, and set up the Enterprise Reporter database. For full information on installing Enterprise Reporter, see “Installing and Configuring Enterprise Reporter” in the Quest Enterprise Reporter Configuration Manager User Guide.

1
Open the self-extracting file named Enterprise_Reporter_<version number>_x64.exe.
3
In the folder Quest Enterprise Reporter\en-US double-click the Enterprise_Reporter_<version number>_x64.msi file.
5
Click View License Agreement and scroll to review the entire license agreement.
Optionally, click Print to send a copy of the agreement to the printer.
6
Select I accept these terms, click OK to close the agreement, and click Next to continue the installation.
Select I do not accept these terms, click OK to close the agreement, and click Cancel to exit the installation.
Clicking Reset restores the default setting of installing all components.
11
Click Install.
12
Click Close.

Create/Connect Your Enterprise Reporter Database

Next, you must create the Enterprise Reporter database. The Database Wizard appears automatically when you install the Enterprise Reporter server.

1
Choose Create New Database, and click Next.
Click Cancel to further modify the Security Group Names.
10
Click Finish to create the database.
IMPORTANT: It is important to backup the encryption key. The Encryption Key Manager will automatically start on the Enterprise Reporter Server. Use the Export Key option to create a back up file of the encryption key. For more information, see Appendix: Encryption Key Manager .


Configure Enterprise Reporter Licenses

You need either a trial or full license to use Enterprise Reporter. You must have a valid license to use the Configuration Manager; no license is required for the Report Manager. If you have questions about your license, contact your sales representative.

Topics:  


Enterprise Reporter for Windows Servers

Enterprise Reporter for Active Directory

Enterprise Reporter for SQL Server

Enterprise Reporter for File Storage Analysis

Enterprise Reporter for Exchange

Enterprise Reporter for Microsoft 365

Enterprise Reporter Suite

Verwandte Dokumente

The document was helpful.

Bewertung auswählen

I easily found the information I needed.

Bewertung auswählen