Chat now with support
Chat mit Support

Foglight for Java EE Technologies 5.9.13 - Installation Guide

Installing and Configuring Foglight for Java EE Technologies Integrating with JBoss Integrating with Apache Tomcat Integrating with WebLogic Domain Startup Scripts Integrating with WebSphere Integrating with WebSphere Liberty Integrating with Oracle AS Integrating with Spring Boot for Embedded Tomcat Creating a Generic Installation for Manual Java EE Agent Integration Managing Java EE Agent Installations, Integrations, and Configurations Managing Java EE Agent Configurations Managing Java EE Installation Java EE Integration Configuration FAQ and Troubleshooting Manually Integrating Application Server Appendix A: Java EE Application Methods AppendixB: Managing Permissions for the Java EE Integration Agent

Switching a Nexus connection

You can change the Nexus connection between an agent and a Nexus after the agent has been created. For example, you might switch the connection for performance reasons (divide up the agents) or to organize your environment (all agents monitoring a particular application use the same Nexus). Switching the Nexus connection affects all of the agents belonging to the application server integration.

1
On the navigation panel, under Dashboards, click Application Servers > Administration.
3
4
In the Configuration Name and Targets list, expand the configuration group (for example, WebLogic on Windows: startWebLogic) by clicking the ‘+’ sign.
6
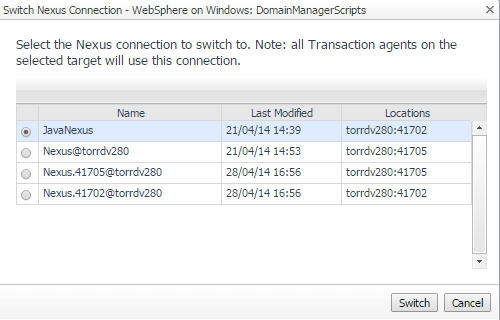
In the list that opens, select Switch Nexus Connection.
8
Click Switch to save your changes.

All of the agents within the application server integration now use this Nexus connection to communicate with the Nexus.

Updating integration configuration properties

Sometimes, due to monitored environment changes, it may be necessary to update the integration configuration properties, such as the target integration script location, or the agent or pre-instrumentor options.

1
On the navigation panel, under Dashboards, click Application Servers > Administration.
3
4
In the Configuration Name and Targets list, click the name of the configuration that you want to edit (for example, WebLogic on Windows: startWebLogic).
7
Click Save.

Java EE agent logging properties

You can configure the following for logs that the Java EE agents produces:

Log level (ALL, DEBUG, VERBOSE, INFO, WARN, ERROR, FATAL, and OFF) for each log target

You can also configure several log targets:

Java EE agents normally have Console and Text File log targets active. The Serialized File target is active in all log-enabled applications, but its threshold is set to OFF normally. This can be overridden in release-mode by setting its threshold to something other than OFF, preferably ALL. WebSphere is active only for agents monitoring WebSphere.

Each target has a set of properties that can be set to modify its behavior. All targets have one common property: Threshold Log Level. Targets ignore log messages of a level below this threshold. Standard levels are ALL, DEBUG, VERBOSE, INFO, WARN, ERROR, FATAL and OFF, in descending order of verbosity. A threshold of OFF effectively disables a target. File-based targets do not create files when their threshold is OFF.

Create a basic log configuration as part of the agent installation process. You can edit that configuration, or create ones, at any other time.

Creating or editing logging properties

The process for creating a log configuration and the process for editing an existing one are similar. The following procedure describes both options and any differences between them.

1
On the navigation panel, under Dashboards, click Application Servers > Administration.
3
4
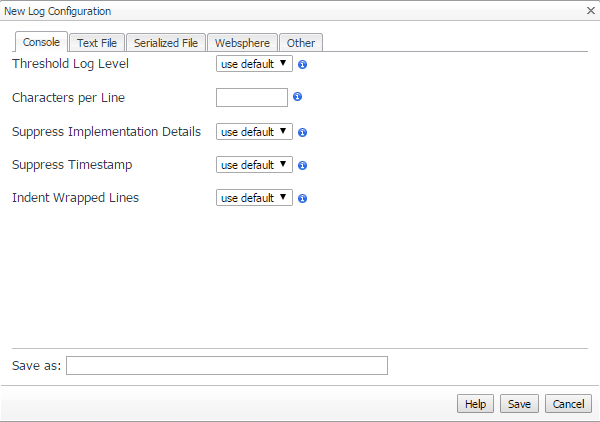
Click Manage logging. The Logging page opens.
Click New.
TIP: If you are uncertain about how to adjust these settings, click Help for an overview of log targets and their purposes.
8
Click Save.

The next time that you create an agent, you can assign the saved log configuration to it. You can also update any integrations that are already using the log configuration.

1
On the navigation panel, under Dashboards, click Application Servers > Administration.
3
On the Java view, click the Integration Configurations tab.
4
In the list of Configuration Name and Targets, expand the configuration group by clicking the ‘+’ sign, then click the name of the target you want to update.
Verwandte Dokumente

The document was helpful.

Bewertung auswählen

I easily found the information I needed.

Bewertung auswählen