
Using Foglight Hybrid Cloud Manager for Azure
Installation requirements
Azure Performance Agent Configuration
Azure monitoring setup
Monitoring Tab
Getting authentication information through Azure portal
Configuring firewall settings
Creating Azure Performance Agent
Dashboard location and UI elements
Regions monitoring
Virtual Machines monitoring
Resource Groups Monitoring
Storage Accounts monitoring
Virtual Networks monitoring
Tags Tab
Reports Tab
Rule Configuration Tab
Usage & Quotas Tab
Global Services Tab
Administration Tab
Tasks view
Agents related commands
Editing agent properties
Managing certificates
Optimizer Tab
Cost Tab
Policy Management Tab
Agents related commands
The Administration dashboard shows a list of existing agent instances and a set of agent management commands at the top of the list. Use it to verify that your agents are collecting data from the monitored environment.
The following commands are available:
|
• |
Add: Starts a workflow for creating new agent instances. For more information, see Creating Azure Performance Agent. |
|
• |
Refresh: Refreshes the list of agent instances and their states. |
|
• |
Activate: Activates one or more selected agent instances. Activating an agent instance starts the agent process on the machine on which the agent is installed. |
|
• |
Deactivate: Deactivates one or more selected agent instances. Deactivating an agent stops the agent process on the machine on which the agent is installed. |
|
• |
Start Data Collection: Starts the data collection for one or more selected agent instances. Starting an agent’s data collection causes the agent to begin monitoring the Azure accounts and to send the collected metrics back to the Management Server. |
|
• |
Stop Data Collection: Stops the data collection for one or more selected agent instances. Stopping an agent’s data collection causes the agent to stop monitoring the Azure accounts. |
|
• |
Edit Properties: Starts a workflow for editing the properties of one or more selected agent instances. Each agent comes with a set of properties that it uses to configure its correct running state. Editing agent properties . |
|
• |
Remove: Deletes the selected agent instance. |
|
• |
Update Agent: Updates the agent package to the latest version. |
|
IMPORTANT: Updating the agent package using this command generates the previously existing credentials. However, if you update the agent package by re-deploying its .gar file through the Agent Status page, the credentials need to be re-created. To do that, select an agent instance, click Edit Properties, and configure the required credentials on the Credentials tab of the Edit Tab Manager dialog box. |
Editing agent properties
|
3 |
The Cloud Manager dashboard opens.
|
4 |
Click Administration. |
The Administration dashboard opens.
|
5 |
|
6 |
|
• |
Azure Environment*: The value of Azure Environment: Azure.com (default value) or Azure.cn (China). |
|
• |
Tenant Directory ID *: The value of Tenant ID retrieved in Getting authentication information through Azure portal. |
|
• |
Tenant Alias Name: The display name that identifies your Tenant. |
|
• |
Application ID *: The value of Application ID retrieved in Getting authentication information through Azure portal. |
|
• |
Access Key *: The value of Access Key retrieved in Getting authentication information through Azure portal. |
|
• |
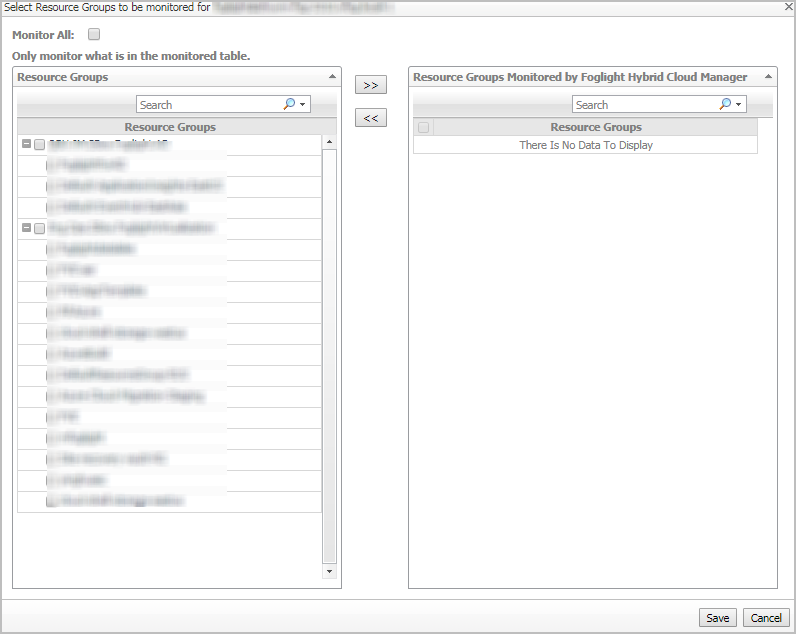
Select Resource Groups to be monitored: Specify to monitor all resource groups or only monitor specified resource group. |
|
• |
If Monitor All is selected: By monitoring all Resource Groups or any Resource Group that is running on the monitored cloud which will be monitored 24x7 may consume licenses depending the number of virtual machines in the Resource Group. |
|
• |
If Monitor All is not selected: The following view appears on the bottom of the Select Resource Groups to be monitored dialog box. Select virtual machines that you want to monitor, and then click >> to move selected Resource Groups to the Resource Groups Monitored by Foglight Hybrid Cloud Manager table. |
|
• |
If the Removed from Monitoring and Virtual Machines Monitored by Foglight Hybrid Cloud Manager tables are empty, and Monitor All is not selected, the Azure agent will not collect any Virtual Machine data. |
|
• |
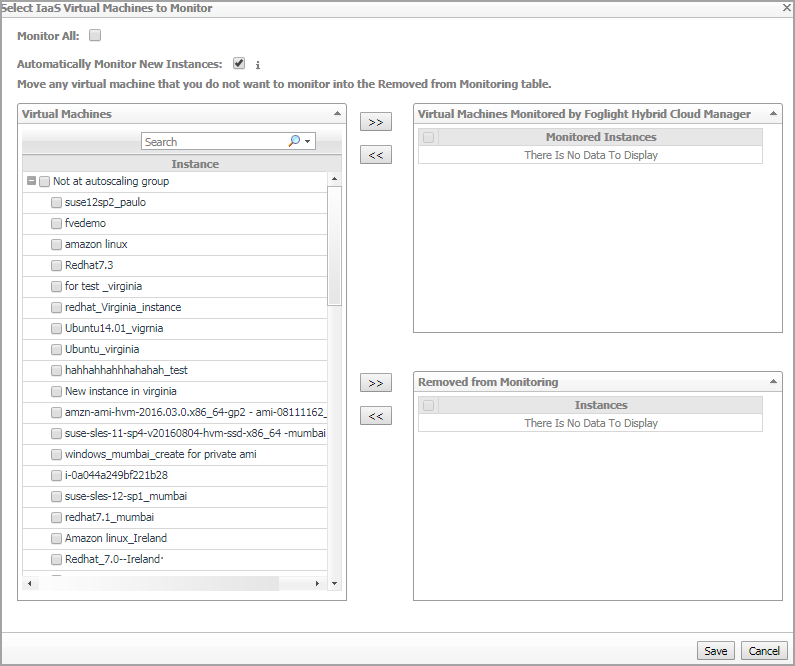
Select IaaS Virtual Machines to Monitor: Specify to monitor all virtual machines or only monitor specified virtual machine. |
|
• |
If Monitor All is selected: By monitoring all virtual machines any virtual machine that is running in the monitored cloud will be monitored 24x7 consuming a monitored virtual machine license. Every virtual machine that is monitored will count against the purchased license pool. Any Monitored Virtual Machine that is above the purchased license limit will require an additional Foglight Hybrid Cloud Manager per Monitored Virtual Machine license. |
|
• |
If Monitor All is not selected: The following view appears on the bottom of the Selected IaaS Virtual Machines to Monitor dialog box. |
|
• |
If Automatically Monitor New Virtual Machines is selected, select virtual machines that you do not want to monitor, and then click >> to move selected virtual machines to the Removed from Monitoring table. |
|
• |
If Automatically Monitor New Virtual Machines is not selected, select virtual machines that you want to monitor, and then click >> to move selected virtual machines to the Virtual Machines Monitored by Foglight Hybrid Cloud Manager table. |
|
• |
If the Removed from Monitoring and Virtual Machines Monitored by Foglight Hybrid Cloud Manager tables are empty, and Automatically Monitor New Virtual Machines is not selected, the Azure agent will not collect any virtual machine data. |
|
• |
Collect Cost Metrics: Select the checkbox to enable and configure the cost metrics collection. Configurations will take effects only after a complete metrics collection cycle is finished. |
|
• |
Collect Cost Metrics by Enterprise Agreement API: Enterprise Agreement Billing API only applies to Enterprise Agreement subscriptions and collects cost metrics directly from the Azure Enterprise Portal. If not, Foglight Hybrid Cloud Manager will use Usage and Rate Card APIs to collect and populate the cost data for subscriptions. |
|
• |
Enrollment Number: See To get the Enrollment Number and Usage API Access Key: to get this value. |
|
• |
Usage API Access Key: See To get the Enrollment Number and Usage API Access Key: to get this value. |
|
• |
|
• |
Billing Cycle Day: Calculate the total usage from the specified Billing Cycle Day of the month, and then populate the rate card data. See To get the subscription information: to get this value. |
|
a |
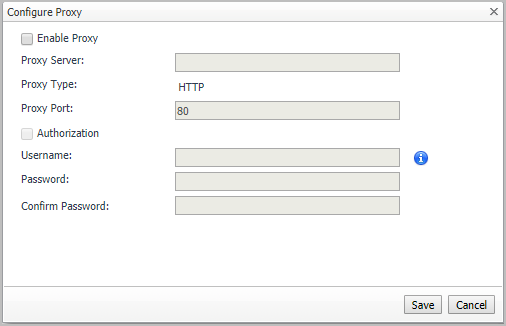
Select the Enable Proxy check box to enable the proxy settings. |
|
b |
Input the host name or IP address for the Proxy Server and input the Proxy Port number. |
|
c |
If the proxy requires an authorization, select the Authorization check box, and input the Username and Password. |
|
7 |
Click Save. The Edit Properties dialog box closes and the list of agent instances automatically refreshes in the display area. |
Managing certificates
|
• |
<foglight_home> is a placeholder that represents the path to the Foglight Management Server installation. |
|
• |
<foglight_agent_mgr_home> is a placeholder that represents the path to the Foglight Agent Manager installation. This can be the location of the Foglight Agent Manager installation on a monitored host, or the home directory of the Foglight Agent Manager that comes embedded with the Foglight Management Server. For example: |
Syntax Conventions
|
• |
<foglight_home> is a placeholder that represents the path to the Foglight Management Server installation. |
|
• |
<foglight_agent_mgr_home> is a placeholder that represents the path to the Foglight Agent Manager installation. This can be the location of the Foglight Agent Manager installation on a monitored host, or the home directory of the Foglight Agent Manager that comes embedded with the Foglight Management Server. For example: |