|
2 |
Unzip the compressed (.zip) file to a Windows® server or workstation. |
Next step: Deploy the Foglight-Evolve-vApp or Deploy the Foglight-FGLAM-vApp-fglam
|
1 |
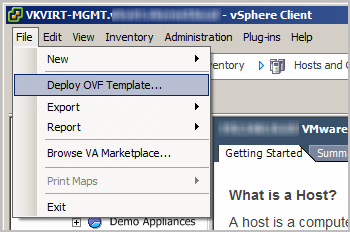
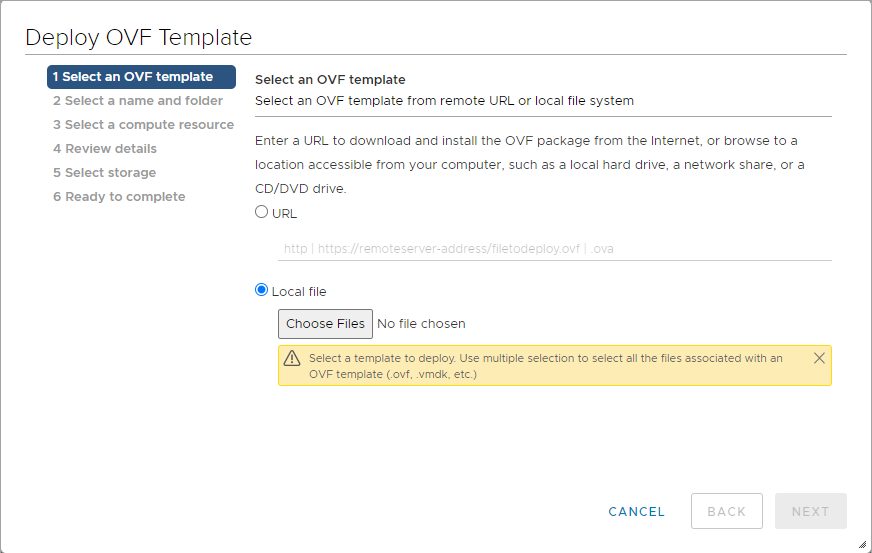
Open the VMware® vSphere® Client and click File > Deploy OVF Template. |
|
2 |
|
3 |
|
4 |
On the End User License Agreement page, review the license agreement, click Accept, then click Next. |
|
5 |
On the Name and Location page, type a name for the virtual appliance, and select a destination folder. Click Next. |
|
6 |
|
7 |
On the Storage page, select the datastore in which that the virtual machine (VM) should reside. Click Next. |
|
8 |
On the Disk Format page, select the type of datastore provisioning. |
|
• |
Thick Provision Lazy Zeroed: Creates a virtual disk in a default thick format. |
|
• |
Thick Provision Eager Zeroed: Creates a type of thick virtual disk that supports clustering features, such as Fault Tolerance. |
|
• |
Thin Provision: Creates a disk in thin format. |
|
9 |
On the Network Mapping page, map your existing virtual networks to the ones in the deployed template, and then click Next. |
|
• |
Internal Network: Private network for virtual appliance components to communicate with each other. If you need to have several Foglight-Evolve-vApp virtual appliances running, you must create the dedicated internal network for every vApp (with different names). |
|
• |
Reconfigure static IPs for both FMS and DBS VMs for the second NIC which is packaged with 192.168.200.1 and 192.168.200.2 IP to a different value. For details, see Change the network settings. |
|
• |
Change the DB IP in the FMS VMs server.config file to the one set for the DBS VM. Change the line Server.databse.hostwith the new IP in the /home/foglight/Quest/Foglight/config/server.config file. |
|
• |
External Network: Public network to collect data from the virtual environment. |
|
10 |
On the Properties page, select a time zone to set inside Guest OS. Select Yes to enable FIPS Compliance Mode. Also, implement the following network settings: |
|
• |
FMS VM IP Address: IP address for the FMS VM interface. Leave this field blank when using DHCP. |
|
• |
VM Netmask: Netmask for the vApps VMs. Leave this field blank when using DHCP. |
|
• |
Default Gateway: Default gateway address for the vApps VMs. |
|
• |
DNS: Domain name servers for the vApps VMs (separated by a semicolon). |
|
11 |
|
1 |
Open the VMware vSphere Client and right click on the folder, select Deploy OVF Template. |
|
2 |
|
3 |
|
4 |
On the End User License Agreement page, review the license agreement, click Accept, then click Next. |
|
5 |
|
6 |
On the Storage page, select the datastore in which that the virtual machine (VM) should reside. Click Next. |
|
7 |
On the Select Networks page, select a proper network for “External Network” that allows FglAM to connect to the existing FMS, and then click Next. |
|
8 |
On Customize template page, specify the FMS Server IP Address, input the FglAM Display Name, select a Timezone, select Yes to enable FIPS compliance Mode. Also, implement the following network settings: |
|
• |
FglAM VM IP Address: IP address for the FglAM VM interface. Leave this field blank when using DHCP. |
|
• |
VM Netmask: Netmask for the FglAM VMs. Leave this field blank when using DHCP. |
|
• |
Default Gateway: Default gateway address for the FglAM VM. |
|
• |
DNS: Domain name servers for the FglAM VM (separated each name by a semicolon). |
|
9 |
Next step: Power on and initialize the virtual appliance
After installing the OVF, you must power on and initialize the virtual machines.
|
1 |
|
3 |
Once that is completed, access Foglight Evolve / Foglight for Storage Management by copying the IP address (either with or without “:8080”) on a standard web browser. |
|
4 |
If DHCP is present, the FMS VM acquires an IP address. If you want to assign a static IP address, follow the instruction in the Change the network settings section. |
|
5 |
If you already have other Foglight-Evolve-vApp or FVE-vApp running on the Host/Cluster, you must manually reconfigure the static IP of the newer vApp VMs, and change the DBS Internal IP address in the FMS VM configuration file. |
|
a |
Reconfigure static IPs for both FMS and DBS VMs for the second NIC which is packaged with 192.168.200.1 and 192.168.200.2 IP to a different value. For details, see Change the network settings. |
|
b |
Change the DB IP in the FMS VMs server.config file to the one set for the DBS VM. Change the line Server.databse.host with the new IP in the /home/foglight/Quest/Foglight/config/server.config file. |
