
Tenant Environments
All Power365 Projects require at least 2 Microsoft 365 Multi-Tenants or environments be added to your Power365 Project to establish at least one source and one target environment for migration and integration activities. Additional environments can be added for more complex migration scenarios.
What is a Tenant?
A “tenant” or “environment” is this context is referring to an Microsoft 365 Worldwide subscription.
What should I prepare before adding a tenant?
Before creating your project, it is recommended that an Application Service Account be created in each of your Microsoft 365 environments. This account will be used for the duration of the project or services requirement.
This account will be used to grant delegated permissions to Power365 on-behalf of the signed-in user. The administrator consents to the permissions that the app requests and the app has delegated permission to act as the signed-in user when making calls to Microsoft Graph. Some higher-privileged permissions require administrator consent. Power365 requires Global Administrator consent for 4 Graph permissions anytime a tenant is added or reconnected.
Follow these recommended steps to prepare your accounts for project setup:
- Create a cloud only Power365 Application Service Account in each environment.
- The recommended name of the account would be “Power365 App Services”.
- Set the account password expiration date to correspond with the project end date or set to “do not expire”.
- Assign Global Administrator Role to the account.
- Assign an Microsoft 365 License to the user. The minimal subscription should include Exchange Online.
- Login to the account for the first time in Microsoft 365 to verify access.
- Make the account information available to the authorized administrator for each client environment.
Please Note: It is acceptable to use an existing administrator account if that is preferred.
How do I add a tenant to my project?
During the start of your project setup you will be asked to add your tenants or environments. Follow these steps to complete the process.
- Login to Power365 with your Microsoft account.
- Click the Create Project button or open your existing project.
- Navigate through the setup wizard to the add a tenant step.
Click the Add Tenant button.

- When you add a tenant, you will be prompted for your Microsoft account.
- Enter the credentials of an administrative account for this Office365 tenant.
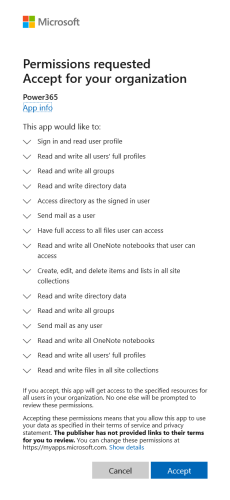
Read and accept the permission notice related to MS Graph permissions required to manage your migration and integration projects. For more details about required Graph permissions, see the Power365 Application Permission Requirements topic. Note that two SharePoint Migration API permissions are included to allow OneDrive for Business Accelerated Velocity Mode migration to function.
(click to view larger)
- You will then be returned to the Add Tenant screen. You will repeat this process for each tenant that is part of the project.
What happens when I add a Tenant to my Project for the first time?
When setting up your project for the first time, a Binary Tree PowerShell account will be created in each tenant added to the project and the Power365 App will be installed. This account is used for PowerShell related tasks and to provide full access to the source and target mailboxes for migration purposes.
To complete this process, each tenant must have at least 1 available Microsoft 365 license, so it may be assigned to the account.
Power365 will use your Application Service Account you created to connect to Microsoft 365. Credentials are never stored or transmitted between Power365 and Microsoft 365.
Power365 will add the Power365 App to your Tenant. See figure 2 below.
Power365 will create a cloud only account in your Microsoft 365 tenant for PowerShell.
Power365 will license your new account with the available subscription that has the Exchange Online plan. A lower cost license will be used if available. For example, if you have both E3 and E1; E1 will be used if a license is available.
Power365 by default will grant the Exchange and SharePoint Administrator Roles to this account.
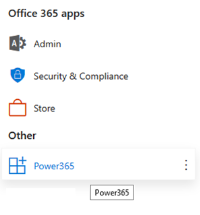
Figure 2: Example Power365 App (click to view larger)
What permissions am I granting to Power365?
Here is the list of minimal Graph permissions required to operate a Power365 project.
Sign in and read user profile (User.Read)
Read and write all users’ full profile (User.ReadWrite.All)
Read and write all groups (Group.ReadWrite.All)
Read and write directory data (Directory.ReadWrite.All)
Access directory as the singed in user (Directory.AccessAsUser.All)
Have full access to all files user can access (Files.ReadWrite.All)
Send mail as user (Mail.Send)
For more details about the required Graph permissions, check out the Application Permission Requirements topic.
How are these permissions being used?
The following lists the basic need for each Graph permission. For more details about required Graph permissions, see the Power365 Application Permission Requirements topic.
Sign in and read user profile (User.Read) - Used to connect a tenant.
Read and write all users’ full profile (User.ReadWrite.All) - Used for OneDrive Sync.
Read and write all groups (Group.ReadWrite.All) – Used for OneDrive Sync.
Read and write directory data (Directory.ReadWrite.All) - Used to discover Azure directory and automate licensing.
Access directory as the singed in user (Directory.AccessAsUser.All) - Used to provision the Binary Tree PowerShell account and assign the required roles.
Have full access to all files user can access (Files.ReadWrite.All) – Used to read and write OneDrive files during Sync.
Send mail as user (Mail.Send) - Used to send the User Cutover email notification.
Does Power365 save my account password?
Power365 will not ask you to save or transmit your administrator credentials in any cloud environment endpoint configuration.
What account roles are required to manage my project(s)?
For daily migration and integration operations and services, the minimum Microsoft 365 administrator roles required are:
- Exchange Administrator (Mailboxes, Archives, PFs)
- SharePoint Administrator (OneDrive)
For complete details about the required account roles, check out the Requirements.
What account roles are required to add or reconnect a tenant to my project(s)?
Anytime a tenant is connected for the first time or reconnect later, the minimum Microsoft 365 administrator role required is:
- Global Administrator
For complete details about the required account roles, check out the Requirements.
When should I reconnect my tenant?
There are a few reasons why you could be required to reconnect your Microsoft 365 tenant to your Power365 project. The following lists the most common reasons this action is required.
- Office 365 OAuth Token has Expired – After 90 days a standard OAuth token will expire. So, if your project is running longer than 3 months, please be sure to update your token by reconnecting your tenant to your project.
- Before a Domain Cutover Event – Before a domain cutover event, it is required that you raise your application account’s role to Global Administrator to facilitate the domain move orchestration and automation.
- Application Account has Changed – If the Application Account is deleted, recreated or changed it will be required that you reconnect your tenant to the project to continue services.
Additional Information
Application Permission Requirements
Pairing
What is pairing?
Pairing in this context means to identify the source and target relationships in your project. There are three (3) pairing types in an Advanced or Premium project. Those are tenant environment pairing, the accepted domain pairing and the object attribute pairing.
Why is pairing required?
Pairing environments, domains and objects are important because without designating the source and target locations, it will not be possible to migrate data, match objects, orchestrate mail flow or translate email addresses.
When do I setup my pairings?
The project setup wizard will ask a few questions about the required pairings. And authorized administrators may update pairings when needed.
How do I setup environment pairings?
After adding your tenants in the project setup wizard, it is time to set up your tenant pairs. This is where you identify the source and target relationships in your project.
Power365 will use this information as it guides you through configuring your project. You start with your tenants, and then it’s just a matter of “from” and “to.” From what tenant would you like to migrate accounts? And to where are they going?
With only two tenants it might be just a simple one-to-one relationship. If you have multiple tenants like in a divestiture, you may need to set up several tenant pairings.

(click to view larger)
How do I setup domain pairings?
After setting up tenant pairs, the next step is to pair the domains. Domain Pairing is setting up accepted domains from the source tenant with accepted domains in the target.
When an account is setup in the target, the email address is automatically stamped with the paired domain in the target. The default domain might be a different domain altogether, so pairing makes sure you know what you will have in the target after migration.
Create one pairing at time. Choose an accepted domain from the source. And then a domain from the target. That’s the basic pairing.
Create whatever combination of domain pairings meets your needs. You can do a simple one-to-one relationship, or pair several source domains to a single target domain.

(click to view larger)
How do I setup attribute pairings?
After setting up domain pairs, the next step is to pair the attributes for the purposes of matching objects between environments. Attribute Pairing is setting up value pairs from the source object and the target object.

(click to view larger)
Additional Information
Manage Scope
What is project scope?
In this context, project scope represents the users and groups defined as required for migration and integration services. This includes the users and groups data.
In other words, when a user is defined as in-scope this includes the user’s scope of data.
How do I manage scope?
Managing scope in Power365 is very flexible. Pick the best fit for your project needs, you have several options or methods to choose from.
During project setup for Advanced and Premium project types, you will be asked to choose which users and which groups will be discovered.
During these steps you have two (2) options.
- Discover Everyone
- Discover based on Group
The best way to manage scope is by choosing to discover objects based on group membership. Anyone outside of the group membership will not be displayed in the application and cannot be acted upon at any time. Only authorized Client Administrators are permitted to modify the scope of users or groups in a project.
May I manage scope from a local AD group?
Yes, when managing scope by group membership that group may be in the local Active Directory or a cloud only group within Microsoft 365. Power365 always discovers the objects within the Azure directory, therefore any local AD group used must be synchronized up to Microsoft 365 with Microsoft Entra Connect or similar technology.
May I manage scope from a cloud group?
Yes, when managing scope by group membership that group may be in the local Active Directory or a cloud only group within Microsoft 365. Power365 always discovers the objects within the Azure directory, therefore any local AD group used must be synchronized up to Microsoft 365 with Microsoft Entra Connect or similar technology.
Are nested groups supported?
Yes, nested groups are fully supported. However, we recommend they remain as simple as possible because the more complexity the longer discovery may take. So, when possible create new discovery or wave groups or use single nested existing groups. Dynamic groups are not supported.
How do I manage scope for Basic Migration Projects?
Basic migration projects do not provide discovery services; therefore, scope is controlled by the list uploaded during project setup. Only authorized client administrators may add new users to the scope of a project.
How can I ensure scope remains unchanged during a divestiture project?
Unlike typical migrations or consolidation projects where all users and groups are being moved, it is very important during divestiture projects that scope be securely managed to reduce risk and human error. That is why Power365 offers different methods to manage scope for divestiture projects.
First, Power365 provides a role-based access model that only grants permission to add, modify or remove the scope definitions for users and groups to authorized client administrators. In other words, only assign the client admin role to users who you trust to control the scope of a project.
Second, Power365 offers a parallel divestiture solution whereby, parallel Migration and Domain Sharing projects are running but each parallel project has different goals and timelines, is managed by different teams that don’t communicate and project ownership is separated. Therefore, this type of one-to-many divestiture must have isolated experiences but share the same single source tenant without overlapping or conflicting with one another’s efforts or licensing. To find out more about Email Rewrite Services parallel divestiture solutions, contact Support or contact your account manager.
Additional Information
Matching
What is matching?
Matching is a process in Power365 that provides a method for objects between different directories to be paired together for migration and synchronization purposes.
Why is matching required?
Matching is required because it provides a mapping between source and target objects for the purposes of group membership synchronization and email address translation during migration.
What is matched?
All Users and Groups are matched between a source tenant environment and a target.
What projects types support automatic matching and discovery?
The Premium and Advanced projects types support discovery and matching services. The Basic project type supports uploading of mapping lists for matching users and groups.
When does matching occur?
Matching automatically occurs during the discovery process and can be run manually at any time by an authorized project administrator.
How does matching work?
Power365 will attempt to match users and groups in the source tenant with users and groups in the target tenant.
During project setup, you may choose up to 3 attribute pairs that Power365 will use to make this object pairing determination.
Matching is processed in the order listed. If there is no match on the first attribute, Power365 moves down the list.
With the Integration project type, if no match is found, Power365 may create the users and groups for you.
What are the projects requirements for matching?
To complete the project setup and match objects, you will be required to setup pairs for Tenant Environments, Domains and Attributes for Users and Groups.
Can I run a match myself?
Yes, there is an action available called Match. This action will match an unmatched user or group against the target environment without the need to run a full discovery in source and target.
How do I run the match action?
It’s easy, navigate to the users or group you would like to match. Select the item then select the Match action from the action drop-down menu. Once selected, click the Apply Action button to begin. The status of the object will change to Matching. When successfully complete, the status will change to Matched.
Are there matching logs?
Yes, within the discovery logs, matched objects will be logged. However, the easier method is to export all discovered users and groups. The export of all discovered objects will provide a list of all matched and unmatched objects. Navigate to the user or group management view then select all the objects. Afterwards, select the Export action from the action drop-down menu.