
Discovery
What is discovery?
The discovery service is used to collect user and group identity and properties for the purposes of migration preparation.
When discovery is complete, it will have collected all user, group, and contact information within the configured Azure directory environments. It will use this data based on project configuration to find matching objects between environments for the purposes of data migration and synchronization.
The Power365 Directory Discovery Service runs by default every twenty-four (24) hours. This frequency may be changed as needed.
Should I change the default discovery frequency?
After the initial discovery has successfully completed, subsequent discovery jobs will be deltas, which are quicker. Monitor the time it takes to run a delta sync. If the total discovery time exceeds 24 hrs., adjust the frequency to fit the environment size. The more directory objects, the more time a discovery will take. Be sure the initial discovery completed successfully. Otherwise, each new discovery job will run a full discovery again.
The Power365 Directory Discovery Service may be run at any time by an authorized project administrator.
Can I run a full discovery?
Yes, a full discovery may be run after the initial discovery has completed when required. However, it is recommended that delta discovery be allowed to run to ensure new and modified object changes are processed quickly.
To manually run Discovery and adjust the Discovery Delta Timestamp,
Click the drop-down menu located in the top left corner.

Click the Discovery link from menu.
- Hover over the desired tenant environment.
Click RUN DISCOVERY to begin the process.

In the pop-up window displayed, adjust the Delta Timestamp via the date time control text box.

When should I run a full discovery?
Full discovery should only be run when previously skipped objects are now required for the project. To discover the previously skipped objects, set the delta timestamp to a time before the initial discovery, when the objects were created or last modified.
Who is authorized to run discovery?
The Client Administrator, Power User and Operator may manually run a new discovery.
Who is authorized to modify the Delta Timestamp?
Only the Client administrator role may adjust the Delta Timestamp.
What is the Delta Timestamp?
After the first full tenant discovery is completed, only new or modified objects are discovered during subsequent delta discovery jobs. The Delta Timestamp field allows authorized administrators to set the timestamp so that previously skipped objects will now be added to the scope of the project. Essentially, objects created, or modified before the timestamp will be skipped.
Yes, the Power365 Directory Discovery Service can be disabled at any time by an authorized project administrator. Click DISABLE for the desired tenant while in the discovery management page.
To manually disable all future discoveries, follow these steps.
Click the drop-down menu located in the top left corner.
Click the Discovery link from menu.
- Hover over the desired tenant environment.
Click DISABLE to stop all future the processes.

When should I disable discovery?
In most cases, discovery services should not be disabled during an active project. Inactive projects can either be archived if they are no longer required, which will end all related services, or the discovery service can be disabled until the project becomes active.
It is recommended that discovery services be disabled before a Domain Cutover event is started. For more information about Domain Cutovers, review this help article.
Yes, Power365 provides authorized administrators access to the discovery and tenant logs. To download the logs, simply navigate to the DISCOVERY section from your project dashboard then click the LOGS link for the desired environment.
After discovery has ran, is there a report?
Yes, after the initial discovery is complete there is a discovery report designed to help with migration planning.
What is in the discovery report?
The purpose of the discovery report is to provide an overall view of your environment’s data size and scope to help with migration planning.
Pages 1 – 3 focus on data derived from the designated source tenant environment(s). Providing an easy view of data in scope and user averages across different workloads. Data includes mailboxes, archives, OneDrive/OneNote files and other shared resources like, Office 365 Groups. You may also filter collections of data based on the desired project, on the tenants needed or by project type.
Page 4 goes beyond the scope of only the source environments. During discovery, Power365 collects all tenant environment information required to prepare for migration activities. This page lists all configured projects, all accepted domains, discovery history and tenant details to help keep track of all the different projects and environments configured. Select an item in any table to filter the other tables. For example, when selecting a single project, only the domains related to that project will be displayed.
Pages 5 – 8 provide exportable lists of directory objects by type and their corresponding known properties. Additional filter options are available based on object types. You can easily export all your environment data for migration planning and tracking activities.
Please note, all filters selected on a page will remain when navigating between pages.
How do I access the discovery report?
Authorized project users and administrators may go to the following URL to access reports for all their projects.
https://power365.quest.com/Reports
You may also click the Reports action in the dashboard menu. The default report is the discovery report. Additional reports can be selected from the dropdown menu in reports.

Can I export data from the report?
Yes, any visual that has an export option can be exported. Click the top right menu of the desired visual within the report for options.
For additional help with exporting data from visualizations, please read this MS article.
How to export data from visualizations
Pair your Environments, Domains, and Attributes
Profiles
What is a Migration Profile?
A Migration Profile allows you to customize all migration parameters related to Prepare, Sync and Cutover. A Migration Profile can be assigned to a single user or by Migration Wave. You can customize the existing Default profile or create as many as you need to fit your project.
When should I create my Migration Profiles?
We recommend after project set up you review and update the default migration profile. However, you may modify and add profiles at any time.
What migration options are available?
The wizard will take you through the available options. Actual options vary by project type, as noted below.
Outlook Configuration
Choose Power365 Setup Pro for Outlook, cutover options.
Enable or Disable Feature
Choose the delivery options:
Silent Installer
Self-Service Installer
Choose if you want to “Wait for User to Finish” before cutover completes
Create Users, Office 365 Groups and Teams
Decide if you want to allow Users, Office 365 Groups and Teams to be created for non-matches. (Premium Projects Only)
GAL Sync (Deprecated with DSLite)
Choose personal contact information sync options.
- Decide if you want to allow distribution groups to be created for non-matches.
Choose distribution groups sync options.
Additional Workloads (Advanced and Premium Only)
Choose whether to sync Mailbox Archives (All Project Types) and OneDrive for Business Files.
Choose to Send OneDrive Cutover Email.
Choose to use Accelerated Velocity Mode for increased throughput.

Litigation Hold
Choose if to copy Litigation Hold settings and data to destination.
Mailbox Content
Define the Mailbox content types to migrate.
Calendar
Tasks
Notes
Deleted Items
Rules
Automatic Replies (Out of Office)
Signatures (Desktop Setup Pro Required)
Mailbox Filters
- Define Content Filter options for Email, Calendar, Tasks and Notes
Filter by Date Range
Filter by Age Range
Define thresholds for handling of "large items." This setting specifies the maximum item size in MB. This applies to all mailbox items, e.g. emails, meetings, tasks, etc. The default option is “include all”. The recommendation is to meet your destination environments item size policies.
Error Thresholds
Specify how to handle bad items for mailboxes and OneDrive for Business. These settings specify the number of corrupt items that is allowed before marking a sync job as failed. The default is 0, which means the sync will fail if any bad items are detected. The recommendation is 10 or lower.
Specify how to handle folders that cannot be synced for mailboxes and OneDrive for Business. These settings specify the number of folders that can be skipped due to bad items or permission issues before marking a sync job as failed. The default is 0, which means the sync will fail if any bad folders are detected. The recommendation is 10 or lower.
Optimizations
Power365 can help you optimize your sync cycles by allowing you to choose when mailbox Delegation and Litigation Hold (LH) settings are migrated to the destination. By default, Power365 will sync your delegation and LH settings during every sync, including cutover. This ensures mailbox and folder permissions, along with LH settings remain in sync during the entire migration life cycle.
Determine your optimization options.
Optimize Prestaging – Choose “Optimize Prestaging” to speed up all preliminary syncs jobs, prior to cutover. This option will reduce the initial and delta sync times during the preparation stage, by keeping the sync of permission and litigation hold settings until the cutover event, at the very end. Use this option if you wish to ramp-up fast to a cutover event. Keeping plenty of time for each cutover.
Optimize Cutover – Choose “Optimize Cutover” to reduce the cutover event time. This option will reduce the overall time of a cutover event by skipping the permission and LH settings, which have been previously migrated. Use this option if you want to control the amount of time a single cutover event will take. Maybe you need to fit more users into a cutover event, this option was designed to do just that.
Skip Permission Clean-up – Choose this option to skip the automated clean-up process after cutover where all application related accounts are removed from the source and target accounts.

User Licensing (Premium Projects Only)
- Define your destination User’s Microsoft 365 licensing options.
- Choose the default email or customize it.
Download an email template.
- Customize the template.
- Upload the new template.
What options are available to cutover my user’s Outlook Profiles?
With Outlook Setup Pro a project administrator may choose:
- To automatically configure the end-user’s new Outlook profile.
- The agent delivery options.
- If to wait for end-user before continuing cutover process.
Choose No if you do not desire to send the end-user a cutover email or provide a method to configure their Outlook profiles. Otherwise, choose Yes.

Figure 1: Migration Profile Outlook Setup Pro Options
What happens if you wait for the users to update their applications?
If you choose to wait for an end-user to complete their Outlook Profile, the cutover process will wait for end-user to complete the application reconfiguration before moving onto the next cutover stage.

Figure 2: Migration Profile Outlook Cutover Options
Are Outlook Signatures migrated?
Yes, to migrate your users Outlook signatures files, simply choose to send the cutover email to your end-users during cutover. The Desktop Setup Pro agents provides the ability to add your existing signatures to your new outlook profile.
What options are available to create users, Office 365 Groups and Teams?
For integrated Directory Sync projects, unmatched users can be created as either as regular members or as B2B guest users. By creating these users as guests, they may be granted access to shared resources during the coexistence phase prior to any migration activities. More information about B2B guest users can be found at https://docs.microsoft.com/en-us/azure/active-directory/b2b/user-properties.
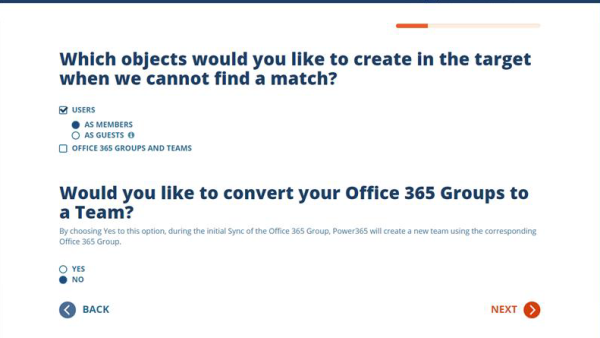
Figure 3: Migration Profile Create Target Objects Options
What litigation hold options are available?
For more information about Litigation Hold options and implications, see the Litigation Hold topic.

Figure 4: Litigation Hold Options
What user license options are available?

Figure 5: License Options
Power365 Premium Integration project types provide automatic license assignment for destination users. For the Basic Migration and Advanced Migration project type, license assignments are a prerequisite and the responsibility of the administrator’s setting up the project.
During the first synchronization job of a user, the Provisioning job runs. During this step, user licenses are assigned to the destination user based on the migration profile options.
Power365 only enables the associated service plan for the Product License selected. For example, if you choose the E3 license, only the Exchange Online service plan will be enabled. All other service plans will be left to the administrator to enable when desired. Optionally, the SharePoint Online server plan is enabled if OneDrive is being migrated.
The migration profile provides two options to assign Microsoft 365 product licenses and the associated service plans needed for Exchange Online Mailbox or OneDrive migrations.
- Default – A license that matches your source mailbox will be used. NOTE: this applies only for E3, E4 or E5 licenses.
- Preferred SKU – Determines which SKU should be applied to your target mailbox.
If your preferred SKU is not available, please contact Support for assistance.
What options are available to optimize my syncs?
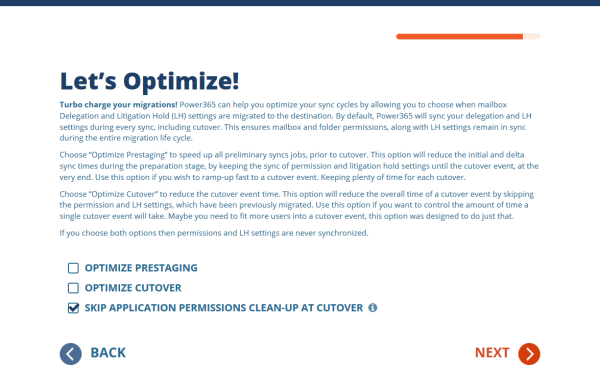
Figure 6: Optimize Options
What happens during automated clean-up at Cutover?
One of the final steps of the cutover process is to clean-up any permission artifacts on the source and/or target objects that were required to migrate content but are no longer required now that the cutover process is complete. During this step any migrated Mailboxes, Office 365 Groups or Microsoft Teams and Teams Channels are purged of any Binary Tree account that was automatically created during set up and will also remove the client’s Application account used to Connect their tenants and grant permissions to tenant resources.
Caution, if you used a personal administrator account, instead of an application specific account to grant Power365 permissions to the tenant resources, this account will be removed during this process which may result in your personal account being removed from a resource you did not intend.
See Application Permissions and Requirements for more information.
Additional Information
Waves
What is a Migration Wave?
A migration wave allows you to organize, schedule and manage collections of users or groups during migration projects. For all project types, each wave can be linked to an Active Directory Group of your choosing for easy management or you can use a cloud only group if that makes it easier or is your only option.
What can I use Migration Waves for?
Migration waves are designed to logically assemble users and groups into collections to apply “actions” and/or “schedule” activities (Prepare for Premium Integration projects, Sync, and Cutover).
It is recommended your migration wave name contain the migration event’s relevant information such as the user cutover date, business unit or physical location/site.
For example, if you plan to cut-over a user’s mailbox on June 2nd and the user is part of the Finance department, you could name the migration wave, June02Finance or Finance_June02.
When should I create my waves?
You can create Migration Waves during the initial setup of the project, or create them later from the Dashboard. To make things easier, we recommend you create your local AD migration groups prior to starting your project but don’t worry it can be done at any time after the Power365 project has been setup.
How do I create a New Migration Wave?
A migration wave is created in the Power365 Project, either during the initial project wizard or later using the Dashboard. It can be associated with a local AD group most project types or created as a stand-alone wave.
For supported project types, simply create a local distribution group in AD, add your members (who is being migrated) and synchronize that group to your Microsoft 365 tenant. Once that prerequisite is complete; to create a Wave with a local AD group associated with it, follow these steps.
- Login to Power365.
- Navigate to your Project Dashboard.
- Locate the “Migration waves for users” information.
- Click “Edit”.
- A new page will open listing your current waves.
- Click “New Migration Wave”.
- Name the Migration Wave, remember use a logical name representing that migration event.
- Click “Next.”
- Select the “Tenant Pair” that should be associated with this wave.
- Click “Next.”
- Enter the name of the local AD Group that is synchronized to your Microsoft 365 tenant. The type-ahead feature will begin to present a list of discovered groups. Select the appropriate group.
- Click “Finish”.
- Now that the Migration Wave is created, each time the Discovery process runs (every 24hrs by default or on-demand as needed), any changes to migration wave membership will be reflected in the User Dashboard view under the “Wave” column.
To create a Wave without a local AD group associated with it, simply follow these steps.
- Login to Power365.
Navigate to your Project Dashboard.
Locate the “Users” information.
Click “Edit”.
Select the desired user, so the “Add to Wave” action is available.
From the Action Drop-down Menu, select “Add to Wave”.
Click the “Apply Action” button.
A new page will open listing your current waves.
In the available field, enter the name of the new “stand-alone” migration wave you will be creating.
Click “OK” to create the migration wave.
Now that the Migration Wave is created, you may assign users to this wave by following the steps above.
For the Basic Migration project type, there is Migration Wave column in the CSV user list that you will upload to set your waves. The Basic Migration project type does not support associating your waves to a synchronized local AD group.
To create or set a Wave using a file upload, simply follow these steps.
- Login to Power365.
- Click to open your Basic Migration Project.
- Using the project wizard, click next until you are asked to “Upload your user list”.
You may download an example template using the “Download Example List” link. The example table below illustrates this template.
Source Email Target Email Migration Wave Profile Name test1@acme.com test1@contoso.co June02_Sales Profile 1 Test2@acme.com Test2@contoso.com June10_Marketing Profile 1 Test3@acme.com Test3@contoso.com June18_Finance Profile 1 - When your list is ready, click the “Select File” button. A dialog box will open to allow you to select the prepared list.
- Navigate and select the desired file.
- Click “Next”.
- If the upload was a success then click “Next”. If it was not, fix your upload list and try again.
- Continue through the project wizard to complete the upload.
- Review the summary page and when ready, click “Submit” to complete the configuration.
- You may also use the “Update” action, located in the Users view to upload new users or make changes to existing users.
How do I manage Migration Wave Membership?
For Advanced Migration and Premium Integration project types, it is recommended you use local AD groups to manage your migration wave membership. Simply add or remove membership from the local AD group to manage the migration event or wave the user will be scheduled under.
If you are managing migration waves from Power365 only, as is the case with Basic Migration project types, use the “Add” action to create or change individual user’s wave.
How do I manage Migration Wave Membership in Bulk?
Use the “Update” action located in the Users view to upload a CSV list to set the Migration Wave or Migration Profile for any account listed in the file.
If the wave does not exist already, the wave will be created during the upload process.
How do I schedule a Mailbox Migration activity (Prepare, Sync, or Cutover) using Waves?
Anytime during the project, you may setup or edit your Migration Wave schedule(s) using the Project Wizard. See the Migration Schedules topic for more information.
How do I move multiple users to a different Wave?
Located in the Project Dashboard under the User details view, the Update feature can be used to change one or more user's Migration Wave using a CSV file.
How to update the Migration Wave for multiple users with a SCV file:
Prepare the CSV file as follows:
Source Email Target Email Migration Wave Profile Name test1@acme.com test1@contoso.co July02_Sales Profile 1 Test2@acme.com Test2@contoso.com July10_Marketing Profile 1 Test3@acme.com Test3@contoso.com July18_Finance Profile 1 - Click the Update action.
- Click the Select File action.
- Select the CSV then Click Open.
- Click Next if upload is successful.
- Click Finish.
Additional Information
Granular Control with Active Directory Groups
Schedules
What schedule features are available in Power365 migrations?
Power365 provides the option to schedule user actions by wave. You can schedule the start time of 3 types of actions.
- Prepare
- Sync
- Cutover
For more information about each action, read this online help article about Prepare, Sync & Cutover.
Can I schedule when a user is created?
Yes, the user creation process can be scheduled to start based on a wave.
To schedule the creation of a missing user in the target environment, the Prepare action must be scheduled or executed manually. Just choose the start date and time when asked in the schedule setup wizard.
This option is only available for Premium Integration projects. All other project types require the target user be created by Power365 Directory Sync or by another method.
Can I schedule when a user is provisioned and licensed?
Yes, the user account provisioning and licensing process can be scheduled to start based on a wave.
During the first synchronization job a user account is licensed for Exchange Online and optionally for SharePoint Online if OneDrive for Business is being migrated. Once the user is licensed, the user’s mailbox will be provisioned to ready for data migration.
The Sync action must be scheduled or executed manually to provision the target account. Just choose the start date and time when asked in the schedule setup wizard.
This option is only available for Premium Integration projects. All other project types require the target user be provisioned manually.
Can I schedule when a user cutover begins?
Yes, the user cutover can be scheduled to start based on a wave. Just choose the start date and time when asked in the schedule setup wizard.
Click these links for more information about Migration Waves and Cutover.
Can I schedule all these tasks at once or separately?
Each migration schedule is assigned to a single wave or group of waves. Each wave can be moved as need into a new schedule or out of an existing one. A wave can only be assigned to one schedule at a time.
By selecting one or more option, as illustrated below, the “Start On” date and time fields will be available for population. Set the date and time for each action selected.
If you wish to schedule only the Prepare job at first then decide later when to schedule your first Sync, that’s easy to do. Simply select Prepare in the schedule and click next and finish up the schedule.
Once the wave(s) is scheduled for Prepare and runs successfully, check your users for errors that may need resolving.
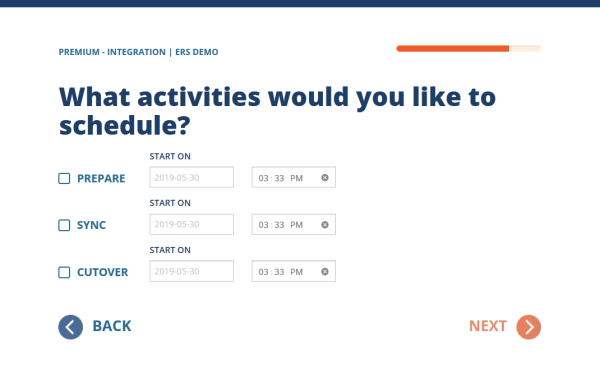
Figure 1: Example Activity Schedule
Can I schedule the frequency and number of Syncs?
Yes, the user sync action has two (2) additional parameters besides the start date and time. When scheduling a Sync activity, you will be asked how many times you would like to run a sync and how often that sync should run, either in hours, days or weeks.
When choosing how often to sync, keep in mind that subsequent sync jobs after the initial sync are delta syncs that bring over changes, therefore are smaller and faster.


Figure 2: Example Migration Schedule Questions
How do I schedule migration activity (Prepare, Sync, or Cutover) using Waves?
Anytime during the project, you may setup or edit your Migration Wave schedule(s) using the Project Wizard. Follow these instructions to edit your Migration Wave Schedule.
- Login to Power365.
- Navigate to your Project Dashboard.
Click the “Schedule” button at the top of the Dashboard.

Figure 3: Dashboard Menu with Schedule
- A new page will open listing your current schedules.
- Click "Add Another Schedule" button to create a new one.
- A new page will open listing your current waves.
- Select the existing wave(s) you wish to schedule or Click the “Add Migration Wave” button to create a new one.
- Once selected, click “Next”.
- Select the activities to schedule (Prepare, Sync, Cutover) and enter the Start Date and Time for each selected activity. Note that the Prepare activity is available for Premium Integration projects only.
- Click “Next”.
- If the Sync activity was selected, enter the frequency of the Sync jobs. You can enter the frequency in Hours, Days or Weeks.
- Click “Next”.
- If the Sync activity was selected, enter the total number of Syncs that will take place during the scheduled sync jobs. The number of syncs is unlimited, however there is a 100-sync throttling policy. The policy can be adjusted if required, upon a valid request to Support.
- Click “Next”.
- A summary page will open. Review the details, make modifications by clicking the “Back” button.
- Add another schedule for another wave by clicking the “Add Another Schedule” button.
- If satisfied with the summary, click “Looks Good” to save and close the schedule.