About copy options
Previous
Copy options offer more options for the copy process. You can set basic options on the Job Summary page to perform a copy job quickly.
|
|
NOTE: Secure Copy maintains job names and option settings in the SecureCopy.SSD file, which is located in the Secure Copy installation directory. If necessary, you can modify this file using a text editor, such as Notepad. NOTE: After making changes, click Save to save the job. Alternatively, choose File | Save or right-click the job name, and choose Save. |

Setting copy locations
Previous
|
|
NOTE: Secure Copy will transfer data between NTFS/FAT16/FAT32 partitions only (security will not be maintained when copying to a FAT partition). Secure Copy also transfers data from or to an Azure file share. Certain NAS appliance manufacturers have devices that are compatible with Secure Copy. |
To set the copy locations
1 Click Jobs and expand the job.
2 Click Copy Locations.
3 In the Source Folders area, click Browse to locate a path or click Add to type a path.
-OR-
If you have prepared a .TXT or .CSV file of paths, click Import, locate the file, and click Open.
4 If you have a volume shadow copy service installed, select Use volume shadow copy services on local source path to ensure open files are copied. If a file is in use, the copy will continue.
5 In the Target Folders area, click Browse to locate a path or click Add to type a path.
|
|
NOTE: If you type a path that does not exist, you are asked if you want to create it. |
6 By default, Secure Copy creates a folder structure on the target that mimics the folder structure in the source. To ignore the source folder structure, clear the Create initial source folder under target folder check box.
|
|
IMPORTANT: If the Synchronize target contents with source check box is selected on the Synchronization page, and you copy from multiple source paths, only those files in the last source file in the list are synchronized with the target. All other files in the target are deleted. See Setting synchronization. |
Setting synchronization
Previous
There are several options you can choose to determine how the data is copied from the source to the target.
To set synchronization
1 Click Jobs, and expand the job.
2 Click Synchronization.
3 Set the options to determine how the data is copied.
Table 5. Copy options
|
Option |
Description |
|
Copy only changed source files to target |
If the source and target have files with the same name, Secure Copy compares the file size and time/date stamp. If the file size is different or the target file is older than the source file, Secure Copy overwrites the target with the source. The target is not purged; files and folders that are in the target, but not in the source, remain in the target after the copy process completes. If the target path is empty, all files and folders are copied from the source to the target. |
|
Overwrite target files even if they are newer than the source |
Select to overwrite the target file even if the target file is newer than the changed source file. |
|
Copy all files from source to target |
If the source and target have files and folders with the same name, Secure Copy overwrites the target with the source. The target is not purged; files and folders that are in the target, but not in the source, remain in the target after the copy process completes. If the target path is empty, all files and folders are copied from the source to the target. |
Table 6. Purge options
|
Option |
Description |
|
Synchronize target contents with source |
Select to purge files during the copy process. For specific examples on using this option, see Synchronizing single source path to single target path. NOTE: When purging files during the synchronization process, the source and target machines and paths as defined by the job must be compared, and then adjusted or purged accordingly. Because the purge requires the comparison of the source and target directories and files, the process could extend the duration of the data migration. |
|
Purge orphaned files/folders on the target |
Select to make all files and folders in the target identical to those in the source. This option deletes files or folders in the target that also do not exist in the source. IMPORTANT: Only select this option with a single source path and a single target. NOTE: To move the deleted files or folders to the Recycle Bin, select the Delete files or folders to the Recycle Bin check box. IMPORTANT: If the Create initial source folder under target folder check box on the Copy Locations page is not selected, the purge does not occur. See Setting copy locations. If Source is File share, Create source root share folder on target check box on File shares page is not selected, the purge does not occur. |
|
Purge orphaned files/folders in SUBFOLDERS of the target |
Select to make all subfolders in the target identical to subfolders with the same name in the source. This option deletes files and folders in the target subfolders that also do not exist in subfolders with the same name in the source. IMPORTANT: Only select this option with multiple source paths if you are certain that none of the source paths have subfolders with duplicate names. NOTE: To move the deleted files or folders to the Recycle Bin, select the Delete files or folders to the Recycle Bin check box. |
|
Delete files or folders to the Recycle Bin |
Select to move the deleted target files and folders to the Recycle Bin. NOTE: Only target files and folders on the local computer can be moved to the Recycle Bin. |
|
Filters |
Click to include or exclude specified files or folders from the purge. See Applying filters. |
Table 7. File attributes options
|
Option |
Description |
|
Synchronize archive bit on source and target |
Select to set the archive bit on the target folder or file to be the same as the source. |
|
Clear archive bit on source after copying |
Select to clear the archive bit on the source file after it is copied. Otherwise the archive bit will remain untouched. |
|
Change Read Only attribute on copied files |
Select to set or clear the Read Only attribute on all copied files. |
Table 8. Synchronization options
|
Option |
Description |
|
Reset last accessed date on source files |
Copying files and permissions causes the Last Accessed Date to be set to the current date. Select this option to change the Last Accessed Date to the date last accessed before the copy, which is useful if you want to later audit your files to see if they need to be archived or deleted. |
|
Synchronize Last Accessed Date and Created Date on target files with source |
By default, the Last Accessed Date and the Created Date on the target files will be identical to the source. NOTE: If you uncheck this option, the Last Accessed Date and the Created Date becomes the date the copy occurred. |
|
Synchronize Last Accessed Date and Modified Date on target folder with source |
By default, the Last Accessed Date and the Modified Date on the target folder will be identical to the source. NOTE: If you uncheck this option, the Last Accessed Date and the Modified Date becomes the date the copy occurred. |
Table 9. Permissions options
|
Option |
Description |
|
Don't copy permissions (copy data only) |
Copying the permissions on data is not always necessary for every copy job. A user may just want to migrate data from one drive to another or from one server to another. |
|
Always copy permissions, even on skipped files |
Copies the permissions of source files and folders from the source to the target, even if the files and folders are exactly the same. This option is helpful in a situation where the permissions were changed on the source, but the files were not modified. The copy process skips the files because of the file size and time/date stamp are identical. If this option is selected, the permissions are copied even if the file is not. |
|
Filters |
Specify selected groups or users to exclude or include in the copy process for permissions. To create a filter 1. Click Filters. 2. Click Add. 3. Select the groups or users to include or exclude. 4. Select the appropriate option: · DO NOT copy permissions for selected groups/users · Copy permission ONLY for selected groups/users NOTE: To save the filter to a .csv file, click Save. You can load the saved filter file at a later time by clicking Load. |
|
Override security on access denied (you must be an administrator) |
Allows an administrator to perform a copy without changing any of the permissions or ownership for the objects. In a traditional copy process, a user must have permissions on a file or folder to copy it. If the user is denied access, they must first take ownership of the object, and then set the appropriate permissions before copying it. Imagine the nightmare scenario of migrating 10,000 user home and profile directories from one server to another. These directories would take forever to repermission and copy. |
|
Block inheritance for root folder(s) |
Select to block inheritance on root folders. Blocking inheritance at the root of your target folder is designed to prevent permission changes made above the root of your target from overwriting any permission structures you migrate from your source. NOTE: This check box is unavailable if the Force inheritance for all target folder(s) check box is selected. |
|
Force inheritance for all target folder(s) |
Select to force all the copied folders to keep their original permissions and to inherit the permissions from the target folder and the parent folder. |
Synchronizing single source path to single target path
Previous
When synchronizing the contents of the target folder with the source folder, you can select two different methods of purging orphaned files/folders in the target. These two options on the Synchronization page work in conjunction with the Create initial source folder under target folder check box on the Copy Locations page. See Setting synchronization and Setting copy locations.
The examples included in this section illustrate how these three options work together.
Single source example 1
Selected Options


Paths
|
Source Path |
Target Path |
Target Result |
|
C:\SOURCE\ |
\\SRV1\C$\TARGET\ |
\\SRV1\C$\TARGET\SOURCE\ |
Result
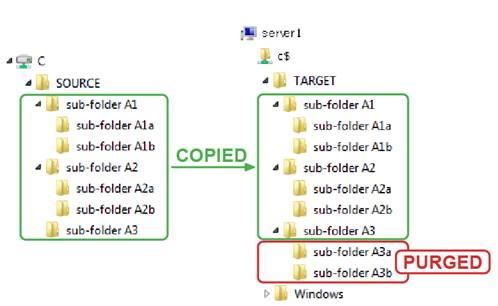
Because the Create initial source folder under target folder check box is selected, the source folder structure is duplicated under the target folder. When the copy process is complete:
● Files and folders in the target folder (\\SRV1\C$\TARGET\SOURCE\) that do not also exist in the source folder (C:\SOURCE\) are purged from the target folder.
Figure 1. Orphaned folders and files on the target are purged
Single source example 2
Selected Options
Paths
|
Source Path |
Target Path |
Target Result |
|
C:\SOURCE\ |
\\SRV1\C$\TARGET\ |
\\SRV1\C$\TARGET\SOURCE\ |
Result
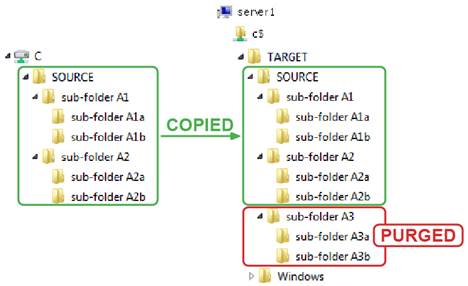
Because the Create initial source folder under target folder check box is selected, the source folder structure is duplicated under the target folder. When the copy process is complete:
● Files and folders that do not exist in the source folder (C:\SOURCE\) are not purged from the target folder (\\SRV1\C$\TARGET\SOURCE\).
● Files and folders that do not exist in the first subfolders of the source folder (C:\SOURCE\subfolder A3\) and down are purged from the corresponding target folder (\\SRV1\C$\TARGET\SOURCE\sub-folder A3\).
Figure 2. Orphaned subfolders and files on the target are purged
Single source example 3
Selected Options

Paths
|
Source Path |
Target Path |
Target Result |
|
C:\SOURCE\ |
\\SRV1\C$\ |
\\SRV1\C$\ |
Result
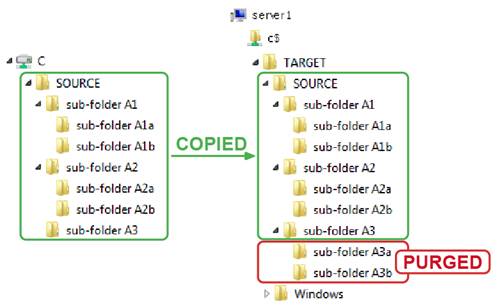
Because the Create initial source folder under target folder check box is not selected, the source folder structure is not duplicated under the target path. When the copy process is complete:
● All files and folders inside the source folder (C:\SOURCE\) are copied to the target folder (\\SVR1\C$\).
● For safety, orphaned files and folders in this scenario are not purged because the system drive would be purged of all other data.
Figure 3. Orphaned folders and files on the target are not purged
Single source example 4
Selected Options
Paths
|
Source Path |
Target Path |
Target Result |
|
C:\SOURCE\ |
\\SRV1\C$\TARGET\ |
\\SRV1\C$\TARGET\ |
Result
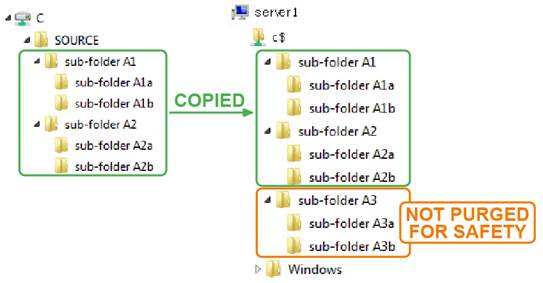
Because the Create initial source folder under target folder check box is not selected, the source parent folder is not duplicated under the target path, but the source subfolders are duplicated. When the copy process is complete:
● All files and folders inside the source folder (C:\SOURCE\) are copied to the target folder (\\SRV1\C$\TARGET\).
● Files and folders that exist in the root of the source folder (C:\SOURCE\) are not purged from the target folder (\\SRV1\C$\TARGET\).
● Files and folders that do not exist in the first subfolders of the source folder (C:\SOURCE\sub-folder A3\) and down are purged from the corresponding target folder (\\SVR1\C$\TARGET\sub-folder A3).
Figure 4. Orphaned subfolders and files on the target are purged