|
2 |
Log in as root or sudo to root. |
|
4 |
|
6 |
|
NOTE: Most prompts revealed during the installation process have a default selection. These options are displayed at the end of each prompt, enclosed in brackets ([ ]). To accept a default, press Enter. |
|
• |
y: Indicates Yes. To accept the agreement, type y, and press Enter. The installation process continues without displaying the license agreement. |
|
• |
|
• |
d: Indicates Display. This option is the default. To view the agreement, type d, and press Enter. The license agreement is displayed in sections with a percentage value shown at the bottom of the screen. This value accounts for how much of the agreement has been displayed. Each time you press Enter, more of the agreement is displayed and this value increases. Continuously holding down the Enter key will scroll through the entire agreement, and end with the next prompt. |
|
You must specify different physical paths for the Staging Path and Store Path. |
|
12 |
|
• |
|
• |
If you entered y, enter the applicable user name and password when the corresponding prompts are displayed, making sure to press Enter after each entry. The installer verifies that the information you enter is correct. |
|
NOTE: For the user name in the WebDAV credentials, NetVault SmartDisk currently supports the use of any ASCII characters except the quotation mark ("), comma (,), and colon (:). The are no restrictions for the corresponding password. |
|
13 |
Depending on whether you are installing NetVault SmartDisk on a local machine or a domain client, review the applicable notes before proceeding to Completing installation on a Windows local or domain client.
|
• |
After you have specified the controller, add the intended NetVault SmartDisk machine, NetVault SmartDisk_client, to the domain (DomainSample). To add the client, you can log in to the client, NetVault SmartDisk_Client, and select My Computer > Properties > Computer Name > Change > Member of Domain > DomainSample. |
|
• |
|
• |
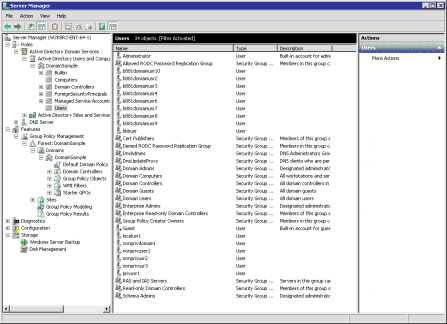
After installation is finished, verify that the new domain user has been created. To do so, log in to the Windows Domain Controller, and access Server Manager > Roles > Active Directory Domain Services > Active Directory Users and Computers > DomainSample > Users. |
|
• |
The user context — domain or not — in which remote volumes are added for the Staging Path and Store Path is not related to the user context — local or domain — of the main NetVault SmartDisk installation. Therefore, if you must use a domain-user context for the remote Staging Path and Store Path volumes, use the standard format to complete the Username field. That is, use the <domainName>\<userName> format regardless of whether the <domainName> or <userName> is the same as what you specify elsewhere in the installation process. |
|
• |
