The Preferences dialog presents several options that are used to configure the Manager’s settings. Select Preferences... from the File menu on the Manager's menu bar.
This setting tells Desktop Authority to use a specific domain controller in order to enumerate Group and User information. Click Edit to modify the Domain Controller setting.
A Domain Controller may be selected by clicking Browse. Remove the selected server from the field to allow the network to decide which domain controller to query for necessary resources.
Click Save to confirm the updated setting. Click Cancel to abandon the changes.
Click Browse to import a custom INI file that will add new values to drop lists in the Alerts, Logging, MS Office, Common Folder Redirection, Security Policies, Service Packs, Folder Redirection and Shortcuts objects.
Off-Network Support (ONS) allows a computer previously provisioned with Desktop Authority to continue receiving configuration updates while off-network. A computer that is considered to be off-network may have an Internet connection but the company network is unreachable.
To use this feature, Off-Network Support must be configured in the Desktop Authority Manager.
Off-Network Support is accomplished by using Desktop Authority's Replication capabilities. Configuration and necessary files are replicated to a configured Internet cloud service; currently Desktop Authority supports Amazon Web Services (AWS) and Microsoft Azure.
|
|
IMPORTANT: Prior to configuring ONS (Off-Network Support) within the Desktop Authority Console, you will first need to access the web portal for your intended cloud storage provider (AWS or Azure) to create the appropriate storage container(s). Visit the video help link on the ONS configuration page to access a Knowledge base article containing information on the necessary pre-configuration steps for both AWS and Azure usage. |
|
|
TIP: To prevent any unwanted dialogs or errors when off-network, the special SLBYPASS option file should be used. To configure this option refer to Special Option Files. |
Click Edit to manually configure or manage Off-Network support settings.
Click Check Connection to confirm that Desktop Authority can connect to the selected Off Network Storage Provider.
Select this Off-Network support box to enable and configure Off-Network support.
Select an Off-Network provider from the drop list. Currently Desktop Authority supports Amazon Web Services (AWS) and Microsoft Azure.
Click Auto Configure AWS to allow Desktop Authority to automatically configure the Off-Network support configurations.
A Bucket is similar to a folder. This will be where the Desktop Authority files will be stored.
Select the AWS geographic area.
Access keys are assigned to your AWS account to allow programs to programmatically access your account. Amazon allows a maximum of 2 Active keys and recommends that they be changed every 90 days.
Access keys are assigned to your AWS account to allow programs to programmatically access your account. Amazon allows a maximum of 2 Active keys and recommends that they be changed every 90 days.
Using either the Autocreate or manual configuration options will require a copy/paste of the AccessKeyId and SecretAccessKeyId. The main difference in the operations is the Bucket.
Autocreate will create a dedicated bucket for the Desktop Authority files. After the bucket is created, you MUST log in to AWS and define a region for it.
When manually configuring Off-Network Support, a dedicated bucket must be created in AWS, with a region applied to it. It is recommended that this bucket be dedicated to Desktop Authority.
|
|
|
The name of the storage folder within MS Azure where the replicated Desktop Authority configuration information will are stored.
|
|
NOTE: The configured share will automatically be created prior to replication, if it doesn't already exist. |
The server-side connection string to connect to MS Azure storage. This connection should have Read/Write/List/Create/Delete access to the storage and is used by the DA Server Manager (server side).
The client-side connection string to connect to MS Azure storage. This connection should have Read/Write/Create access to the storage and is used by the DA Client (client side). This string can be the same as the connection string for the Manager Console.
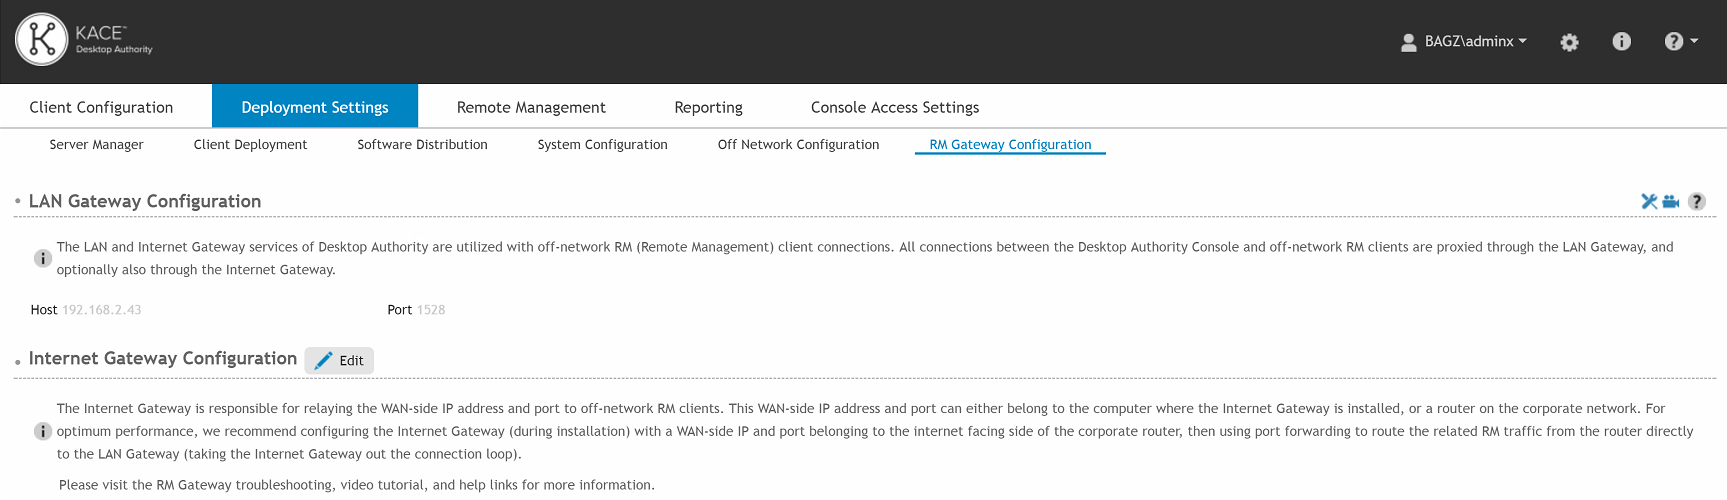
The RM Gateway Configuration tab is used to configure the Off-Network Remote Management (ONRM) services which allow Desktop Authority to remotely control online computers that are currently disconnected from the corporate network. This feature extends the capabilities of the Desktop Authority Remote Management feature to support connecting to computers across networks.
|
|
NOTE: Desktop Authority’s Off-Network Support (ONS) feature, used to push configuration updates to computers while they are remote and disconnected from the corporate network, is not required for the Off-Network Remote Management feature to work. However, having Off-Network Support enabled provides the added benefit of being able to deploy the Remote Management client (ExpertAssist) to both on and off-network computers that are joined to the corporate domain. |
The LAN Gateway is used to transfer data between the Desktop Authority Console and Off-Network clients. The Host IP and Port specified here are read-only. They are the IP and Port that were specified during the installation of this feature through the Desktop Authority Installer or the DA Setup tool.
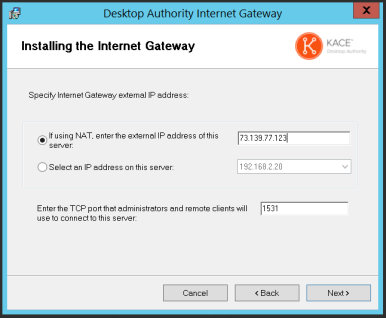
The Internet Gateway is a required component of the ONRM (Off-Network Remote Management) feature and is responsible for storing the external IP address and the port number used by remote RM clients while off-network. Optionally, the Internet Gateway can be installed on a machine with a public address and act as a proxy between the LAN Gateway and connections from external clients. However, for optimal performance, we strongly recommend the Internet Gateway be configured with the public/external IP address and Port of the network’s router. From there, Port Forwarding can be used to route the associated traffic from RM clients directly to the LAN Gateway service (by-passing the Internet Gateway).

To configure the Internet Gateway click the Edit button. Enter the requested internal/private Host IP and listening Port. If you plan on installing the Internet Gateway on your Desktop Authority server, then just enter the IP for your Desktop Authority server and choose any open port.
The RM Gateway Configuration tab will only be visible in the Desktop Authority (DA) console if the Off-Network Remote Management feature was either enabled during the installation of Desktop Authority, or post-installation via the Desktop Authority Setup Tool.
If the RM Gateway is not visible, please go to the ONRM tab of the DA Setup Tool and enable the feature.
In order to configure the Off-Network Remote Management feature, the Internet Gateway application needs to be downloaded and installed.
From the Internet Gateway section of RM Gateway Configuration tab, click the Edit button then enter the requested internal/private Host IP and listening Port.

If you plan on installing the Internet Gateway on your Desktop Authority server, then just enter the IP for your Desktop Authority server and choose any open port.
Once the Internet Gateway’s internally accessible IP/Port is configured, click the Save & Download button. You will be directed to download and install the Gateway via an installation wizard.
The Internet Gateway install will be downloaded to your machine. If you will be installing it on another computer simply copy this file over to the other computer. Otherwise, you can run the installation right away.
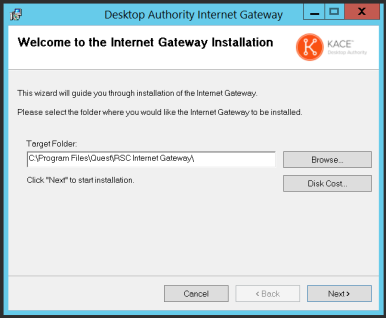
Click Next to continue.
If the Internet Gateway was configured using the public address of a router, then the appropriate port forwarding must be created within the router’s configuration in order for the Off-Network Remote Management feature to work properly. Specifically, any traffic being received on the configured Gateway Access Point Port (selected during the installation of the Internet Gateway) must be forwarded to the Host IP address and port of the LAN Gateway.


In the above example, 73.139.77.204 is the public IP address of the router and off-network RM clients will attempt to connect using port 1531 on that IP address. Therefore port 1531 will need to be forward to 192.168.2.43:1528 (LAN Gateway) within this router’s configuration.
The Host IP address and Port shown here is the information about the server where the Internet Gateway is installed.
The Host IP address and Port shown here is the information used by Off-Network clients to establish a connection from an outside network. This is the IP address and port used when installing the Internet Gateway.
|
|
NOTE: When using the Off-Network Remote Management (ONRM) feature it is highly recommended that you exclude all Quest installation folders from real-time AV/AM (Anti-virus/Anti-Malware) scans. Various AV/AM products have been known to drastically slow down and sometimes completely stop Desktop Authority processes (also potentially affecting the ExpertAssist remote management module). |
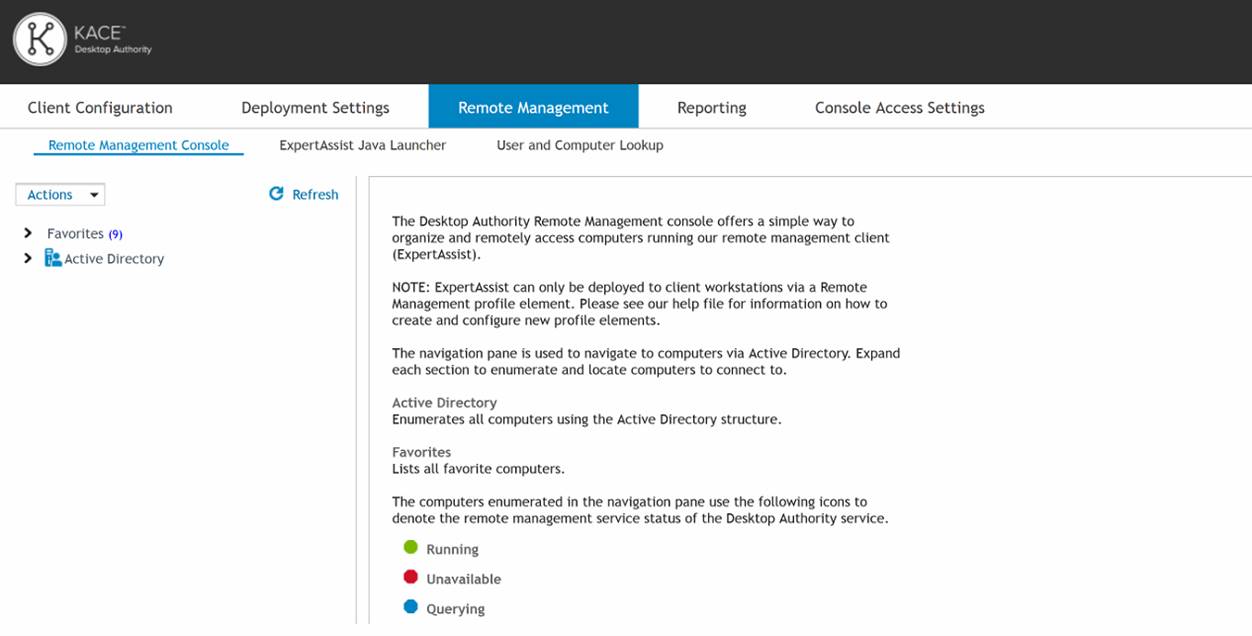
Desktop Authority Remote Management offers a simple way to remotely access multiple computers on the network for the purpose of remotely controlling and organizing computers running the Remote Management client (ExpertAssist).
Select this tab to remotely manage a computer running the Remote Management client.
Use the left side navigation pane to navigate through the Active Directory or Favorites and find the computer you will be connecting with. The right view pane provides the ability to establish a remote connection with a computer running the Remote Management client.
Figure 33: Navigation pane
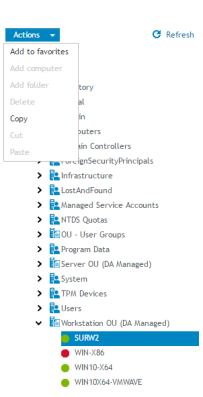
The navigation pane displays a tree enabling a computer to be selected from Active Directory.
Once a computer is selected in the navigation pane, the Add To Favorites selection in the Favorites drop list is enabled. Click Add To Favorites to add the selected computer to the Favorites list. You can also add a computer to Favorites by utilizing the available drag/drop or copy/paste (right menu options) functionality. Use your Favorites for computers that are commonly accessed for Remote Management. Add to Favorites can also be selected by right-clicking on the computer in the navigation pane.
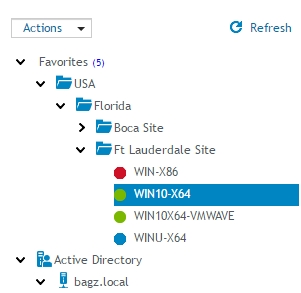
Figure 34: Manage Favorite computers
The favorites list displays computers that have been added to the favorites list from the Active Directory tree. The computers in the Favorites list lets you organize and quickly access the most frequently used computers. "Favorite" computers can be organized into folders by adding, moving, or deleting them.
Figure 35: Favorites list
The computers enumerated in the navigation pane use the following icons to denote the Remote Management service status.
Table 3: navigation pane icons
|
|
Denotes the computer is running the Remote Management service. |
|
|
Denotes the computer is being queried regarding the status of the Remote Management service. |
 |
Denotes the status of the Remote Management service on that computer cannot be determined. |
|
|
|
Once the computer is located, right-click on the computer name to access the available actions on the view pane.
Figure 36: Available actions for computer
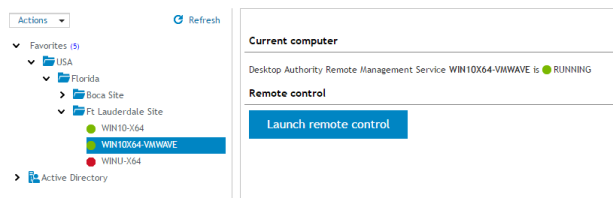
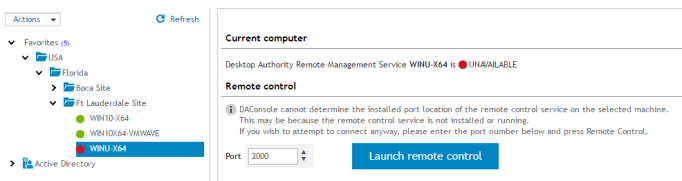
The Current computer section gives the status of the Remote Management service on the computer selected in the navigation pane.
Once the Remote Management service is deployed to the client (via a Remote Management profile element), a computer status should be visible. You can then launch a remote control session using the Launch remote control button. When clicked, a new browser window will open with a logon to Expert Assist, the Remote Management client software.
|
|
*Note: This feature is not a standard part of Desktop Authority Essentials. To obtain this feature, Desktop Authority Essentials must be upgraded to the full version of Desktop Authority. |
The Java Launcher provides an execution container for ExpertAssist's Java dependent functionality. Additionally, it is also responsible for automatically downloading and installing the OpenJDK version of Java if no supported Java version can be found on the host computer. Currently, both the Oracle JDK and OpenJDK version of Java are supported.
The Java Launcher must first be downloaded and installed in order to utilize any of the Java dependent features (e.g. Remove Control) of an ExpertAssist connection. Use the available Download link to download and install it.
Select this tab to quickly find a user or a computer to remotely manage. This tab provides shortcuts to the computer for easy access to remote management functionality.
The ExpertAssist Remote Management client MUST already be deployed (via a Remote Management element) to all computers being accessed via the User and Computer Lookup tab. Additionally, both User Data Collection (with "Collection logon and logoff session information" enabled) and Computer Data Collection (with Hardware, Software and Startup/Shutdown collection options enabled) must already be configured on these computers for the reporting component of the User & Computer Lookup feature to be fully functional.
To locate a recent session on a particular computer, enter the Computer Name and/or Username and click the Lookup button. Wildcards may also be used in the search field for either Computer Name or Username.
Examples of Search terms (Computer Name):
Examples of Search terms (Username):
To locate a computer or user using the Active Directory tree, click the Browse link under the entry field for Computer Name or Username.
The computers and/or users found via the lookup are displayed in the list below the search.
Shortcuts are provided for the following functionality:
By default, most User and Computer Lookup shortcuts require one login per machine (per session) to the ExpertAssist client running on the remote computer. However, for browsers that support automatic NTLM authentication for local sites, it is possible to avoid the need to enter credentials when using this feature.
To do this you first need to enable NTLM for Remote Management (DA Setup Tool -> Remote Mgmt -> EA Connection Configuration -> Use the parameters in the URL -> Parameter string = /ntlm) and then configure your DA Console browser for automatic NTLM authentication. For example, in Firefox, the about:config setting network.automatic-ntlm-auth.allow-non-fqdn=True can be used to enable automatic NTLM authentication for all internal sites.


