
Add Topology Types
Use the XML syntax when defining a topology type. For example:
|
1 |
|
2 |
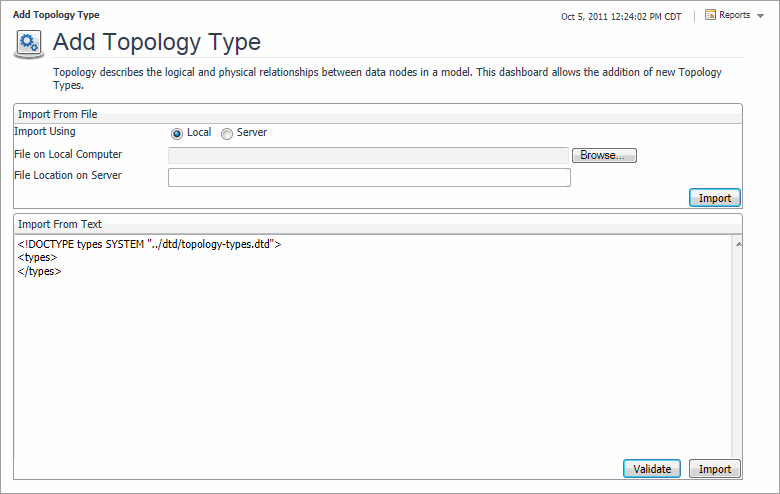
To add one or more topology types that are defined in an XML file accessible by your local machine, complete one of the following steps in the Import From File area of the Add Topology Type dashboard. |
|
• |
Ensure that the File on Local Computer option is selected. Then click Browse, and navigate to the topology file in the file browser that appears. |
|
• |
Select the File on Local Computer option, and in the box to the right, type the absolute path and name of the topology file |
|
a |
Select the Location on Server. |
|
b |
In the File Location on Server box, type the path and name of the topology file. Use either an absolute path or a path relative to the installation directory of the Foglight Management Server. |
|
4 |
To define one or more topology types using the text editor in the Add Topology Type dashboard, in the Import From Text area, type the topology definition that you want to add between the <types> and </types> tags. |
|
5 |
Close Click Import Topology. |
Online-Only Topics
Manage Host Aliasing Rules
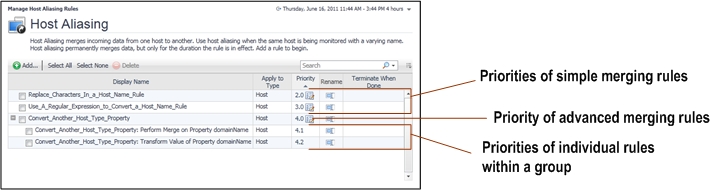
Simple merging rules can consist of a single rule. Advanced merging rules consist of a group of individual rules that are executed in a pre-defined order. It is possible to change the group priority, but not the priority of an indi vidual rule within the group. For example, an advanced rule has the group priority of 4.0, and it consists of two individual rules, with their priorities set to 4.1 and 4.2 by default. While the priority of the rules within the group cannot be changed, increasing the group priority to 3.0 automatically increases the priority of the rules it contains to 3.1 and 3.2.
|
1 |
On the navigation panel, under Dashboards, click Administration > Tooling > Manage Host Aliasing Rules. |
|
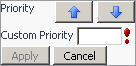
IMPORTANT: You can only edit the priority of a simple merging rule or an advanced merging rule consisting of individual rules. The priorities of individual rules with a group (advanced merging rules) are assigned automatically and as such cannot be changed. A priority action icon appears on the right of an editable priority |
|
3 |
In that row, click the Priority column. |
|
• |
|
IMPORTANT: This value must be a valid integer number. |
|
1 |
On the navigation panel, under Dashboards, click Administration > Tooling > Manage Host Aliasing Rules. |
|
3 |
|
1 |
On the navigation panel, under Dashboards, click Administration > Tooling > Manage Host Aliasing Rules. |
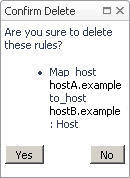
The merging process is in effect only while the merging rules exist and are active while the data consolidation resulted from a merging rule is permanent. For example, creating a rule that merges a source host with a target host results in the source host’s data being consolidated with the target host’s data, which is not only reflected in the data collection model, but also in any dashboards that display host-related data such as the Agents dashboard. When the rule is deleted, the data collected from the source host before the rule deletion still appears as collected by the target host, while the data collected after the deletion is stored under each individual host. For more information on how to delete rules, see Deleting host aliasing rules.
Based on their complexity, there are two types of host aliasing rules:
|
1 |
On the navigation panel, under Dashboards, click Administration > Tooling > Manage Host Aliasing Rules. |
|
3 |
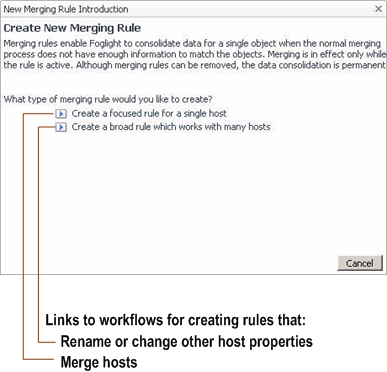
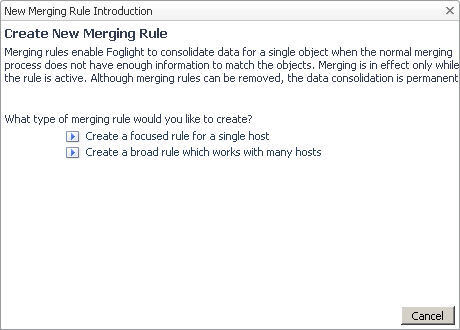
Choose the type of the rule that you want to create by clicking one of the following options in the New Merging Rule Introduction dialog box: |
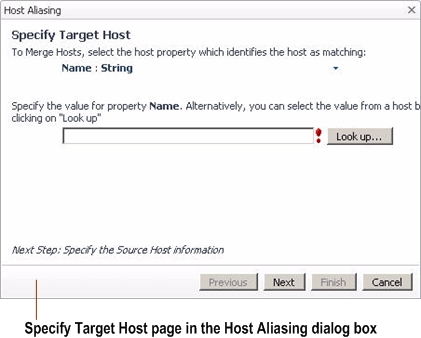
Selecting the Create a focused rule for a single host option in the New Merging Rule Introduction dialog box invokes the Specify Target Host workflow for creating a host merging rule.
|
a |
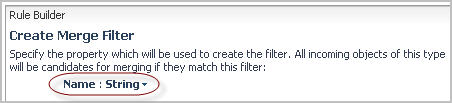
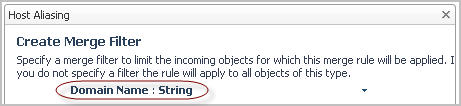
Ensure that the property you want to use for matching the host is selected. By default, in the Host Aliasing dialog box, the name property appears selected. |


|
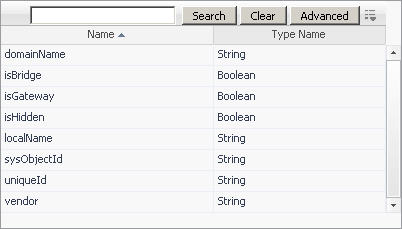
IMPORTANT: The list that appears shows only a subset of the entire property set for the selected object type. This is because property matching filters can only reference certain types of properties such as String or Boolean properties. To see a full set of properties that exist in the Host type, view the Schema Browser dashboard; for more information about this dashboard, see the Foglight User Guide. |
|
c |
|
a |
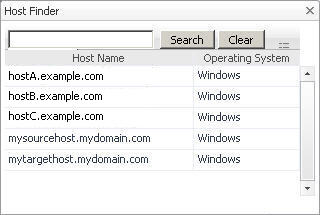
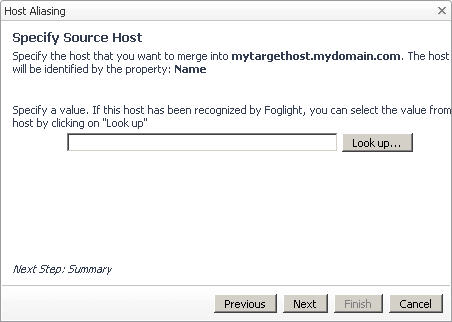
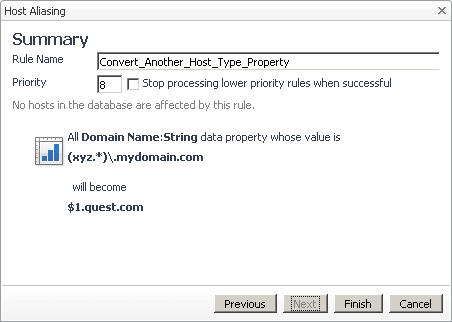
In the Host Aliasing dialog box, on the Specify Source Host page, type the value that you want to search for in the host objects that exist in the data collection model. For example, to look for a host object whose name is mysourcehost.mydomain.com, with the name property selected (Name: String, see Step 1, sub-Step a), type mysourcehost.mydomain.com into the box. |
|
b |
|
c |
|
d |
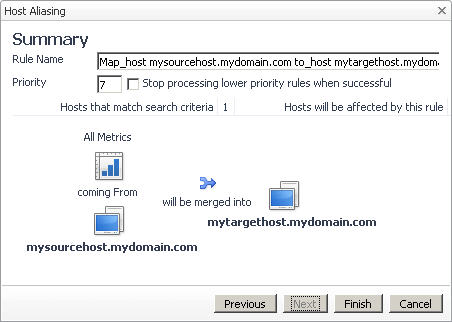
In the Summary page, review the overview of the merge process. |
|
e |
|
f |
Click OK to close the message box. |
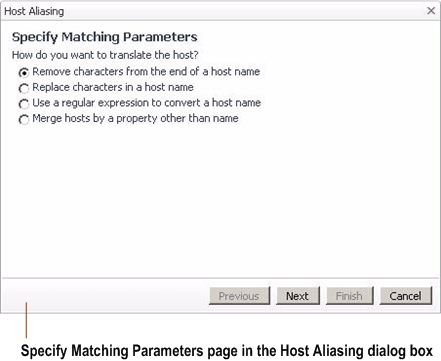
Selecting the option Create a broad rule which works with many hosts in the New Merging Rule Introduction dialog box invokes the Specify Matching Parameters workflow for creating a rule that changes the names or other host properties. The Host Aliasing dialog box includes several options that simplify the process of renaming host properties.
From there, specify the current and target names, and review the summary of the merge process.
|
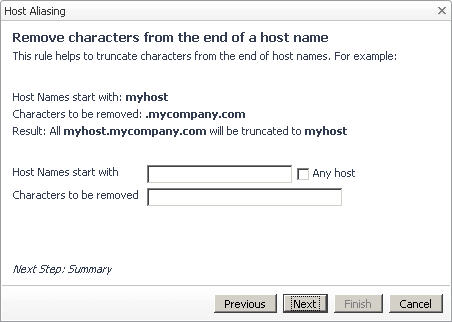
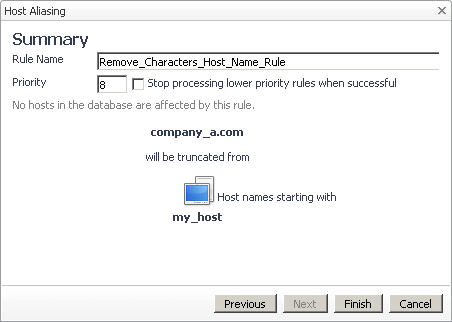
1 |
In the Specify Matching Parameters page of the Host Aliasing dialog box, select the option Remove characters from the end of a host name, followed by clicking Next. |
|
TIP: To use a different type of matching parameter, click Previous to return to the Specify Matching Parameters page. |
|
CAUTION: Host aliasing rules include a system-level rule, adjustHostName, that automatically restores host names if the entire domain name is removed. This rule is hidden and as such does not appear in the browser interface. The rule includes a default priority of one '1', while newly created rules have a default priority of two '2' or lower, causing adjustHostName to override the removal of domain names. For example, if you have a host called example.mydomain.com, and want to remove the domain name, .mydomain.com from that host name, adjustHostName reverts the removal of the domain name. To successfully remove the entire domain name from the host name, you must prevent adjustHostName from executing. This can be done by selecting the Stop processing lower priority rules when successful option. |
|
TIP: To use a different replacement text or to select different hosts, click Previous to return to the Remove Characters from the End of a Host Name page. |
|
4 |
|
5 |
Click Ok to close the message box. |
|
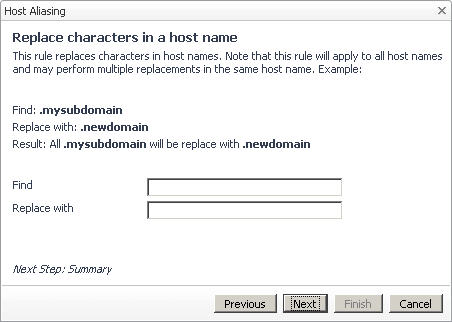
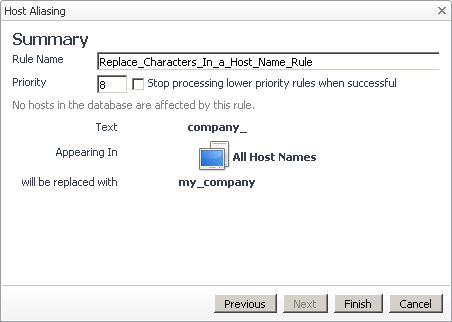
1 |
In the Specify Matching Parameters page of the Host Aliasing dialog box, select the option Replace characters in a host name, followed by clicking Next. |
|
TIP: To use a different type of matching parameter, click Previous to return to the Specify Matching Parameters page. |
|
TIP: To use a different type of matching parameter, click Previous to return to the Specify Matching Parameters page. |
|
4 |
|
5 |
Click Ok to close the message box. |
|
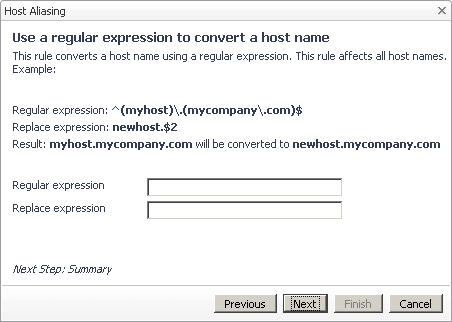
1 |
In the Specify Matching Parameters page of the Host Aliasing dialog box, select the option Use a regular expression to convert a host name, followed by clicking Next. |
|
TIP: To use a different type of matching parameter, click Previous to return to the Specify Matching Parameters page. |

|
TIP: To use a different type of matching parameter, click Previous to return to the Specify Matching Parameters page. |
|
4 |
|
5 |
Click Ok to close the message box. |
|
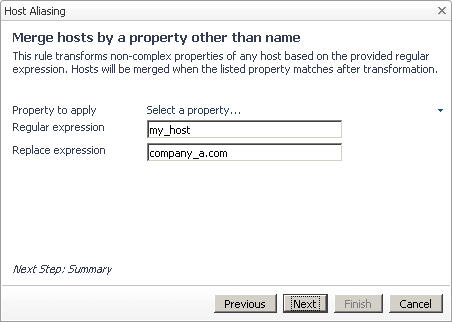
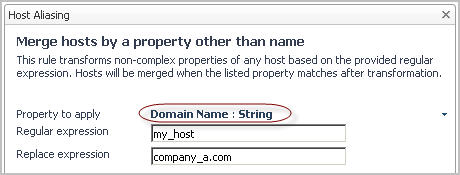
1 |
In the Specify Matching Parameters page of the Host Aliasing dialog box, select the option Merge hosts by a property other than name, followed by clicking Next. |
|
TIP: To use a different type of matching parameters, click Previous to return to the Specify Matching Parameters page. |
|
a |
|
IMPORTANT: The list that appears shows only a subset of the entire property set for the host object. This is because property matching filters can only reference certain types of properties such as String or Boolean properties. To see a full set of properties that are exist in the Host type, view the Schema Browser dashboard; for more information about this dashboard, see the Foglight User Guide. |
|
5 |
|
6 |
Click Ok to close the message box. |
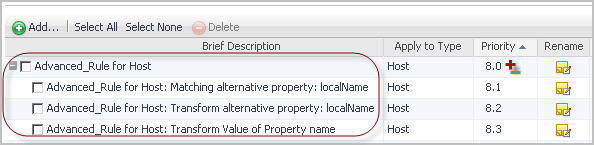
The range and type of simple rules in an advanced rule depends on the nature and complexity of the advanced rule. Each simple rule is assigned a priority number that illustrates the order in which they are executed. These priorities cannot be changed for the simple rules, however, changing the advanced rule priority affects each individual rule. For more information abut changing rule priorities, see Changing the priorities of host aliasing rules .
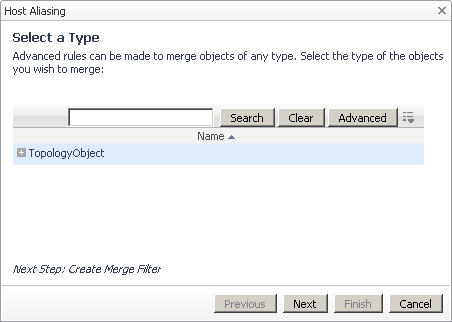
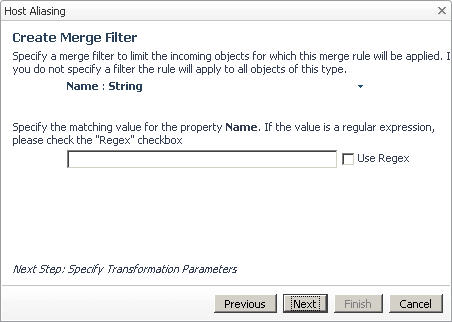
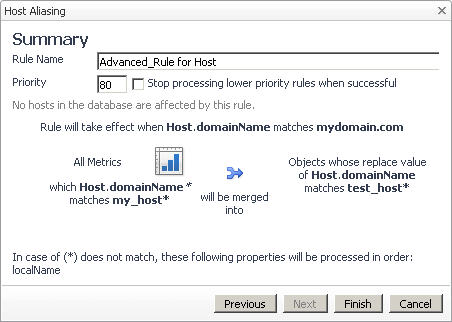
Selecting the option Create an Advanced Rule in the New Merging Rule Introduction dialog box invokes the Select a Type workflow for creating a rule that merges two or more topology objects.
|
a |
In the Host Aliasing dialog box, on the Select a Type page, use the TopologyObject node to select the desired topology type. |
|
a |
Ensure that the property you want to use for matching the objects is selected. By default, in the Host Aliasing dialog box, the name property is selected. |
|
c |
|
d |
|
a |
|
b |
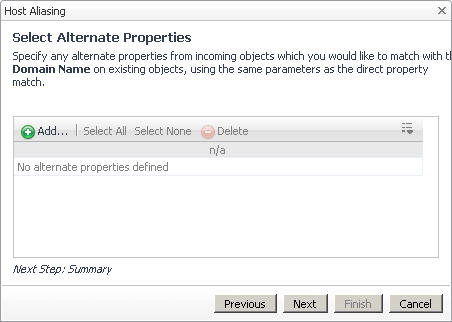
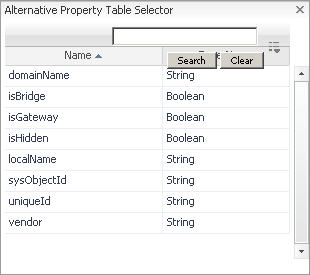
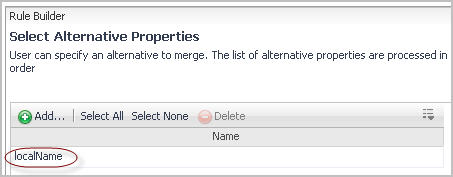
In the Alternative Property Table Selector dialog box, select the row containing the property that you want to add as an alternative property. |
|
c |
|
5 |
|
6 |
Click Ok to close the message box. |
Build Script Agents
There are two types of scripts:
|
• |
Type 1 scripts. The Foglight collector calls these scripts every time they need to collect data. In Type 1 scripts, the collector executes the script, then stands by for a time period specified in the agent properties. When the standby period ends, the collector becomes active and reruns the script. Type 1 scripts are useful for collecting data that does not require calculations from multiple collection periods. |
|
• |
Type 2 scripts. These scripts control their own collection frequency cycle. In Type 2 scripts, the Foglight collector executes the script and remains open. The script controls the standby period instead of the agent properties. Type 2 scripts perform data calculations before the data enters the database and measure changes between collection periods. |
The following is an example of a Type I script:
|
Sample Type 1 scripts are also available from the Foglight Management Server installation directory: |
The following is an example of a Type 2 script:
|
NOTE: A Windows version of the Type 2 script is also available from the Foglight Management Server installation directory: <foglight_home>/scripts/agent/Type2_NT_Script.bat |
When writing a script to create a custom agent, use the following syntax:
A Canonical Data Transformation (CDT) dynamically converts the output data into the appropriate format (such as topology types and observations) that exist in the collection model. This mechanism dictates the syntax of the line of the code that specifies the field data immediately following the START_SAMPLE_PERIOD command, as shown in the above syntax block:
|
Sends the current collection sample to the database and completes the transaction. | |
|
Contains the name of the field under which to store the observation. | |
|
Indicates that the property should be treated as an identity. | |
|
LOG message |
Sends a status message to Foglight Agent Manager logs with message specifying the message. |
|
LOG severity message |
Sends an error message to Foglight Agent Manager logs with message specifying the message and severity set to one of the following values: FATAL, WARNING, or CRITICAL. |
|
Indicates that the specified topology type is an observation (such as StringObservation). | |
|
NOTE: In NT operating systems, use the rapssleep command, as those systems do not have a sleep facility: rapssleep %sample_freq% | |
|
Opens the table with table_name specifying the name of the table. If an identity field is declared, append it to the table name. | |
Custom script agents interact with the Agent Manager through the Foglight collector executable. Script-based custom agents output data to standard output (STDOUT). The Foglight collector reads this data and retransmits it to the Agent Manager.
Script agents work by running a prescribed script and processing the output. The actual agent is called JCollector. This agent runs the script, parses the output, and sends the resulting data table samples to Foglight.
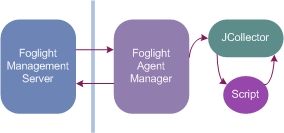
There are two ways to make a script run:
|
• |
Let JCollector call the script on the sampling interval (Type 1 scripts). |
|
• |
Allow JCollector to call the script once (Type 2 scripts). The script controls the sampling interval. |
Type 2 scripts are more complex because the script author must handle looping and honour the sampling interval from the server. This might be necessary if the length of the loop is important for doing things like calculating rates. For the purposes of getting started, use Type 1. This will minimize the complexity. Switch to Type 2 once you have a reason for hand-coding the loop. For more details about Type 1 and Type 2 scripts, see Script types.
As mentioned before, JCollector runs the script and parses the output sent to STDOUT. It then sends that output back to the Management Server in the form of tables. There is a special Canonical Data Transformation (CDT) that interprets the data that is sent back. That CDT knows how to deal with the table elements, mostly by parsing the field/column names.
The standard model for a script agent is an agent containment model. An agent containment model means that the tables you send from your script agent are contained in an instance of your agent, and that agent is contained inside a host. This is usually good enough for getting started.
The output format is easy to understand:
The TABLE directive instructs the Collector to start a new table of data with the specified name. A single script agent can emit multiple tables. START_SAMPLE_PERIOD and END_SAMPLE_PERIOD allow you to insert rows into that table. One or more rows are allowed. The Field = Value entry specifies the name of a table column and its value. To find out more about syntax rules, see Script syntax.
For example, if you have a table of data with the following contents:
Then the script agent results appear as follows:
This simple example demonstrates how data tables are translated into script agent format. However, it is invalid because of non-numeric data in the Host column. This is covered later in this topic, and illustrates a classic pitfall while working with script agents in Foglight. For more information, see Script agent pitfalls: Converting string data.
Creating a cartridge from a script involves several steps. First, you write an agent script and upload it to the Management Server using the Build Script Agent dashboard. The upload process automatically builds the agent package. Next, you deploy that agent package to the host, create an agent instance, and edit its properties, if required. For complete instructions on using the browser interface to create a script agent and enable its data collection, see Uploading custom agent scripts.
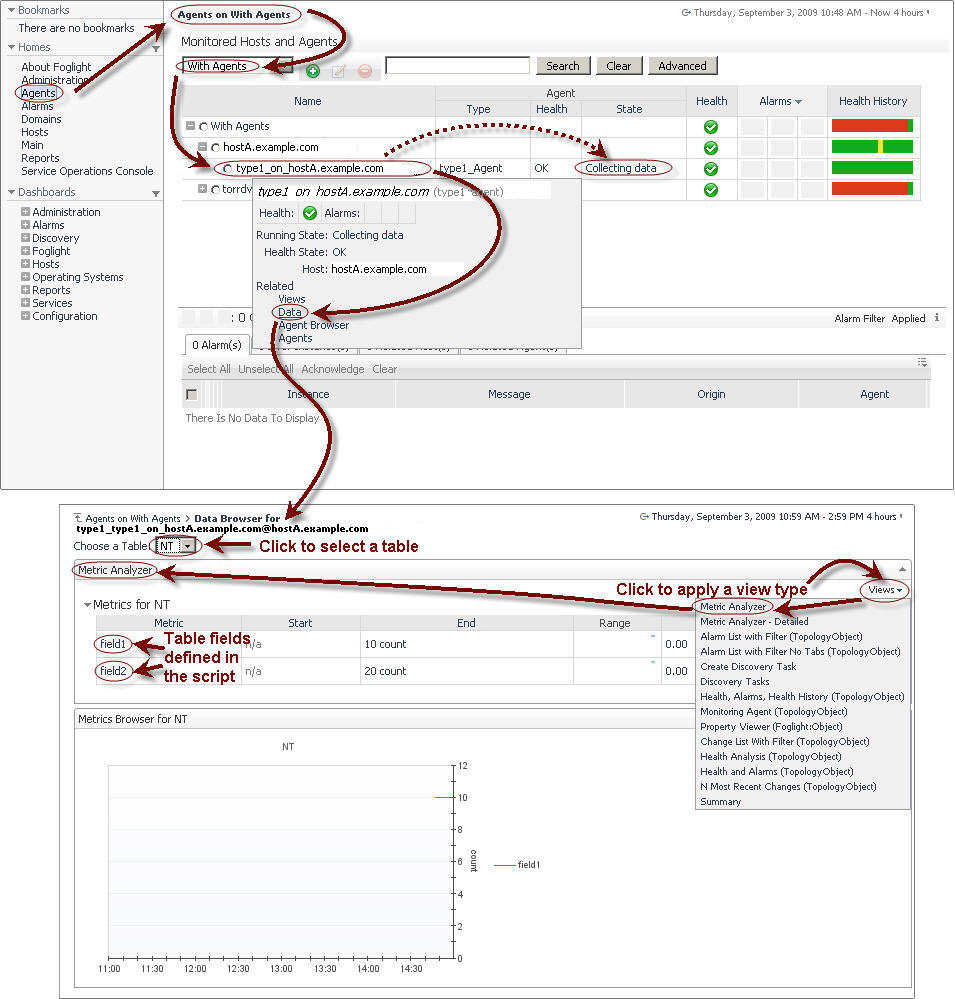
After a minute (which is the default sampling frequency), you can verify that the agent is collecting data using the Agents dashboard. The Agents dashboard can be accessed by clicking Homes > Agents on the navigation panel. On the Agents dashboard, applying the With Agents filter allows you to see monitored hosts with agents. Use that list to locate the host you deployed the script agent to, and your script agent. For more information about the Agents dashboard, see the Foglight User Guide.
If you cannot find your script agent on the Agents dashboard, you can retrieve its log from the Agent Status dashboard by selecting your script agent and clicking Get Log. For more information about retrieving agent logs, see Retrieve agent logs.
To verify that your script agent is collecting data, after locating the agent instance on the Agents dashboard, select the Data option. Choosing this option allows you to view the raw data. Applying the Metric Analyzer view allows you to see the metrics’ value and type. Then, choose the Data option to see the collected data in a selected table.
We now go back to the data example shown in Script agent format, with the contents:
Then the script agent results based on the above table are as follows:
Uploading the script to the server, deploying the resulting agent package, and creating and enabling an agent instance results in the following type of data being collected: CPU, Memory, and Disk. Note that the Host column is missing from the set of collected data.
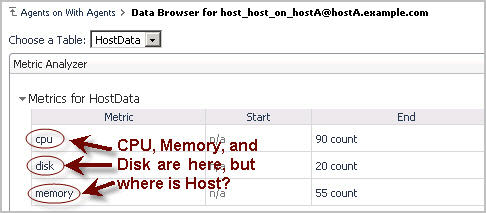
To find out what happened to the Host column, observe the contents of the server log file. You can download log files using the Log Analyzer dashboard. This dashboard is accessible through the navigation panel, under Management Server > Diagnostic > Log Analyzer. For more information about the Log Analyzer dashboard, see Monitor Server Performance. The pattern to look for with script agent errors is anything related to TopologyAdapter. The following section in the log file shows an error related to the Host entry in the script:
What does this mean in plain language? It looks like the server is trying to convert the string-based host names provided for the Host field into doubles. This is because, by default, Foglight assumes all script agent entries are numeric time series data. In other words, Foglight is trying to convert these values to numbers. It is not working as expected, which explains why the Host values are not appearing as expected.
|
Does the field uniquely identify the row of data? If it does, then we should mark it as an identity field. An identity field causes a new object instance to be created. | |
|
Does the field change frequently? If a string changes frequently, then it should be marked as an observation. That way Foglight stores a new value every sample, and does not the changes. If a string changes infrequently, then it can be a property. A property has one value stored, and changes are tracked. To determine if something changes frequently, ask the following question: Could this value change each sample period in a typical use case? To understand these concepts, we need to expand our example. |
In this example, we will assume that we are actually gathering the following data about a host:
In the above data sample, there are three string values: Host, IP Address, and State. We will now apply Question 1 and Question 2 to each of the entries:
It is clear that the Host column contains the name of a host, and therefore defines its identity. We want to see a new instance of the data for each unique value of Host.
IP Address, on the other hand, is not an identity property. It is unlikely to change with each sample frequency. In most environments, IP Addresses are leased long-term. Marking IP Address as a property but not an observation makes sense.
Finally, the State column is not an identity property. However, it is possible that it could change from sample period to sample period. A host may not go down often, but when it does go down you want to know when. Tracking State as a string observation makes the most sense.
After uploading the script and re-deploying the agent package, on first look, the data you see in the Metric Analyzer for the script agent appears to be the same, consisting of cpu, disk, and memory.
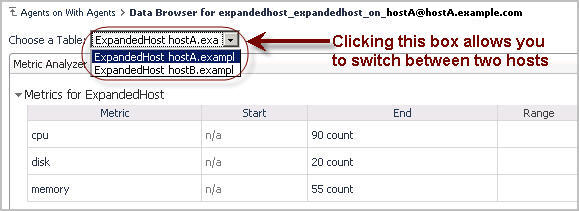
Now we actually have two sets of entries: one for hostA, and another one for hostB. What we never really noticed before is that we were getting two values of the same metrics into the same table before. Now we have two separate table entries, one for each host. So we fix at least one problem by adding Host.String.id to the script.
But where are the IP Address and State columns? IP Address should be visible as a property.
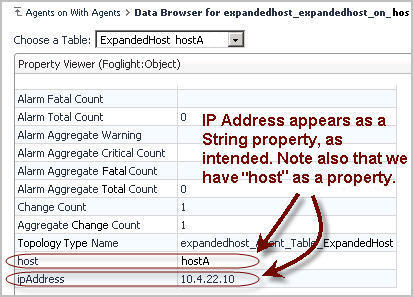
|
TIP: To open the Property Viewer, in the Data Browser’s upper-right corner, click Views and select Property Viewer (Foglight:Object) from the list that appears: 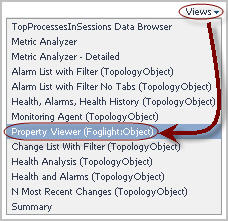 |
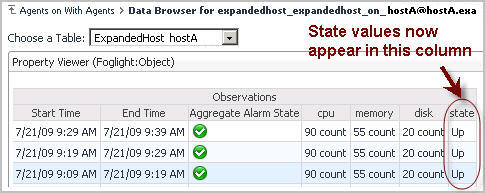
We have so far accounted for two of our changes. But what happened to the State column? Observations are a special class of metric. They are, by nature, harder to display. A time-series metric of type double can be graphed. But a set of values for a String appears differently. In general, observations are a little more difficult to deal with than other types. You can still display them, write rules, and so on, but you have to use special techniques. So where is State?
The following error in the server log indicates that you declared a String as Field.String.obs instead of Field.StringObservation.obs:
Next, if you see the following error:
In script agents, data is sent to the server by specifying a series of field=value pairs. The syntax is as follows:
As we work through this topic we explore how to use all elements of this syntax.
For detailed syntax description, see Script syntax.
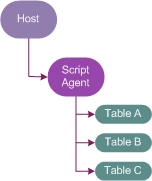
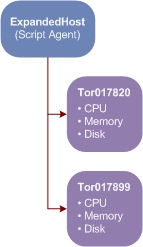
This type of table in Foglight 5 results in creation of two objects of type ExpandedHost. The Host property is the unique identifier for the object because Foglight generates a new object instance will be generated for each new Host entry in the script agent. Each object has CPU, Memory and Disk metrics attached to it.
This lead to the following script agent entries:
|
An identity property called Host is added to the object. For each new value, a new object is created. | ||||
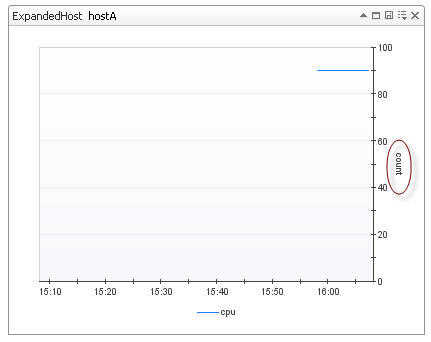
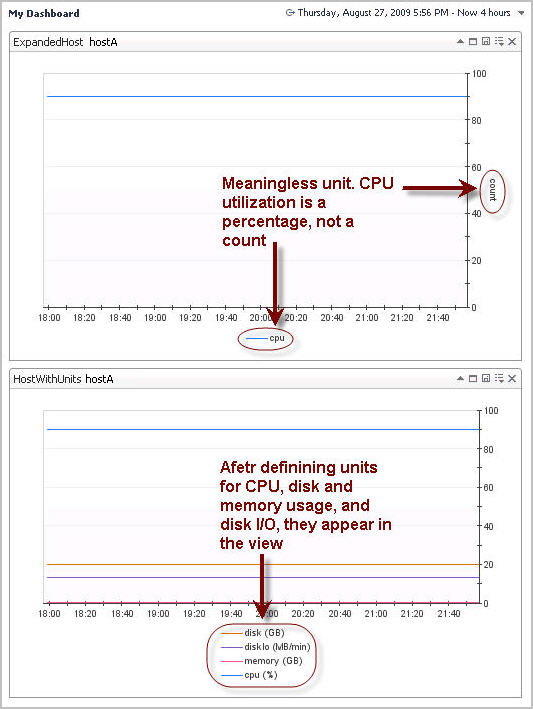
By default, any metric that comes into the system does not have a unit assigned. This means any numeric value have the unit count. This quite often does not matter early on in agent development. But without units, in the browser interface, you see this the following type of output in script agent views:
In a script agent, it is possible to set the unit using the last part of the field syntax:
The possible units are listed below:
A modified version of the script appearing in How script agent data is represented in Foglight 5 now includes units for CPU, Memory and Disk. It also includes a DiskIO metric that has a compound unit.
Not all field names are available. Many field names are reserved. The reason for this is that script agents create objects for each TABLE entry. These objects extend a type called F4Table. This type already has properties defined. You are not allowed to replace those properties with new ones as this causes problems with how models hold together.
It is possible to figure out exactly what property names are reserved by looking at the type definitions for F4Table and its parent classes. The type hierarchy looks like this:
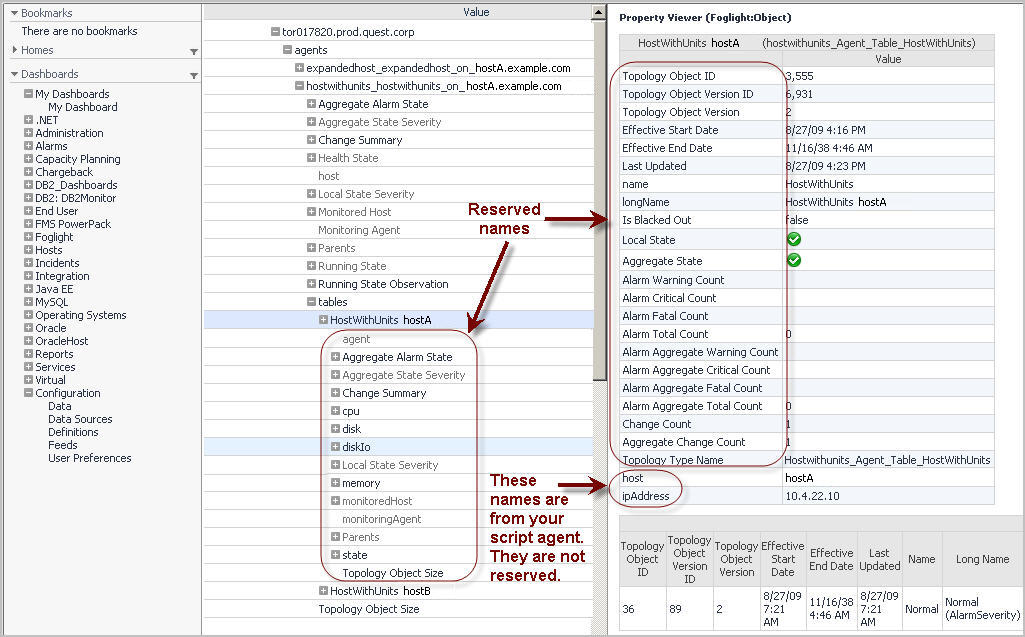
Here is a sample script that includes fields that conflict with reserved names:
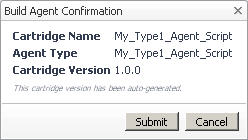
When you write a custom agent script, upload it to Foglight and build the agent package.
|
2 |
|
5 |
|
6 |
|
8 |
Click Go to Agent Status. |
To enable the script agent to collect data, follow the standard work flow for deploying agents. First, deploy the script agent package, and create and activate script agent instances. For more information, see Configuring Foglight Agents for Host Monitoring.