Before you start
Ensure Global Search is enabled.
Accessing the Advanced Filters
Access the search window by typing your search text in the left hand pane and clicking the search icon or pressing enter.
This will give an initial result set using the current filter settings. Clicking the down twisty 'v' will show the standard filters.
Just above the apply button there is an Advanced twisty 'v', this will give access to the advanced filters section.
In order to add an advanced filter you must first select one or more object types.
|
Fig. Advanced button |
Fig. Object Type Selection |
|---|
Using the Advanced Filters
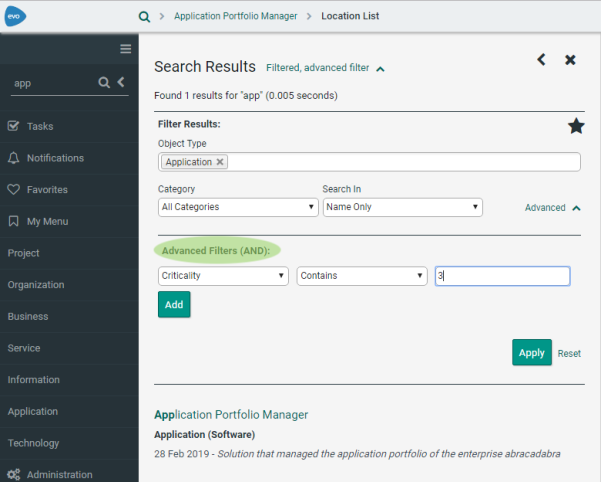
Click the "Add" button to add a filter.
Drop down a property (note: if multiple object types are selected, only the intersected set of properties will be available).
Choose your condition from the second drop-down (e.g. Contains).
Type the text you wish to use with the condition.
Press 'Apply' to apply a filter and 'Reset' to remove the filters.
Note that all filters are "AND"ed together, with the standard filter content.

Fig. Advanced Filters
Related Topics
Before you start
Ensure Global Search is enabled.
Using Favorite Filters
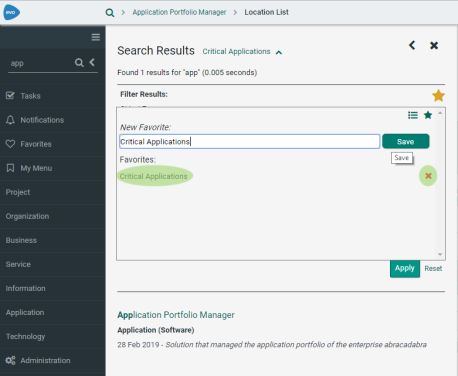
When viewing the filter options you will see a star symbol. Pressing this star will open the favorites options.
By default you will see a place to name a favorite, and the 'Save' button.
Naming and saving a favorite will store it in your favorites.
It will appear in a list on the same page.
Pressing a favorite name from the list, will switch to this saved filter.
Pressing the X to the right of the favorite, will delete this favorite.

Fig. Your favorites, click one to use this filter
Viewing Preset Filters
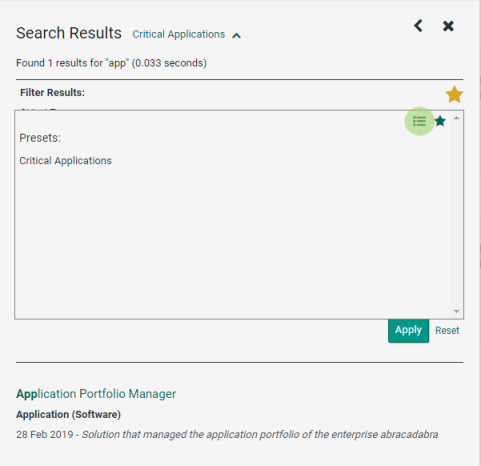
To the left of the favorites star icon is the presets icon. Pressing this icon, will show the preset filters.
Preset filters are like favorites, but are available to all users with a given Role.
Preset filters are also available in Static evolve sites, where the Roles of the user generating the Static site, will control which filters are available to ALL users.
Note: Static sites themselves do not have Roles, hence the preset's availability.
Preset filters can only be added by an Administrator, and assigned to Roles

Fig. Choosing to view Preset Filters
Sharing Favorite filters as Presets (Administrator option only)
In order to configure Presets, it is necessary first to be an Administrator.
Create a filter in the usual way.
Make the filter a favorite.
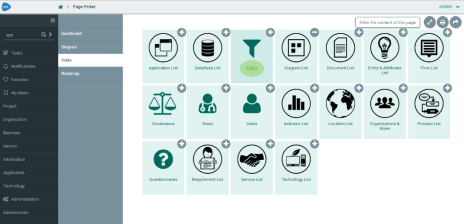
From the 'Page Picker', choose the 'Filters' Page.

Fig. Configure Preset Filters with this Page

Fig. Select your favorite and assign it a Role
From the list of favorites displayed, choose the edit button
Search for a role and associate it to the favorite
Save the association.
This favorite will now display as a Preset, to all users who share this Role
Remove a Preset (Administrator option only)
In order to remove a Presets, it is necessary first to be an Administrator.
From the 'Page Picker', choose the 'Filters' Page.
Locate the Preset you wish to remove.
Disassociate the Roles from the Preset.
It will return to being a favorite and can be deleted in the same way as other favorites.
Related Topics
Overview of the folder structure of Evolve Web Platform
|
|
If you have configured your site to replicate content from one server to another, for example when using a load balancer, you may need to adjust your 'Copy' scripts for 2020.0.2 onwards. See the details below to determine what folders have moved. |
|---|
Unlike many Windows applications, including 'Evolve Suite', 'Evolve Web Platform' is typically installed to the root of your C: drive.
While most of the files that are installed are not intended for user serviceability, there are a few folders that contain content, useful for administrators. Most significantly, folders containing customized content, search indexes, and generated content. All of which may be replicated to other servers, when load balancing.
Up to and including Evolve Web Platform 2020.0.1 the folders followed this pattern:
|
Folder |
Description |
|---|---|
|
c:\erwin\evolve [or] |
Main installation folder |
|
\CWSServices |
Global Search services |
|
\CWSServices\Data |
Global Search encrypted audit records, for indexing (and sharing to other servers in a load balanced group) |
|
\Data\Common |
Shared web client content for all sites (javascript) |
|
\Data\Sites\[sitename] |
Specific content for the given dynamic site sitename |
|
\Data\Statics\[sitename] |
Specific content for the given static site sitename |
|
\Diagrammer |
The new Web Modeler application service |
|
\ElasticSearch |
The elastic search runtimes to operate Global Search |
|
\Elasticsearch\elasticsearch-6.4.0\data\nodes |
The elastic search database files. If upgrading within the same Major release version, these files can be kept, to remove the need for a full search re-index. In large installations this can save many hours of re-indexing. |
|
\JRE |
The Java runtime to support ElasticSearch and other Java components |
|
\node_modules |
The node modules required to support Web Modeler |
|
\Site\bin\sites |
The site configuration files that describe site settings |
|
\Site\bin\webDesigner\custom |
The location for customization files for Evolve Web Platform |
|
\Site\logs |
The Web Designer, Diagram Designer, and Live log files for the platform |
|
\WebRestAPI |
The REST API that replaces Portal Web Services, and supports interaction over a http interface |
What has changed from 2020.0.2 onwards, is the location of the static generated content, and any data related content for the dynamic site. The new structure is as follows:
|
Folder |
Description |
|---|---|
|
\Data\Sites\[sitename] |
Site structure and design for the given dynamic site sitename |
|
\Data\Statics\[sitename] |
Site structure and design for the given static site sitename |
|
\Data\Data\[sitename]\live\ |
Content data for the site sitename |
|
\Data\Data\[sitename]\static\ |
Content data for the site sitename |
Related Topics
Your web server machine must be configured to understand some specific file formats used by Evolve.
|
|
The instructions below alter the settings for the Evolve application only. You can make these settings at a higher level, such as the Default Web Site, that will then ensure they are available to all applications below. |
|---|
To specify the new MIME Types:
On the web server machine, run Internet Information Services (IIS) Manager
In IIS Manager’s left-hand pane, select the node for the Evolve application
Ensure you have the central pane set to Features View, then double-click MIME Types in the IIS section
The MIME Types settings are displayed
Check the list of extensions that are already configured and see if any of the following are missing:
.eot
.json
.ttf
.woff
For each extension that is not already configured, do the following:
Right-click in the central pane and select Add
Enter the following details, depending on which you need to add
|
File name extension |
MIME Type |
|---|---|
|
.eot |
application/octet-stream |
|
.json |
application/json |
|
.ttf |
application/octet-stream |
|
.woff |
application/font-woff |
Click OK
Close IIS Manager.