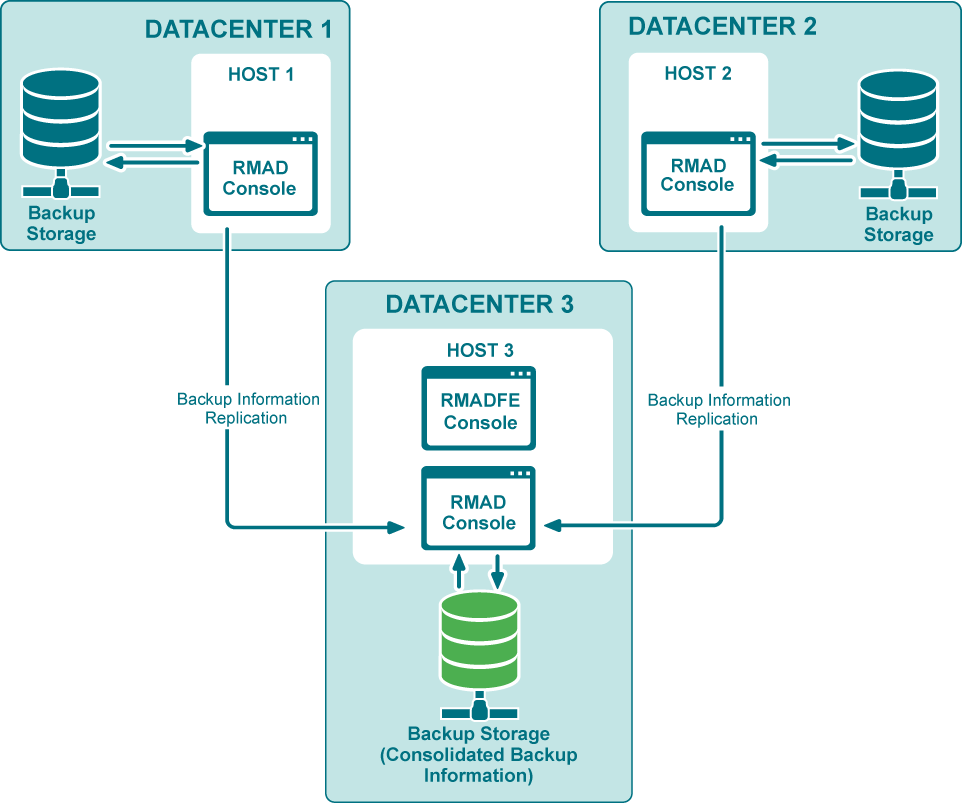
When there are two or more instances of the Recovery Manager Console deployed in your environment, each of these instances has its own dedicated backup registration database that stores information about created backups. Recovery Manager for Active Directory (RMAD) allows you to consolidate backup information from multiple backup registration databases on a single RMAD computer. The main user scenario for using this functionality is to make this data available to Forest Recovery Console. So, Forest Recovery Console must be installed together with Recovery Manager Console on the computer that hosts consolidated backup database to access and use the backup files created by all other RMAD instances installed in your environment.
This functionality as well as the Full replication feature is based on the Recovery Manager Remote API Access service (installed by default) and PowerShell® commands. When the backup replication is enabled, the current console connects to the Recovery Manager Remote API Access service on the remote RMAD console, then imports the data.
| NOTE |
The TCP port 52132 is required for Recovery Manager Remote API Access service. |
This section describes how to configure replication of backup information from remote consoles to the local backup storage.
IMPORTANT:
It is recommended to use this option for consoles that reside in geographically remote datacenters.
Consolidating backups does not affect the backup files.
Replication of backup information is one way. If you need to configure two-way replication, you should configure it explicitly in both instances of Recovery Manager Console.
Several remote consoles can be used simultaneously as replication sources.
In this mode, the local console is fully functional during the backup replication.
Local backups are consolidated with the backups from remote consoles.
It is recommended that you schedule the backup tasks and the replication task so that they do not overlap.
Open the local Recovery Manager for Active Directory console.
Right-click Remote Consoles under the Replication node and select Add Console.
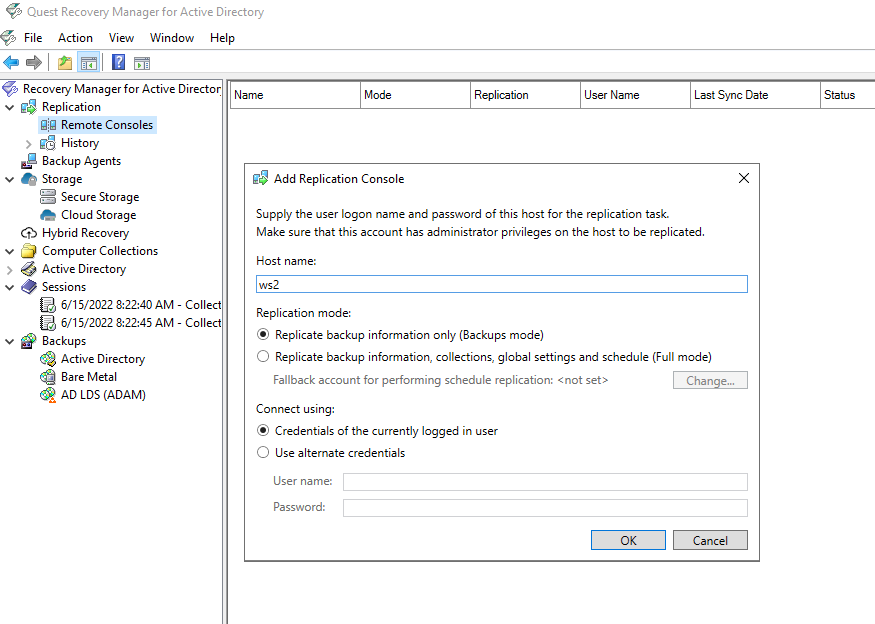
In the Add Replication Console dialog, specify a host name where the RMAD console that will be used as a replication source is installed.
Select Replicate backup information only (Backups mode). This option lets you replicate backup information from the replication source.
Supply the credentials for the replication task. These credentials will be used to connect the source console that you have just added.
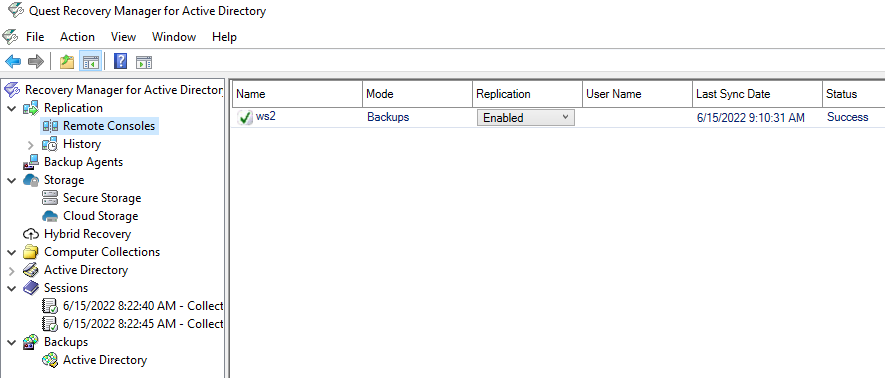
Now the source console instance is added and shown in the right pane.
Set the console replication status to Enabled in the right pane.
To start the replication, right-click Remote Consoles and press Replicate. This option forces the replication for all consoles in the list, not only for the selected one .
To change the console properties, right-click the console instance from the list in the right pane and select Properties.
To remove the console instance from the replication console list, right-click the instance and click Remove.
Replication status
If the data replication is finished successfully, the status in the console instances list is changed to "Success".
The replication may fail with the error "Cannot connect to RMAD on the specified computer." in the following cases:
If the target computer does not exist or RMAD is not installed on the specified host.
If the Recovery Manager Remote API Access service has stopped
If you experience network connection problems
If the account that is used for the replication task is blocked, etc.
Open the local RMAD console.
Click History under the Replication node to view the list of replication sessions.
The list shows the replication sessions for the past 10 days by default. To change the default number of days, edit the value of the registry HKEY_LOCAL_MACHINE\SOFTWARE\WOW6432Node\Quest\Recovery Manager for Active Directory\Synchronization\ReplicationSessionLimitedDays
If you click a replication session, the right pane shows all remote consoles that are involved in the specified replication session.
To remove one or more replication sessions from the list, right-click the session node and select Delete. Multi-select is possible.
In the RMAD console, right-click Remote Consoles under the Replication node and select Properties.
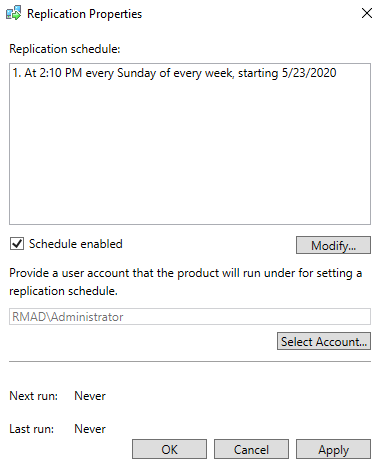
In the Replication Properties dialog, you can create the replication schedule. For that, click Modify…, then click New… in the Recovery Manager Replication Job dialog to create a trigger for the schedule.
Make sure that the Schedule enabled option is selected in the Replication Properties dialog.
Provide a user account that will be used to start the replication schedule task using Select Account… in the Replication Properties dialog. Minimum requirements for the account are listed above depending on the replication mode.
Click OK.
| Note |
You can specify Managed Service Account (in Windows Server® 2008 or higher) or Group Managed Service Account (in Windows Server® 2012 or higher) to run the replication schedule task. Note that you must add the dollar character at the end of the account name (e.g. domain\computername$) and leave the Password field blank. This account must be a member of the local Administrator group on the RMAD machine. |
The Recovery Manager for Active Directory Management Shell, built on Microsoft Windows® PowerShell® technology, provides a command-line interface that enables automation of backup/recovery-related administrative tasks. With this Management Shell, administrators can manage Computer Collections, backup/recovery sessions, compare and start backup/recovery jobs.
The Management Shell command-line tools (cmdlets), like all the Windows® PowerShell® cmdlets, are designed to deal with objects—structured information that is more than just a string of characters appearing on the screen. The cmdlets do not use text as the basis for interaction with the system, but use an object model that is based on the Microsoft .NET platform. In contrast to traditional, text-based commands, the cmdlets do not require the use of text-processing tools to extract specific information. Rather, you can access portions of the data directly by using standard Windows® PowerShell® object manipulation commands.
For a list of all available PowerShell® commands, see the Management Shell Guide supplied with this release of the product.
There may be a situation where technical support requests you to gather and supply diagnostic data from your computer collection. For this purpose, you can use a special tool provided in the Recovery Manager Console. This tool is called Diagnostic Data Collector.
When gathering diagnostic data, the Diagnostic Data Collector collects the following:
From Recovery Manager Console machine
Collects the Recovery Manager Console log
Collects the Recovery Manager for Active Directory event logs
.db3 database files
Recovery Manager for Active Directory configuration files
From Domain Controller
Collects Backup and Restore agent logs
Collects system event logs
Windows debug logs
Runs Microsoft Netdiag, Dcdiag, Nltest, MsInfo32 and Repadmin tools (in diagnostic mode only), and then collects the output provided by these tools. The tools are started by Collectdcdata.cmd and you can modify the list of collected logs.
To gather diagnostic data for your recovery project by using the Diagnostic Data Collector, you need to complete the following steps:
Step 1: Use Diagnostic Data Collector to automatically gather data. In this step, you use the Diagnostic Data Collector to automatically gather diagnostic data from each domain controller in your recovery project and save the data to the folder you specify. You can perform this step regardless of whether or not a recovery operation is currently running on the recovery project. If this step completes successfully for all domain controllers, Step 2 is not needed.
Step 2: Gather remaining data manually. You need to perform this step only for those domain controllers from which you could not successfully collect data in Step 1. In Step 2, you copy several files supplied with RMAD to the target domain controller, and then run one of the copied files. As a result, diagnostic data is collected from the domain controller and saved to a new folder created in the location from which you ran the file.
The next sections provide instructions on how to complete each of these steps.