立即与支持人员聊天
与支持团队交流

KACE Systems Management Appliance 13.0 Common Documents - Administrator Guide

About the KACE Systems Management Appliance Getting started
Configuring the appliance
Requirements and specifications Power-on the appliance and log in to the Administrator Console Access the Command Line Console Tracking configuration changes Configuring System-level and Admin-level General Settings Configure appliance date and time settings Managing user notifications Enable Two-Factor Authentication for all users Verifying port settings, NTP service, and website access Configuring network and security settings Configuring Agent settings Configuring session timeout and auto-refresh settings Configuring locale settings Configuring the default theme Configure data sharing preferences About DIACAP compliance requirements Configuring Mobile Device Access Enable fast switching for organizations and linked appliances Linking Quest KACE appliances Configuring history settings
Setting up and using labels to manage groups of items Configuring user accounts, LDAP authentication, and SSO Deploying the KACE Agent to managed devices Using Replication Shares Managing credentials Configuring assets
About the Asset Management component Using the Asset Management Dashboard About managing assets Adding and customizing Asset Types and maintaining asset information Managing Software assets Managing physical and logical assets Maintaining and using manual asset information Managing locations Managing contracts Managing licenses Managing purchase records
Setting up License Compliance Managing License Compliance Setting up Service Desk Configure the Cache Lifetime for Service Desk widgets Creating and managing organizations Importing and exporting appliance resources
Managing inventory
Using the Inventory Dashboard Using Device Discovery Managing device inventory
About managing devices Features available for each device management method About inventory information Tracking changes to inventory settings Managing inventory information Finding and managing devices Registering KACE Agent with the appliance Provisioning the KACE Agent Manually deploying the KACE Agent Using Agentless management Adding devices manually in the Administrator Console or by using the API Forcing inventory updates Managing MIA devices Obtaining Dell warranty information
Managing applications on the Software page Managing Software Catalog inventory
About the Software Catalog Viewing Software Catalog information Adding applications to the Software Catalog Managing License assets for Software Catalog applications Associate Managed Installations with Cataloged Software Using software metering Using Application Control Update or reinstall the Software Catalog
Managing process, startup program, and service inventory Writing custom inventory rules
Deploying packages to managed devices
Distributing software and using Wake-on-LAN Broadcasting alerts to managed devices Running scripts on managed devices Managing Mac profiles Using Task Chains
Patching devices and maintaining security
Using the Security Dashboard About patch management Subscribing to and downloading patches Creating and managing patch schedules Managing patch inventory Managing Windows Feature Updates Managing Dell devices and updates Managing Linux package upgrades Maintaining device and appliance security Manage quarantined file attachments
Using reports and scheduling notifications Monitoring servers
Getting started with server monitoring Working with monitoring profiles Managing monitoring for devices Working with alerts
Using the Service Desk
Configuring Service Desk Using the Service Desk Dashboard Managing Service Desk tickets, processes, and reports
Overview of Service Desk ticket lifecycle Creating tickets from the Administrator Console and User Console Creating and managing tickets by email Viewing tickets and managing comments, work, and attachments Merging tickets Using the ticket escalation process Using Service Desk processes Using Ticket Rules Run Service Desk reports Archiving, restoring, and deleting tickets Managing ticket deletion
Managing Service Desk ticket queues About User Downloads and Knowledge Base articles Customizing Service Desk ticket settings Configuring SMTP email servers
Maintenance and troubleshooting
Maintaining the appliance Troubleshooting the appliance
Appendixes Glossary About us Legal notices

Deploying the KACE Agent to managed devices

Deploying the KACE Agent to managed devices

The KACE Agent is an application that can be installed on devices to enable inventory reporting and other device management features. KACE Agents installed on managed devices communicate with the appliance through an agent messaging protocol. Agents perform scheduled tasks, such as collecting inventory information from, and distributing software to, managed devices.

You can deploy the KACE Agent to managed devices using one of the following methods.

Provisioning the KACE Agent: You can use the Agent Provisioning Assistant to perform provisioning for devices with Windows, Mac OS X, and Linux operating systems. Within the Assistant, you can choose between using the appliance GPO Provisioning Tool for deploying the Agent to Windows devices, or using Onboard Provisioning for deploying the Agent to Windows, Mac OS X, or Linux devices. See Provisioning the KACE Agent.
Manually deploying the KACE Agent: Use manual deployment is useful when automated Agent provisioning is not practical or when you want to deploy the KACE Agent using email, logon scripts, GPO (Group Policy Objects), or Active Directory. The appliance includes KACE Agent installers for different OS platforms. Each platforms offers one or more ways to deploy the KACE agent. To get started, visit the following sections and their sub-topics:

Using Replication Shares

Using Replication Shares

Replication Shares are devices that keep copies of files for distribution, and they are especially useful if your managed devices are deployed across multiple geographic locations.

For example, using a Replication Share, a device in New York could download files from another device at the same office, rather than downloading those files from a appliance in Los Angeles. A Replication Share is a full replication of all digital assets and is managed automatically by the appliance. Whenever a Replication Share is specified for a label, devices in that label go to the Replication Share to get files.

In addition, you can use Replication Shares to deploy of Managed Installations, patches, or Dell Updates where network bandwidth and speed are issues. Replication Shares are good alternatives to downloading directly from an appliance.

Replication Shares enable an appliance to replicate application installers, patches, upgrades, and script dependencies to a shared folder on a device. If any replication item is deleted from the appliance, it is marked for deletion in the Replication Share and deleted in the replication task cycle. The figure shows a Replication Share configuration and task flow.

Figure 9. Replication Share configuration

In the task flow, an arrow goes from a appliance to a Replication Agent. The arrow has a tag reading "copy replication files. Restarts are supported. Bandwidth can be limited. The Replication Agent can run be a Windows device, a Mac OS X device, or a Linux device. An arrow goes from the Replication Agent to the Replication Share. The has a tag reading "Place file on Share, either local drive or smb network drive." From the Replication Share, arrows go to various Replication Clients that are defined by a Replication Share Label.

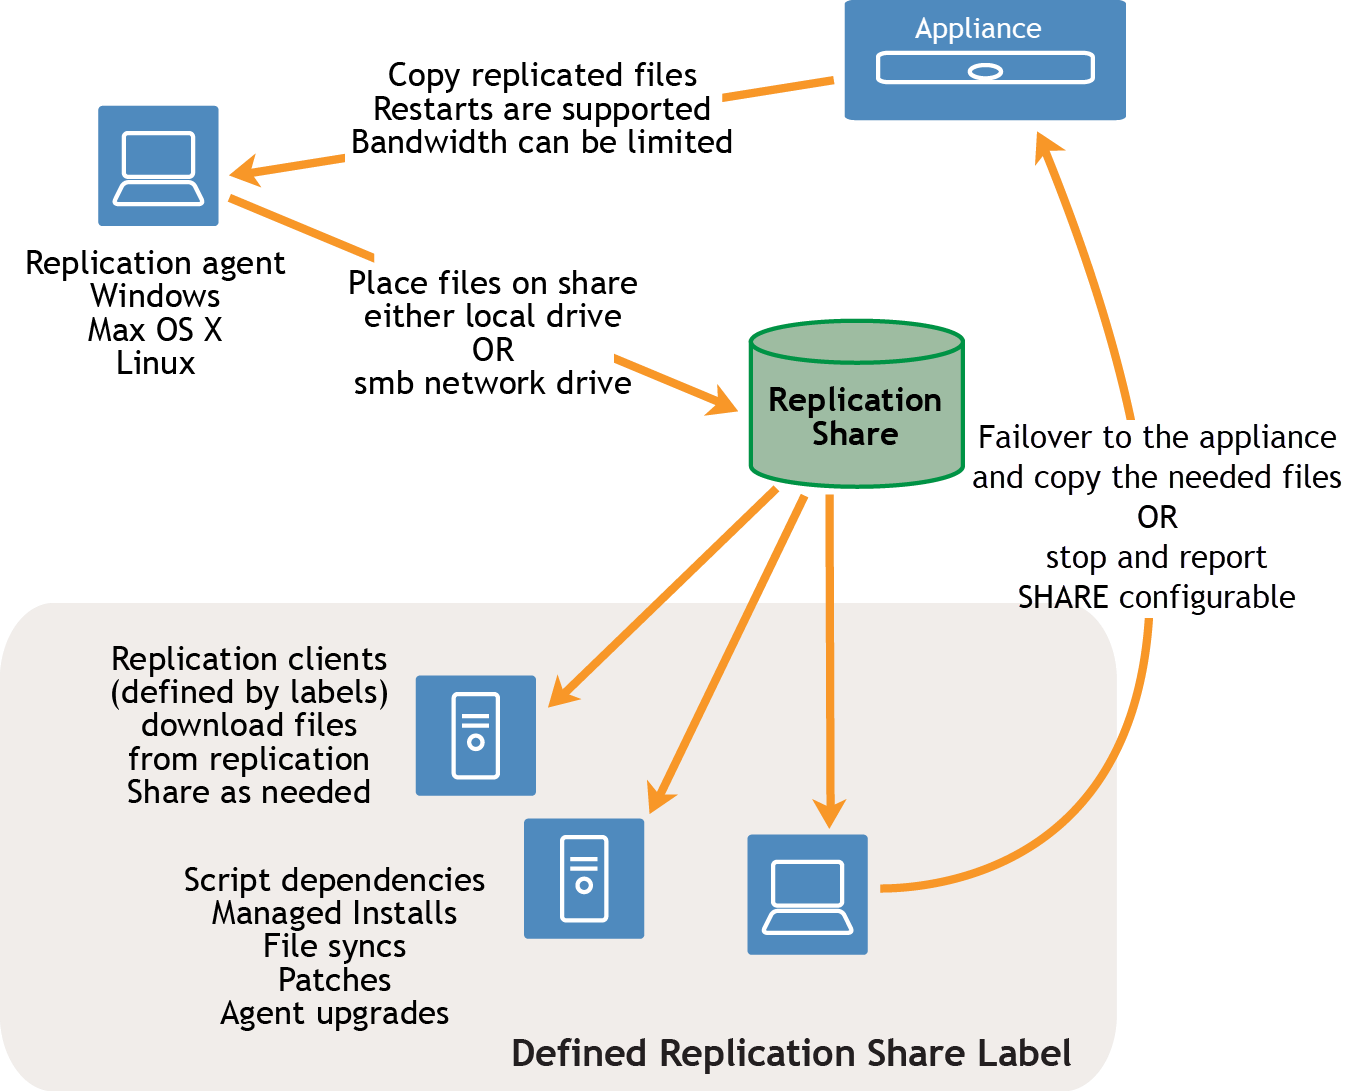
To create a Replication Share, identify one device at each remote location to act as a Replication Device. The appliance copies all the replication items to the Replication Device at the specified destination path. The replication process automatically restarts if it is stopped due to a network failure or replication schedule. If stopped, the replication process restarts at the point it was stopped.

Sneaker net share: You can create a folder and copy the contents of an existing replication folder to it. You can then specify this folder as the new replication folder in the appliance. The appliance determines whether the new folder has all the replication items present and replicates only the new ones, which conserves bandwidth. You can manually copy the contents of replication folder to a new folder. The replication folder created in a device follows following hierarchy:

\\machinename\foldername\repl2\replicationitems folder

The device name and folder name is user defined while repl2 is automatically created by appliance. The replication items folder includes the folder for patches, kbots, upgrade files, and applications.

All the replication items are first listed in the replication queue and then copied one at a time to the destination path. Any new replication item is first listed in the replication queue and then copied after an interval of 10 minutes.

Replication items are copied in this order:

Create Replication Shares

Create Replication Shares

You can create Replication Shares on managed devices.

To create a Replication Share you must:

Have write permission on the destination path to write the software files.

Replication Shares can be created only on devices that appear on the Devices list in Inventory. If the device you want to use is not on the Devices list, you need to create an inventory record for the device before you can use it as a Replication Share.

See Managing inventory information.

1.
Go to the Replication Schedule Detail page:
a.
Log in to the appliance Administrator Console, https://appliance_hostname/admin. Or, if the Show organization menu in admin header option is enabled in the appliance General Settings, select an organization in the drop-down list in the top-right corner of the page next to the login information.
b.
On the left navigation bar, click Distribution, then click Replication.
c.
Select Choose Action > New.
2.
In the Configure section, select the Enabled check box.
3.
Optional: Select Failover To Appliance to use the appliance when the Replication Share is not available.
NOTE: Enable Failover To Appliance only after testing the Replication Share.
4.
In the Device drop-down list, select the device to use as a Replication Share.
5.
Select the Operating System and Locales of the patches to replicate. The lists are populated based on the operating systems and locales selected in the patch subscription.
6.
Select the Include Application Patches, Include Windows Feature Updatesand Include Dell Updates check boxes to copy the patch and update files to the Replication Share.
7.
Specify the Destination Share settings:

Option

Description

Path

The path the Replication device uses for the Replication Share. Applications are copied from the appliance to this location. For a local drive, use local drive syntax, for example: C:\kace_sma_share

For a network drive, use UNC format, for example: \\kaceRep\kace_sma_share\

NOTE: $ notation, for example \\KaceRep\e$, is not supported.

Local Share or UNC

Select whether to use a Local Share or UNC.

Credentials

The details of the service account required to connect to the device and run commands. Select existing credentials from the drop-down list, or select Add new credential to add credentials not already listed.

See Add and edit User/Password credentials.

Label

The label of the devices using the Replication Share. Verify that the selected label does not have KACE_ALT_LOCATION specified. KACE_ALT_LOCATION takes precedence over the Replication Share for downloading files to devices.

8.
Specify the Download Share settings:

Option

Description

Path

The path used by devices in the replication label to copy items from the replication drive.

For example, a UNC path:

\\fileservername\directory\kace_sma\

Other devices need read permission to copy replication items from this shared folder.

Credentials

The details of the service account required to connect to the device and run commands. Select existing credentials from the drop-down list, or select Add new credential to add credentials not already listed.

See Add and edit User/Password credentials.

Option

Description

High Bandwidth

The maximum bandwidth to use for replication. If this field is blank, the maximum bandwidth available for replication is used. This field is specified in bytes per second.

Low Bandwidth

The restricted bandwidth to use for replication. If this field is blank, the maximum bandwidth available for replication is used. This field is specified in bytes per second.

Schedule table

The bandwidth used for each hour of the day (24-hour clock format) and each day of the week.

Bandwidth is color-coded:

White: Replication is off
Light blue: Replication is on with low bandwidth
Blue: Replication is on with high bandwidth

Copy Schedule From

Select an existing Replication Schedule in the drop-down list to replicate items according to that schedule.

Notes

Any additional information you want to provide.

10.
Click Save.
The Replication page appears.
11.
Optional: After you have tested the Replication Share, return to 3 and enable Failover To Appliance.

View Replication Share details

View Replication Share details

You can view details of devices used as Replication Shares.

1.
Go to the Replication list:
a.
Log in to the appliance Administrator Console, https://appliance_hostname/admin. Or, if the Show organization menu in admin header option is enabled in the appliance General Settings, select an organization in the drop-down list in the top-right corner of the page next to the login information.
b.
On the left navigation bar, click Distribution, then click Replication.
This page displays a list of the Replication Shares that are available on the appliance. For each Replication Share, a default view shows its Status, replication Task, associated Device, Destination Path, KACE Agent Version, Label, an indication if the Replication Share is Enabled, and the number of files remaining to be copied along with the total size of files remaining to be copied (in the ToDo column). The information appearing in the ToDo column allows you to review the state of replication process for each Replications Share in this list, instead of reviewing individual shares to find out if their replication process is complete.
2.
In the Device column, click the name of a Replication Share to display the Replication Schedule Detail page.
View the Replication queue: To view items that are queued for replication, click Show Replication Queue below the configuration information. This view is displayed by default when you access the page.
View the Replication inventory: To view items that have been replicated to the share, click Show Share Inventory below the configuration information.
Delete the Replication queue: To view replication items that are marked for deletion, click Show Delete Queue below the configuration information.
相关文档

The document was helpful.

选择评级

I easily found the information I needed.

选择评级