
Search at the page level
Search at the page level
Page-level Search enables you to search for information on the current page.
|
1. |
Log in to the appliance Administrator Console, https://appliance_hostname/admin. Or, if the Show organization menu in admin header option is enabled in the appliance General Settings, select an organization in the drop-down list in the top-right corner of the page next to the login information. |
|
2. |
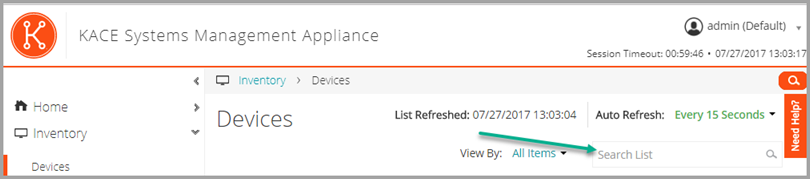
Go to a list page. For example, on the left navigation bar, click Inventory. The Devices page appears. |
|
3. |
On the list page, Devices in this example, enter the search text into the Search field in the top-right corner of the page. Press Enter or Return to begin the page level search. |
|
TIP: Use the percent sign (%) as a wildcard. For example, you can use the percent sign in a search string to find all items that match the criteria before and after the percent sign. |
Searching at the page level with advanced options
Searching at the page level with advanced options
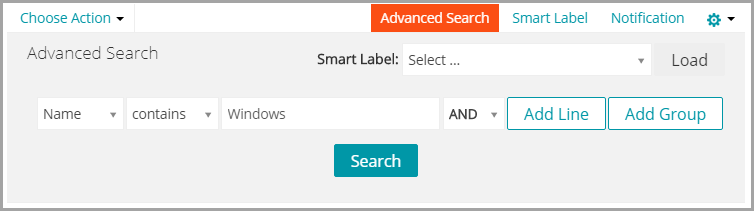
Advanced page-level Search enables you to search for information on the current page using various combinations of criteria. Advanced page-level Search is available on most list pages, such as the Devices page and the Software page.
Example: Search for managed devices using Advanced Search criteria
When a scoped user performs an advanced search on devices, and their user role is associated with a Smart Label, the results only include the devices that are associated with the Smart Label. To see additional devices, you can change the scope of Smart Label, as needed. For more information on how to configure a device scope for a user role, see Add or edit User Roles. For details about Smart Labels, see Managing Smart Labels.
|
1. |
|
a. |
Log in to the appliance Administrator Console, https://appliance_hostname/admin. Or, if the Show organization menu in admin header option is enabled in the appliance General Settings, select an organization in the drop-down list in the top-right corner of the page next to the login information. |
|
b. |
|
2. |
|
4. |
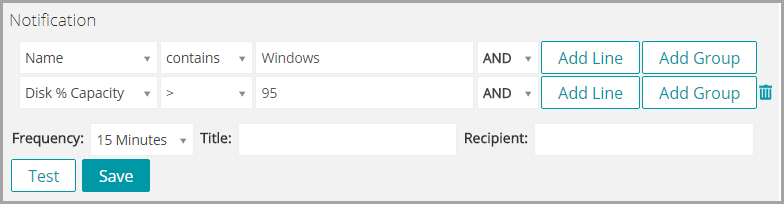
With AND selected in the operator drop-down list, click Add Line to add a new line, then specify the criteria required to find devices that are low on disk space: |
|
5. |
The list is refreshed to show devices that match the specified criteria.
Add Smart Labels and Notifications using Advanced Search criteria
You can add Smart Labels and notifications using criteria in the Advanced Search panel.
When a scoped user performs an advanced search on devices, and their user role is associated with a Smart Label, the results only include the devices that are associated with the Smart Label. To see additional devices, you can change the scope of Smart Label, as needed. For more information on how to configure a device scope for a user role, see Add or edit User Roles. For details about Smart Labels, see Managing Smart Labels.
|
1. |
Log in to the appliance Administrator Console, https://appliance_hostname/admin. Or, if the Show organization menu in admin header option is enabled in the appliance General Settings, select an organization in the drop-down list in the top-right corner of the page next to the login information. |
|
2. |
Go to a list page. For example, on the left navigation bar, click Inventory to display the Devices page. |
|
3. |
|
4. |

|
5. |
|
◦ |
Select an existing label to associate with the Smart Label. Type in the Choose label field to search for existing labels. |
|
◦ |
|
NOTE: Press Enter or Return after you enter a new Smart Label name to move the text from the search field to the label field. |
|
6. |
|
◦ |
If a specific application Smart Label is edited using Home > Labels > Smart Labels, it is applied to or removed from all applications immediately. |
|
◦ |
Smart Labels are automatically applied to or removed from applications when the items are updated on the Inventory > Software page, based on whether the items meet the specified criteria. |
|
7. |
|
The information that you want to appear in the Subject line of the email. | |
|
10. |
The notification is added and it appears on the Email Alerts page.
Load Smart Labels from the Advanced Search tab
You can load Smart Labels from list pages on which the Advanced Search tab is available.
When a scoped user performs an advanced search on devices, and their user role is associated with a Smart Label, the results only include the devices that are associated with the Smart Label. To see additional devices, you can change the scope of Smart Label, as needed. For more information on how to configure a device scope for a user role, see Add or edit User Roles. For details about Smart Labels, see Managing Smart Labels.
|
1. |
Log in to the appliance Administrator Console, https://appliance_hostname/admin. Or, if the Show organization menu in admin header option is enabled in the appliance General Settings, select an organization in the drop-down list in the top-right corner of the page next to the login information. |
|
2. |
|
3. |
|
4. |
At the top of the Advanced Search panel, in the Smart Label drop-down list, select the Smart Label you want to load. |
|
5. |
The criteria of the selected Smart Label appears in the Advanced Search panel.
Example: Search for managed devices using Advanced Search criteria
Searching at the page level with advanced options
Advanced page-level Search enables you to search for information on the current page using various combinations of criteria. Advanced page-level Search is available on most list pages, such as the Devices page and the Software page.
Example: Search for managed devices using Advanced Search criteria
When a scoped user performs an advanced search on devices, and their user role is associated with a Smart Label, the results only include the devices that are associated with the Smart Label. To see additional devices, you can change the scope of Smart Label, as needed. For more information on how to configure a device scope for a user role, see Add or edit User Roles. For details about Smart Labels, see Managing Smart Labels.
|
1. |
|
a. |
Log in to the appliance Administrator Console, https://appliance_hostname/admin. Or, if the Show organization menu in admin header option is enabled in the appliance General Settings, select an organization in the drop-down list in the top-right corner of the page next to the login information. |
|
b. |
|
2. |
|
4. |
With AND selected in the operator drop-down list, click Add Line to add a new line, then specify the criteria required to find devices that are low on disk space: |
|
5. |
The list is refreshed to show devices that match the specified criteria.
Add Smart Labels and Notifications using Advanced Search criteria
You can add Smart Labels and notifications using criteria in the Advanced Search panel.
When a scoped user performs an advanced search on devices, and their user role is associated with a Smart Label, the results only include the devices that are associated with the Smart Label. To see additional devices, you can change the scope of Smart Label, as needed. For more information on how to configure a device scope for a user role, see Add or edit User Roles. For details about Smart Labels, see Managing Smart Labels.
|
1. |
Log in to the appliance Administrator Console, https://appliance_hostname/admin. Or, if the Show organization menu in admin header option is enabled in the appliance General Settings, select an organization in the drop-down list in the top-right corner of the page next to the login information. |
|
2. |
Go to a list page. For example, on the left navigation bar, click Inventory to display the Devices page. |
|
3. |
|
4. |
|
5. |
|
◦ |
Select an existing label to associate with the Smart Label. Type in the Choose label field to search for existing labels. |
|
◦ |
|
NOTE: Press Enter or Return after you enter a new Smart Label name to move the text from the search field to the label field. |
|
6. |
|
◦ |
If a specific application Smart Label is edited using Home > Labels > Smart Labels, it is applied to or removed from all applications immediately. |
|
◦ |
Smart Labels are automatically applied to or removed from applications when the items are updated on the Inventory > Software page, based on whether the items meet the specified criteria. |
|
7. |
|
The information that you want to appear in the Subject line of the email. | |
|
10. |
The notification is added and it appears on the Email Alerts page.
Load Smart Labels from the Advanced Search tab
You can load Smart Labels from list pages on which the Advanced Search tab is available.
When a scoped user performs an advanced search on devices, and their user role is associated with a Smart Label, the results only include the devices that are associated with the Smart Label. To see additional devices, you can change the scope of Smart Label, as needed. For more information on how to configure a device scope for a user role, see Add or edit User Roles. For details about Smart Labels, see Managing Smart Labels.
|
1. |
Log in to the appliance Administrator Console, https://appliance_hostname/admin. Or, if the Show organization menu in admin header option is enabled in the appliance General Settings, select an organization in the drop-down list in the top-right corner of the page next to the login information. |
|
2. |
|
3. |
|
4. |
At the top of the Advanced Search panel, in the Smart Label drop-down list, select the Smart Label you want to load. |
|
5. |
The criteria of the selected Smart Label appears in the Advanced Search panel.
Add Smart Labels and Notifications using Advanced Search criteria
Searching at the page level with advanced options
Advanced page-level Search enables you to search for information on the current page using various combinations of criteria. Advanced page-level Search is available on most list pages, such as the Devices page and the Software page.
Example: Search for managed devices using Advanced Search criteria
When a scoped user performs an advanced search on devices, and their user role is associated with a Smart Label, the results only include the devices that are associated with the Smart Label. To see additional devices, you can change the scope of Smart Label, as needed. For more information on how to configure a device scope for a user role, see Add or edit User Roles. For details about Smart Labels, see Managing Smart Labels.
|
1. |
|
a. |
Log in to the appliance Administrator Console, https://appliance_hostname/admin. Or, if the Show organization menu in admin header option is enabled in the appliance General Settings, select an organization in the drop-down list in the top-right corner of the page next to the login information. |
|
b. |
|
2. |
|
4. |
With AND selected in the operator drop-down list, click Add Line to add a new line, then specify the criteria required to find devices that are low on disk space: |
|
5. |
The list is refreshed to show devices that match the specified criteria.
Add Smart Labels and Notifications using Advanced Search criteria
You can add Smart Labels and notifications using criteria in the Advanced Search panel.
When a scoped user performs an advanced search on devices, and their user role is associated with a Smart Label, the results only include the devices that are associated with the Smart Label. To see additional devices, you can change the scope of Smart Label, as needed. For more information on how to configure a device scope for a user role, see Add or edit User Roles. For details about Smart Labels, see Managing Smart Labels.
|
1. |
Log in to the appliance Administrator Console, https://appliance_hostname/admin. Or, if the Show organization menu in admin header option is enabled in the appliance General Settings, select an organization in the drop-down list in the top-right corner of the page next to the login information. |
|
2. |
Go to a list page. For example, on the left navigation bar, click Inventory to display the Devices page. |
|
3. |
|
4. |
|
5. |
|
◦ |
Select an existing label to associate with the Smart Label. Type in the Choose label field to search for existing labels. |
|
◦ |
|
NOTE: Press Enter or Return after you enter a new Smart Label name to move the text from the search field to the label field. |
|
6. |
|
◦ |
If a specific application Smart Label is edited using Home > Labels > Smart Labels, it is applied to or removed from all applications immediately. |
|
◦ |
Smart Labels are automatically applied to or removed from applications when the items are updated on the Inventory > Software page, based on whether the items meet the specified criteria. |
|
7. |
|
The information that you want to appear in the Subject line of the email. | |
|
10. |
The notification is added and it appears on the Email Alerts page.
Load Smart Labels from the Advanced Search tab
You can load Smart Labels from list pages on which the Advanced Search tab is available.
When a scoped user performs an advanced search on devices, and their user role is associated with a Smart Label, the results only include the devices that are associated with the Smart Label. To see additional devices, you can change the scope of Smart Label, as needed. For more information on how to configure a device scope for a user role, see Add or edit User Roles. For details about Smart Labels, see Managing Smart Labels.
|
1. |
Log in to the appliance Administrator Console, https://appliance_hostname/admin. Or, if the Show organization menu in admin header option is enabled in the appliance General Settings, select an organization in the drop-down list in the top-right corner of the page next to the login information. |
|
2. |
|
3. |
|
4. |
At the top of the Advanced Search panel, in the Smart Label drop-down list, select the Smart Label you want to load. |
|
5. |
The criteria of the selected Smart Label appears in the Advanced Search panel.