|
• |
If you are a new user, click Discover Replication Stream in the Welcome window. |
|
• |
In the Manage Monitoring console, click Discovery. |
|
Note |
Access to the Manage Monitoring console is controlled by security rights. If you do not have proper security rights, the Manage Monitoring option is deactivated. For more information, see the section “Manage Monitoring” on page 27. |
|
2 |
|
• |
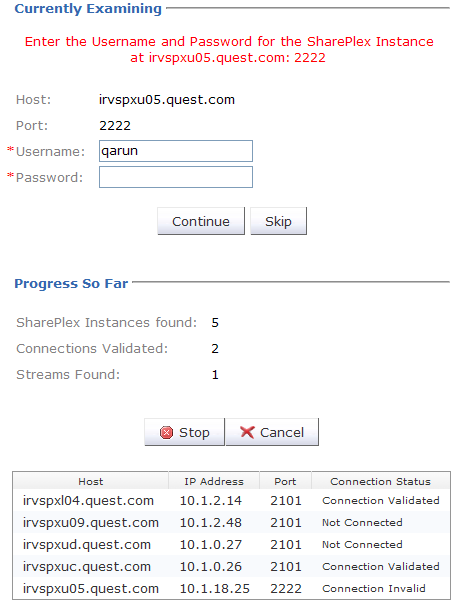
Hostname - Name of the machine on which the SharePlex instance is installed |
|
• |
Port - Port number used by the instance. |
|
• |
Username - Username assigned to the SharePlex instance |
|
• |
Password - Password assigned to the SharePlex instance |
|
4 |
(Optional) Deselect the Use as default credentials option if you do not want the username and password you specify for the initial instance to be used as the default credentials for the other instances identified by the wizard. |
|
5 |
Click Next. |
|
• |
If you want to skip the instance, click Skip. Skipped instances are included in the list of identified instances but because the connection was not validated, data for that instance cannot be monitored in SharePlex Manager. Also, if you skip an instance that functions as the source in a replication stream, the Discovery Wizard will not be able to identify the target instances in that replication stream. |
|
• |
|
Note |

|
7 |
Click Next. |
|
• |
|
• |
If you have already run the wizard and want to add any of the replication streams in the replication model to an existing replication view, select the Existing View option and select the view you in the drop-down list. |
|
Note |
The Existing View Option is disabled if this is the first time you have run the wizard and there are no replication views yet defined. |
|
• |
If you do not want to add any of the replication streams in the replication model, select the Do Not Add to View option. |
|
9 |
Click Next. |
|
10 |
If you selected the New View option, specify a name for view and (optional) add a description. |
|
12 |
Click Next. |
|
• |
If you are a new user, click Setup Replication Stream in the Welcome window. |
|
• |
In the Manage Monitoring console, click Setup Replication Stream. |
|
Note |
Access to the Manage Monitoring console is controlled by security rights. If you do not have proper security rights, the Manage Monitoring option is deactivated. For more information, see the section “Manage Monitoring” on page 27. |
|
• |
Hostname - Name of the machine on which the SharePlex instance is installed |
|
• |
Port - Port number used by the instance. |
|
• |
Username - Username assigned to the SharePlex instance |
|
• |
Password - Password assigned to the SharePlex instance |
|
3 |
Click Next. |
|
• |
To create a new configuration file, click Create New Configuration. Then follow the steps for creating a new configuration described in the section “Creating Configuration Files” on page 23. |

|
6 |
Click Next. |
|
7 |
(Optional) Click Validate Connection. |
|
8 |
Click Next. |
|
9 |
Click Next. |
|
• |
If you want the replication stream to an existing replication view, select the Existing View option and select the view you in the drop-down list. |
|
Note |
The Existing View Option is disabled if there are no replication views yet defined. |
|
• |
If you do not want to add the replication stream to any replication view, select the Do Not Add to View option. |
|
11 |
Click Next. |
|
12 |
If you selected the New View option, specify a name for view and (optional) add a description. |
|
14 |
Click Next. |
|
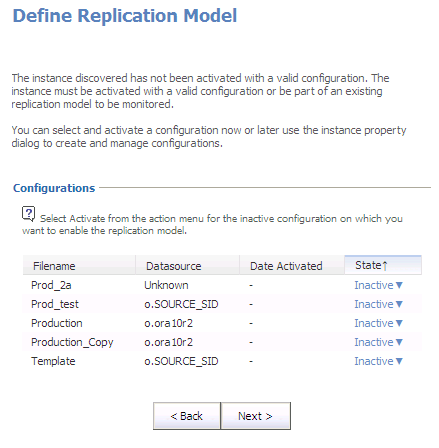
1 |
Click the Active/Inactive status of the configuration file you want to activate. |
|
2 |
|
Note |
To deactivate a currently active file, select Deactivate in the pop-up menu. Be aware, however, that at least one configuration file must be active for replication processing to occur on the SharePlex instance. Also, if you have made system changes since activating the current file and want to refresh your configuration, open the Actions pop-up menu for the currently active file and select Reactivate. |
|
3 |
Click Activate. |
|
1 |
Click the Active/Inactive status of the configuration file you want to deactivate. |
|
2 |
|
1 |
To rename, remove, or a copy a configuration file, click the Active/Inactive status of the configuration file you want to manage. |
|
2 |
In the Actions pop-up menu, select one of the following: |
|
• |
Select Rename to rename the file. |
|
• |
Select Remove to delete the file from the configuration directory of the SharePlex instance. |
|
• |
Select Copy to create a copy of the file. |
You can use SharePlex Manager to upload a configuration directory of a SharePlex instance.
|
1 |
Click Upload Configuration File. |
|
4 |
Click Upload. |
You can edit the contents of a configuration file directly within SharePlex Manager.
|
2 |
Click Edit. |
|
4 |
Click Save. |
You can create configuration files directly within SharePlex Manager.
|
1 |
Click Create New Configuration File. |
|
2 |
Specify a unique name for the file and click Create New. |
|
4 |
Click Save. |
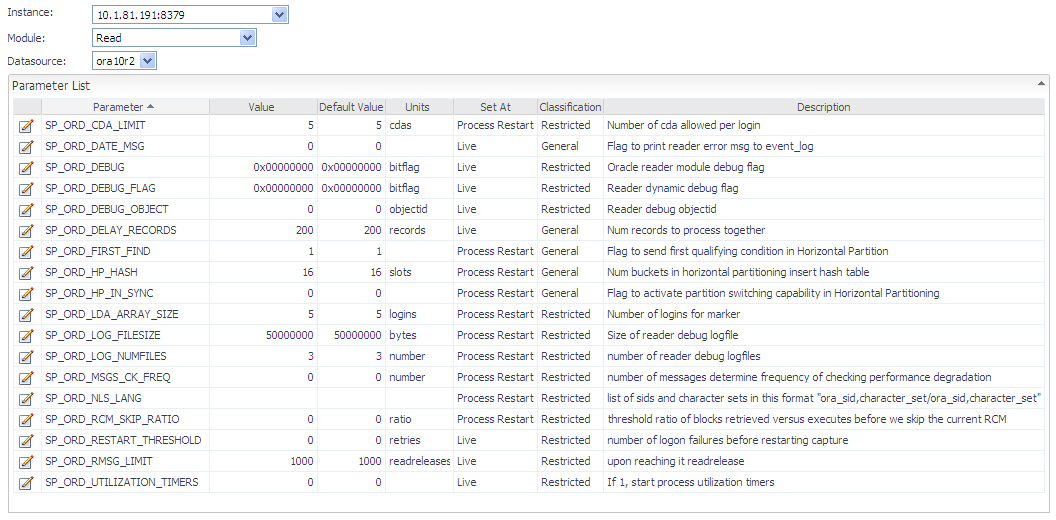
The Parameter Console displays the following information for each parameter:
| |||||||
| |||||||
|
1 |
In the Replication Overview window, click Administration. |
|
2 |
Click Manage SharePlex Parameters. |
|
3 |
In the Instance field, select the instance you want. |
|
4 |
In the Module field, select the SharePlex module that the parameters you want to view are applied. |
|
5 |
|
• |
|
• |
|
Note |
You can also open the Parameter Management console directly from Process Detail views. When opened from a Process Detail view, the Instance and Module fields in the Parameter Management console default to the particular process. For more information, see the section, “Instance Detail” on page 60. |
|
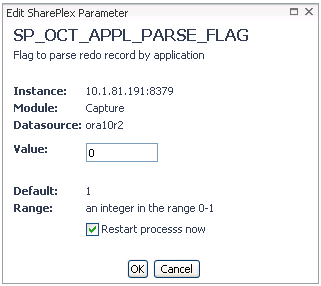
8 |
In the Value field, enter a valid value. |
|
Note |
Most SharePlex parameters require a non-null value. However, you can set a null value for certain parameters that are defined in string units by leaving the Value field blank. When this is the case, SharePlex Manager displays a warning symbol (red exclamation point) which can be disregarded. |
|
• |
Select the Restart process now option if you want the change to take effect immediately. |
|
• |
Deselect the Restart process now option if you want the change to take effect the next time you restart the Foglight server. |
|
Note |
If you are changing a parameter that requires COP to be restarted, SharePlex Manager displays an alert message reminding you that you must use sp_ctrl to restart COP manually for the change to take effect. |

|
10 |
Click OK. |
