You can use this tab to view recovery events related to the entire Active Directory® forest, specific domain controllers, or both these categories of recovery events.
On this tab, you can use the following elements:
Show - Select a category of recovery events to view:
Forest-wide events. Shows recovery events related to the entire Active Directory® forest.
Events for selected DCs. Shows recovery events related to the domain controllers selected in the list.
All events. Shows forest-wide events and events related to the domain controllers selected in the list.
Copy - Copies events in the list to Clipboard.
Save - Allows you to export events in the list to one of the following formats:
Text (Tab delimited) (*.txt)
CSV (Comma delimited) (*.csv)
You can change a number of advanced settings of the Forest Recovery Console. To do so, you need to modify the FRConsoleSettings.xml file that stores these advanced settings. You can find this file in the Recovery Manager for Active Directory (RMAD) installation folder (by default, this is %ProgramFiles%\Quest\Recovery Manager for Active Directory Forest Edition).
The changes you make in the FRConsoleSettings.xml file become effective right after you save the file. You do not need to restart the Forest Recovery Console.
The FRConsoleSettings.xml file includes the following XML elements you can modify:
Enables or disables skipping the files that are identical on the domain controller and in the backup during restore operations. This element can take one of the following values:
TRUE. Enables skipping the files.
FALSE. Disables skipping the files.
Sets the length (in characters) for the passwords automatically generated by RMAD.
Allows you to specify what symbols you want to use in the passwords automatically generated by RMAD.
This element can take the following values:
Latin. Specifies to use English letters.
Number. Specifies to use Arabic numerals.
Upper. Specifies to use uppercase English letters.
Lower. Specifies to use lowercase English letters.
All. Specifies to use all of the above-listed characters.
You can specify multiple values in this element. When specifying multiple values, use a pipe (|) as a separator.
Example:
Latin | Number | Upper | Lower
Specifies the maximum age (in days) of the backups to be displayed on the GUI. Backups whose age exceeds the specified value will not be displayed.
Enables or disables the Recovery Persistence feature. This element can take one of the following values:
TRUE. Enables the Recovery Persistence feature.
FALSE. Disables the Recovery Persistence feature.
Sets the maximum number of days between the updates of a recovery project. When the specified value is exceeded for a project, the Forest Recovery Console displays a warning.
Sets a timeout for the DNS server search operation performed during a forest or domain recovery. Use the format hh:mm:ss.
Specifies the default location on the Forest Recovery Console computer for storing diagnostic data gathered with the Diagnostic Data Collector.
Sets the global catalog partition occupancy level value to be used when advertising a rebuilt GC fast.
This element can take one of the following values:
0. No occupancy requirement.
1. At least one read-only partition in site added by Knowledge Consistency Checker.
2. At least one partition in site fully synchronized.
3. All read-only partitions in site added by Knowledge Consistency Checker, at least one synchronized.
4. All partitions in site fully synchronized.
5. All read-only partitions in forest added by the Knowledge Consistency Checker, at least one synchronized.
6. All partitions in forest fully synchronized.
If this parameter is set to FALSE, the Adjust to Active Directory changes operation will not call the "Remove lingering objects" command of the Repadmin tool.
If this parameter is set to FALSE, the Adjust to Active Directory changes operation will not call the "Unhost/Rehost" commands of the Repadmin tool.
Specifies the default location for storing custom drivers (for bare metal recovery only).
Specifies the port used by Quest Recovery Environment http service (for bare metal recovery only).
Limits the number of automatically selected DNS servers for domain controller DNS client settings.
Specifies the value by which to raise the number of available RID pools.
If necessary, you can revert to the default values in the FRConsoleSettings.xml file.
Specifies the port used by the web server handling Recovery Media Images. Images are consumed by HPE® iLO management software to perform automatic server boots. By default, the port is set to 8080.
Delete the FRConsoleSettings.xml file.
Restart the Forest Recovery Console on the computer on which you deleted the file in step 1.
Recovery Manager for Active Directory recreates the FRConsoleSettings.xml file and assigns default values to the elements in the file.
With Forest Recovery Console Configuration Backup and Restore you can backup your Forest Recovery Console settings and project files.
With a backed up RMAD console configuration file you can install a new Recovery Manager for Active Directory Disaster Edition Forest Recovery console on a new host. This is useful for adding another RMAD console, recovering from a RMAD console failure and/or disaster recovery. Once restoration completes successfully, the RMAD console configuration will contain:
Ability to open Recovery Manager console.
See the registered secure storage servers from previous console.
Be able to refresh and register secure storage server backups and copy them from the servers.
Browse cloud storages and recent upload sessions.
See and use Forest Recovery projects in the folder set when starting restoration.
Open Forest Recovery projects, verify them and run the recovery.
| NOTE |
There are powershell cmdlets, Backup-RMADFEConsoleConfiguration, Restore-RMADFEConsoleConfiguration, Set-RMADFEConsoleConfigurationProjectFiles, and Set-RMADFEConsoleConfigurationBackupSchedule available to perform the console configuration backup. See the Management Shell Guide for more information on the cmdlets. |
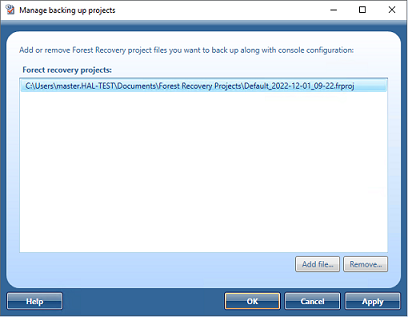
Your console configuration will be stored in a backup file along with Forest Recovery Project file(s) as it is mandatory to add at least one project file to the backup. This backup can then be install on another console with the configuration and project file(s).
| NOTE |
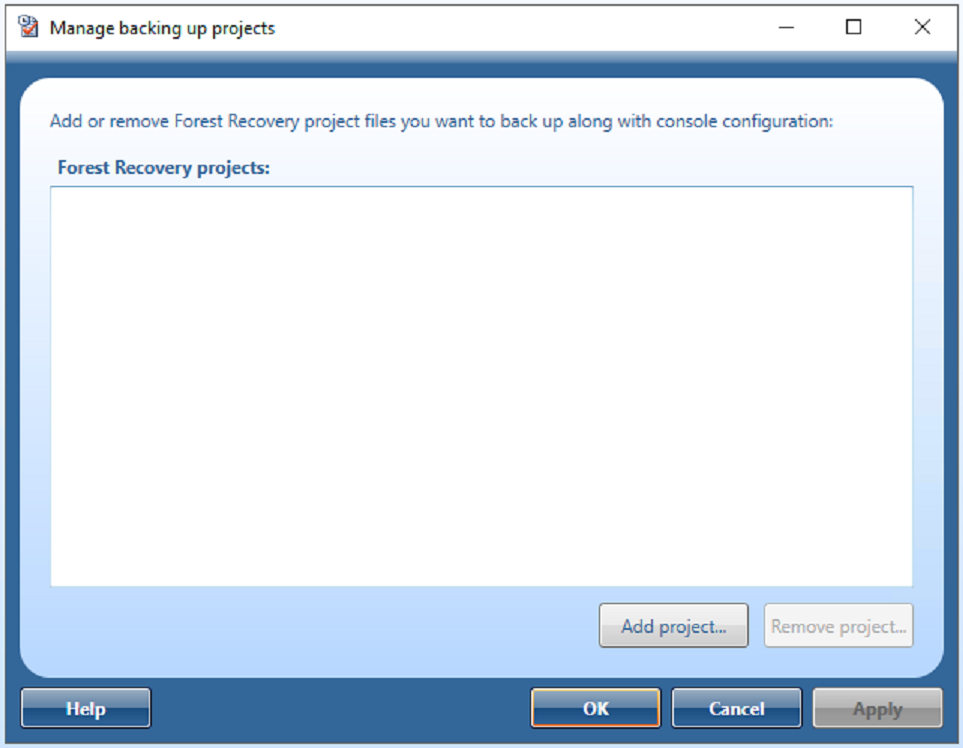
Project files are not added to the backup list automatically. If you create a new project and want it included in the console configuration backups, then the project file must be added using the steps in Manage backing up projects below. |
NOTE: The password used to secure the backup file below, must meet the following password complexity requirements. If the password fails to meet the complexity requirements you will be notified.
Password must be at least 8 letters long
Password requires at least one upper-case letter
Password requires at least one lower-case letter
Password requires at least one special character
Password requires at least one digit
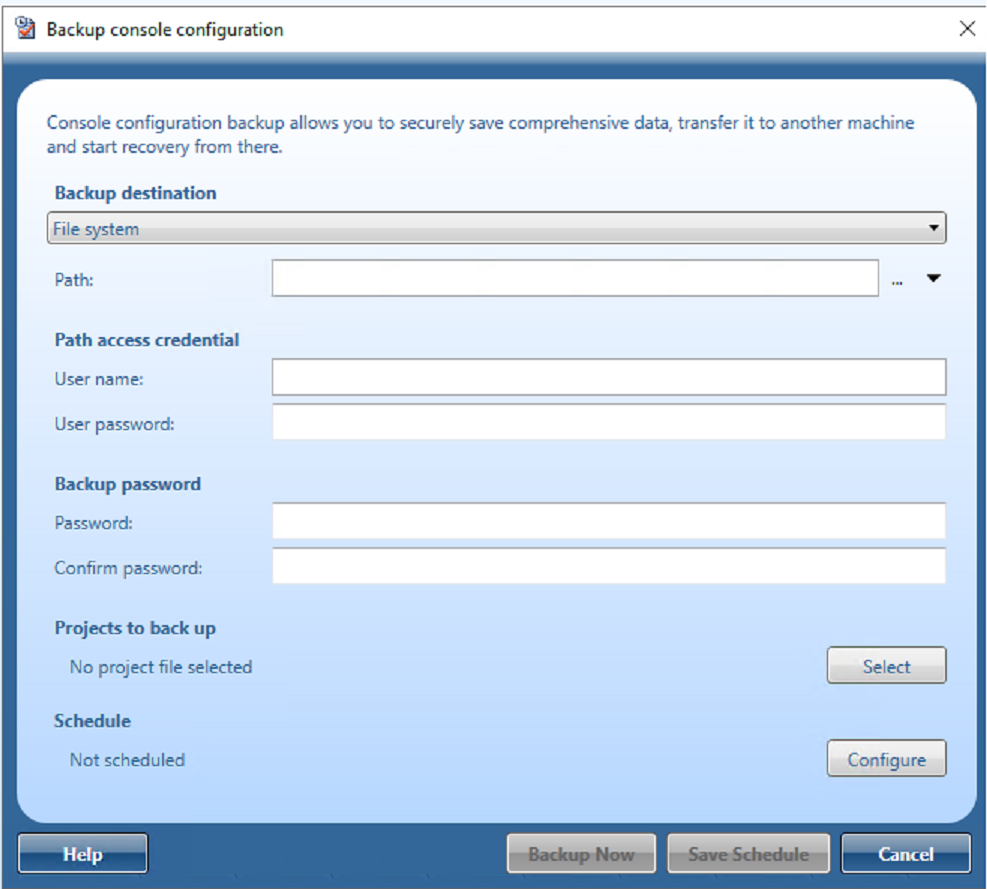

Using the Backup destination of File system enter a path to store the console configuration backup file. Click on the … on the right side of the Path field to open a browser window to help you choose a location.
You can add the console name and the date/time to the file name by selecting the drop down box to the right of the Path.

In Path access credential enter a user name and password, if needed, to access the path you enter in the Path field.
In Backup password, enter a password to protect the backup file and then confirm the password. See the password complexity requirements above.
Using the Backup destination of Secure storage server you can specify a server to store the configuration backup. If more than one secure storage server is available select the server you wish to use from the drop down. Secure storage servers are configured in the RMAD console.
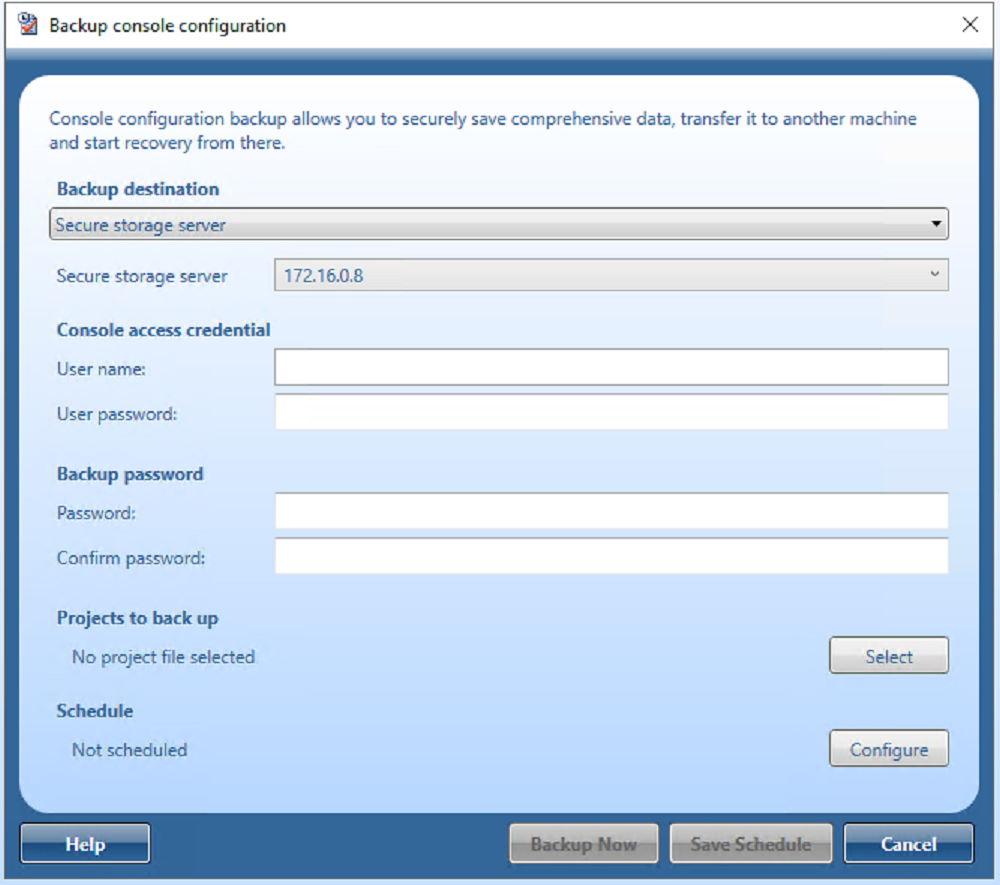
Enter the user name and password used to connect to the Secure storage server.
In Backup password, enter a password to protect the backup file and then confirm the password. See the password complexity requirements above.
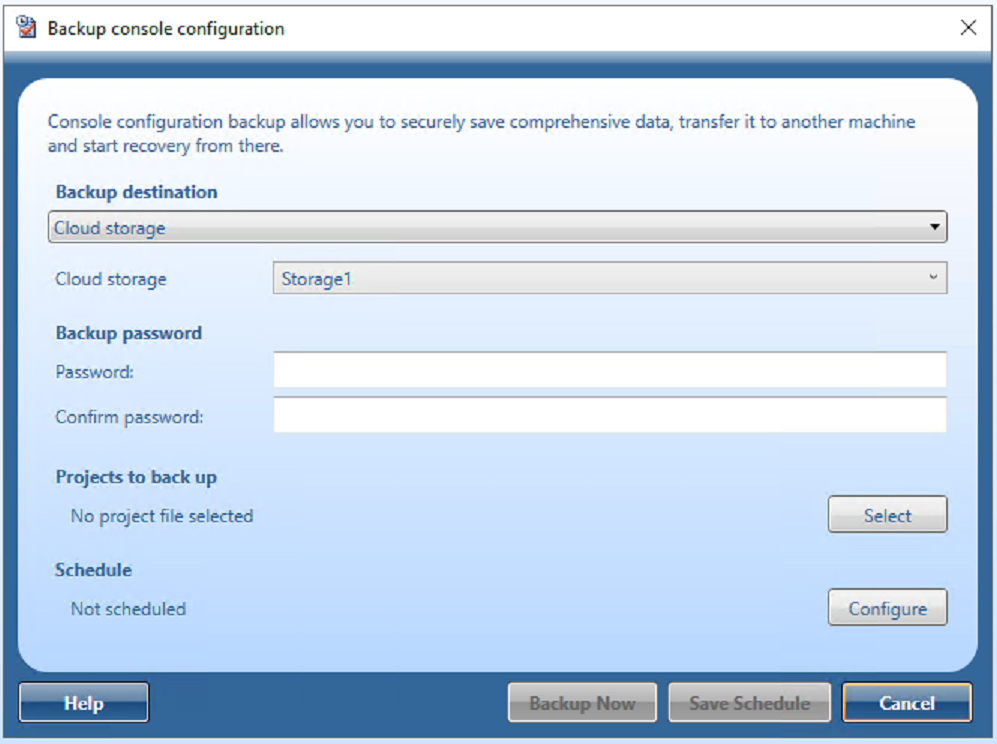
Using the Backup destination of Cloud storage you can specify any cloud storage, Azure or AWS, that you are using to store the backup of the console configuration on.

| NOTE |
Project files that have the yellow warning symbol beside them are no longer available to be backed up and should be removed. |
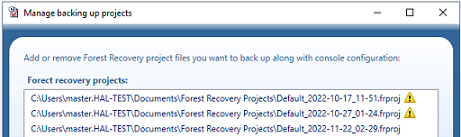
To remove a project file(s) click on the file or hold down the Ctrl and select multiple files and then click the Remove project… button. The files will be removed from the dialog.
Click the Apply button and then OK to save the settings. The project file(s) are saved with the Console configuration backup the next time it is run.
On the menu bar, click Tools | Console configuration backup | Backup configuration, the Backup console configuration opens.
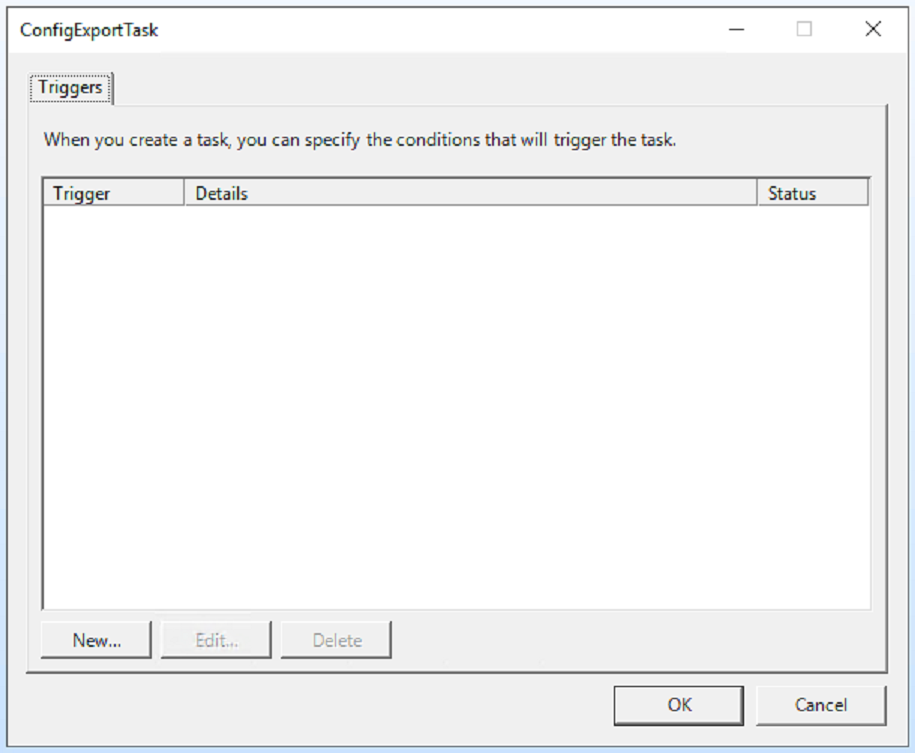
In the dialog that appears, select Configure in Schedule.
To change the schedule, select the Trigger and click Edit…
In the dialog box that opens, configure the new schedule and click OK.
Click OK to save the changes in the Backup configuration schedule dialog.
On the menu bar, click Tools | Console configuration backup | Backup configuration…, the Backup console configuration opens.
In the dialog that appears, select Configure in Schedule.
Select the Trigger and click Delete.
Delete any schedule associated with the backup and click OK.
Click OK to save the changes in the Backup configuration schedule dialog.
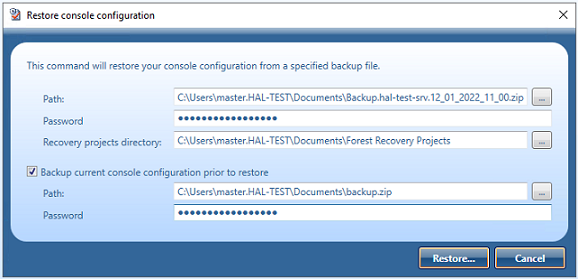
If the console configuration files is located on a Secure storage server or Cloud services then you must copy the file to a location that can be access by File access, as this is the only option available for the restore.
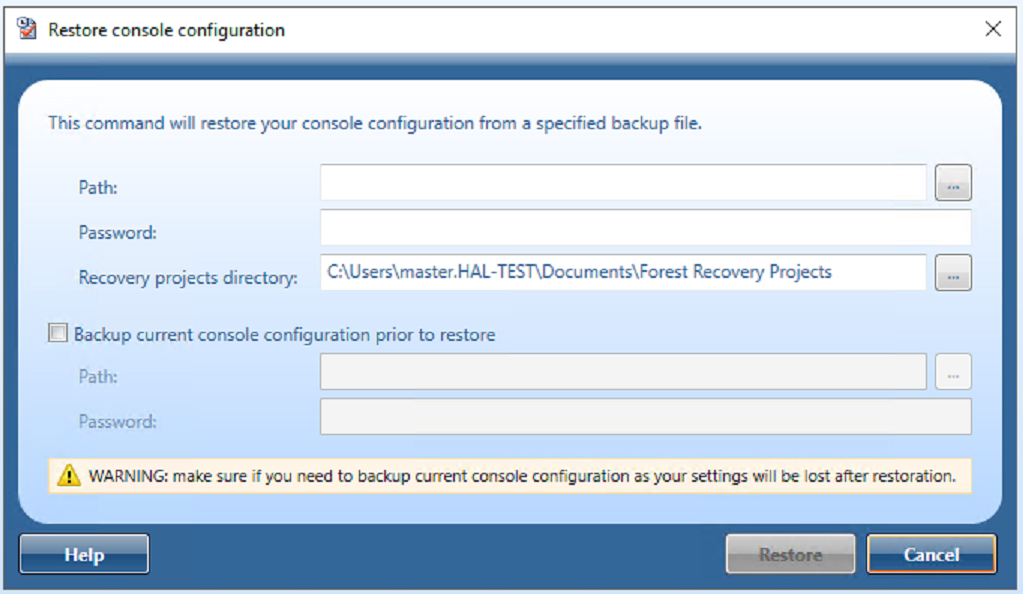
Enter the path to the backed up console configuration file.
Enter the password for the file.
In Recovery projects directory, confirm the location for the project files.
It is recommended that you select Backup current console configuration prior to restore to protect your current configuration in event of an issue. Enter a path and password for the current configuration.
A recovery project is where you manage the recovery of the entire Active Directory® forest or specific domains. Each recovery project contains a list of domain controllers to be recovered and their recovery settings, such as recovery method and access credentials. You can specify individual recovery settings for each domain controller in a recovery project. A recovery project also has a number of project-specific settings you can modify.
Each recovery project is saved to an individual project (.frproj) file. A project (.frproj) file holds information about the contents and settings of the project and the recovery settings specified for the DCs in the project.
You can perform sequential recovery against multiple forests (each forest in a separate project file) from a single Forest Recovery Console. Parallel recovery is possible only if you use several instances of Forest Recovery Console on separate machines.
In this section:
