You can use this tab to specify recovery settings for one or more domain controllers selected in the list.
| TIP |
To specify recovery settings for multiple domain controllers at a time: |
Hold down CTRL, and then click to select domain controllers in the list of domain controllers.
Use the General tab to specify recovery settings for the selected domain controllers.
The "Domain Controller Recovery Settings and Progress" area also provides the following commands for managing the recovery of domain controllers:
Pause Next - Suspends the next operation performed during the current session on the selected domain controllers.
Resume - Resumes the suspended operation on the selected domain controllers. There are two choices which can be made. The first is Resume All DCs which allows the resume function of all Domain Controllers in the recovery and Resume Selected DCs which will only allow the resume for the selected Domain Controllers.
Retry All - Retries all operations for the selected domain controllers. Before retrying all operations, you may specify a different recovery method for the domain controllers.
Retry Last - Retries the last operation performed during the current session on the selected domain controllers.
Skip and Continue - Skips the error encountered for the selected domain controllers.
Abort - Cancels the recovery or verify settings operation for the domain controllers selected in the list.
Recovery method - Allows you to choose one of the following recovery methods for the domain controller selected in the list:
Restores the domain controller from the backup you specify. For more information on backup selection methods, see Selecting backups for recovery. During recovery, Recovery Manager for Active Directory (RMAD) uses custom Internet Protocol security (IPSec) rules to isolate the domain controllers for which you selected this recovery method. For more information, see How does Recovery Manager for Active Directory isolate domain controllers during forest recovery?
The Directory Services Restore Mode (DSRM) can be paused during recovery by selecting the Pause recovery in DSRM to perform additional actions before booting to normal mode. on the Advanced Actions tab.
Restores the domain controller on the freshly installed Windows machine. For details, see Restore Active Directory on Clean OS.
The Directory Services Restore Mode (DSRM) can be paused during recovery by selecting the Pause recovery in DSRM to perform additional actions before booting to normal mode. on the Advanced Actions tab.
The recovery process follows Microsoft best practices by using the following recovery methods:
Recovery from BMR backup (Bare Metal Restore)
(Optional) Restore Active Directory® and Registry data from Active Directory® backup to bring Active Directory® to the latest state
The Directory Services Restore Mode (DSRM) can be paused during recovery by selecting the Pause recovery in DSRM to perform additional actions before booting to normal mode. on the Advanced Actions tab.
For details, see Bare metal forest recovery.
Restores contents of the SYSVOL share on the specified domain controllers. Read-only domain controllers (RODC) will be restored as well.
This method can be set only on the Recovery Mode tab of Recovery Project Settings. For details, see Recovering SYSVOL.
Installs Active Directory® by using Microsoft’s tools.
For domain controllers running Windows Server® 2008 or earlier, this step uses the Dcpromo.exe tool.
For Windows Server® 2012-based domain controllers, this step uses the Windows PowerShell cmdlets Install- ADDSDomainController.
Installs Active Directory® by selecting the Install from Media (IFM) option. The selected servers will be promoted to Domain Controllers using a media file created from the Active Directory® backup.
Note: Make sure that a read-only domain controller (RODC) can be installed using a backup created from a read-only DC, or a writable DC can be installed using a backup created from a writable DC.
For details, see Install Active Directory recovery method.
Uninstalls Active Directory® and then installs it again by using Microsoft’s tools.
For domain controllers running Windows Server® 2008 or earlier, this step uses the Dcpromo.exe tool.
For Windows Server® 2012-based domain controllers, this step uses the Windows PowerShell cmdlets Install- ADDSDomainController and Uninstall-ADDSDomainController.
Uninstalls Active Directory and then installs it again by selecting the Install from Media (IFM) option.
The selected servers will be uninstalled and then promoted to Domain Controllers using a media file created from Active Directory backup.
After the Active Directory® reinstallation is complete, the domain controller replicates Active Directory® data from other domain controllers that were restored from backups in the recovery project.
| Note |
The Reinstall Active Directory® recovery method removes the global catalog by default if it is present on the domain controller being recovered. If you need to reconfigure the global catalog on the domain controller during Active Directory® reinstallation, select the Configure the domain controller as a global catalog server option in the Additional Settings section. |
Performs a forced removal of Active Directory® from the domain controller and then demotes it to a member server in the domain. Domain controller’s metadata is completely removed from Active Directory®.
| Note |
When you use this method, the local Administrator password on the target domain controller is reset to the value you specify in the Set DSRM password and Confirm DSRM password text boxes in the Forest Recovery Console. |
This recovery method is available and selected automatically when the domain controller is a Global Catalog server and belongs to the excluded domain, and either Rebuild GC, advertise normally or Rebuild GC, advertise fast is checked on the Global Catalog tab of the project settings. You can suppress any of the first two options using advanced settings.
How the Adjust to Active Directory changes method works:
The agent removes lingering objects from other recovered domains, if any, using the Repadmin tool.
If the previous step fails, the agent performs unhost and rehost of recovered domain partitions using the Repadmin tool.
Only if both previous steps fails, the agent rebuilds Global Catalog on this domain without attempts to remove lingering objects. In case of full reset of Global Catalog, the replication of Global Catalog data may require additional time.
Isolates the domain controller from other domain controllers and completely removes it from the domain - no actions are performed on the domain controller itself. This option is used if the domain controller is inaccessible or you do not want to recover the domain controller due to any failures. RMAD removes all metadata of domain controllers that were not recovered from the Active Directory® forest.
| Note |
For recovery in the second phase only: If you are going to restore this domain controller on the second phase later, select the Keep this domain controller in the project option. For details, see Phased recovery. |
This recovery method does not perform any actions on the domain controller and does not remove it. This method is available only if the Repromotion recovery mode is selected on the Recovery Mode tab of Recovery Project Settings. For details, see Phased recovery.
Allows you to specify the user name and password that will be used by RMAD to access domain controllers in the domain. This area has the following text boxes:
Target computer - Using this option you can specify the IP address for the target computer where Active Directory® will be installed. Only for the Install Active Directory® From Media, Install Active Directory®, and Restore to Clean OS methods.
What does Source DC mean? When performing a verification for one of the following recovery methods, Install Active Directory From Media, Install Active Directory, or Restore to Clean OS, if a target IP address is not supplied, then the currently selected DC’s address will be used, and the Source DC placeholder will be displayed in the Target computer text box. Using the source DC's address is only applicable during verification; when performing a restoration a valid target computer IP address must be supplied.
Use Default Domain Access Credentials - This option lets you use the default domain credentials to access domain controllers. To configure the default domain access credentials, select the option and press the view link that opens Recovery Project Settings. For more details, see Specifying recovery project settings. If the option is not selected, you can specify domain access credentials and DSRM password in the Domain Controller Access section. Otherwise, the Domain Controller Access section is not active.
User name and User password - Allows you to specify the user name and password with which RMAD will perform the following operations:
install, upgrade and check the Forest Recovery Agent
purge Kerberos tickets
manage FSMO roles
manage DNS client settings
manage Global Catalog servers
check forest health
These credentials are not used to access domain controllers during the project verification and forest recovery. Forest Recovery Agent uses RPC over SSL for communication. To get more details, see Managing Forest Recovery Agent.
| CAUTION |
The password for the specified account will be reset to the value specified in the project during the restore process. Make sure that the specified account existed in Active Directory® at the time of the creation of the selected backup - the backup can be selected by a user or by the specified backup criteria. Otherwise, the password will not be reset. |
DSRM administrator - Allows you to specify the user name with which you want RMAD to access the selected domain controllers in Directory Services Restore Mode (DSRM).
Set DSRM password and Confirm DSRM password
Allows you to specify the DSRM password to be used by RMAD during the domain controller (DC) recovery.
When using these boxes, consider the current mode of the DC:
If the DC is already in DSRM mode. Use these boxes to specify the current password of the account you entered in the DSRM administrator text box. Otherwise, the DC recovery will fail.
If the DC is not in DSRM mode. Use these boxes to set a new temporary DSRM password for the account you entered in the DSRM administrator text box. RMAD will use this temporary DSRM password to restart the domain controller in DSRM during the recovery. Then, RMAD will replace this temporary password with the DSRM password stored in the backup you specified for the DC.
Target server network settings - Allows you to specify network settings applied to the recovered machine.
IP Address
Subnet mask
Default gateway
DNS Server
*Only for the Bare Metal Active Directory Recovery method
The network and DNS settings will be retrieved automatically from the BMR backup for the Bare Metal Active Directory Recovery method. If you need to edit the settings, click Change and specify the following options:
This option gets network settings for the selected domain controller from the backup
This option lets you specify network settings manually.
If this option is selected, DNS server will be selected automatically.
This option lets you specify one DNS server or a list of DNS servers separated by semicolons.
NAT settings - This option lets you access recovered domain controllers that are located outside the network where RMAD is installed. *Only for the Bare Metal Active Directory Recovery method
This area has the following options:
Install the domain controller as a read-only - Use this option to install Read-Only Domain Controller(RODC) for Install Active Directory and Reinstall Active Directory recovery methods. This option will be selected by default if the original DC was read-only. Note that a read-only DC can be installed using a backup created only from the RODC. For more details, see Recovering read-only domain controllers (RODCs).
Configure the domain controller as a global catalog server - Use this option if you need to reconfigure the global catalog on the domain controller during Active Directory® reinstallation. This option will be selected by default if the original DC was a global catalog.
Preferred DNS server - Allows you specify a preferred DNS server for the domain controller during its recovery. For more information, see Assigning a preferred DNS server during recovery.
Use backup criteria to automatically select a backup - Allows you to automatically select a backup file that meets particular criteria. To specify your criteria, click the Backup Criteria button on the toolbar.
Backup - Displays the path and name of the currently selected backup file from which the domain controller will be restored. To manually select a backup file, make sure the Use backup criteria to automatically select a backup check box is cleared, and then click the Select button.
Backup password - Allows you to type the password to open a password-protected backup.
Temporary backup folder - Here you can specify the folder on the domain controller to store temporary forest backup data.
Access Credentials - Allows you to enter the user name and password with which you want to access the location that holds the backup specified in the Backup file box. The account you specify must have Read access to that location. For BMR backups, the account you specify must have Read and Write access to that location.
Wipe all disks on the target machine before restore from the backup - If this option is selected, RMAD performs the DiskPart "clean all" command before recreating the disks. This command removes all partitions and cleans all disk sectors. The "Wipe all disks…" operation significantly increases the time of the restore process. *Only for the Bare Metal Active Directory Recovery method
Scan the selected backup (and Active Directory backup if applicable) for malware during the project verification - This option allows you to run antivirus checks for backups as a part of the settings verification process.
Restore from Active Directory Backup - This option allows you to restore the latest Active Directory/Registry data from the Active Directory® backup. *Only for the Bare Metal Active Directory Recovery method.
DIT database path - Specifies the location of the DIT database. *Only for the Install Active Directory From Media and Install Active Directory methods.
Log files path - Specifies the location of Log files. *Only for the Install Active Directory From Media and Install Active Directory methods.
SYSVOL path - Specifies the location of SYSVOL. *Only for the Install Active Directory From Media and Install Active Directory methods.
This tab is available only for the Restore Active Directory on Clean OS and Bare Metal Active Directory Recovery methods.
To automatically boot a physical server or create and/or boot a virtual machine, from the Infrastructure drop-down list, select the type of physical server, virtual machine platform, or cloud platform on which you want to perfrom the selected recovery method.
If you select Dell® server, HPE server, or Custom from the Infrastructure drop-down list, you must complete this section. For more information, see Boot from the ISO image automatically.
When recovering a DC to the VMWare® or Hyper-V® platform, from the Infrastructure drop-down list, select VMWare ESXi™ or Microsoft Hyper-V®. For more information, see VMware ESXi™ and Microsoft Hyper-V®.
If you selected the Restore Active Directory on Clean OS method, see Create virtual machines in Microsoft Azure.
The Quest Recovery Environment image requires storage drivers to recognize the drives of the server, and network adapter drivers in order to communicate with the Forest Recovery Console over the network.
A generic set of Windows storage controller and network adapter drivers are included automatically when you generate the Recovery Environment image. This satisfies the requirements of newer systems. Systems from other manufacturers or older systems may require you to inject storage controller or network adapter drivers when creating the Recovery Environment image.
When creating the Recovery Environment image, driver injection is used to facilitate interoperability between the Forest Recovery Console, network adapter, and storage on the target machine.
Data restored from the Bare Metal Recovery Backup includes drivers for the hardware previously in place. Custom third-party drivers will be added automatically from the Recovery Environment image to the restored operating system. This allows the restored operating system to boot using the new set of hardware.
Store recovery media on the Bare Metal Recovery backup share - By default, the Quest Recovery Environment image file will be saved on the backup share specified on the General tab.
Add third-party drivers - This option allows you to create the Quest Recovery Environment image supporting custom network cards and custom disks.
Add third-party drivers from Bare Metal Backup - Adds third-party drivers from Bare Metal Recovery backup.
If you choose not to add third party drivers and then run the Verify Settings operation, the Recovery Environment image will not contain any third-party drivers. You can add third-party drivers to the Recovery Environment image later by selecting the Add third-party drivers check box or the Add third-party drivers from Bare Metal Backup check box and running the Verify Settings operation again. You can also remove third-party drivers from the Recovery Environment image by clearing the Add third-party drivers check box and the Add third-party drivers from Bare Metal Backup check box and running the Verify Settings operation.
| Note |
Note that adding additional drivers may significantly increase the size of the Quest Recovery Environment image file. |
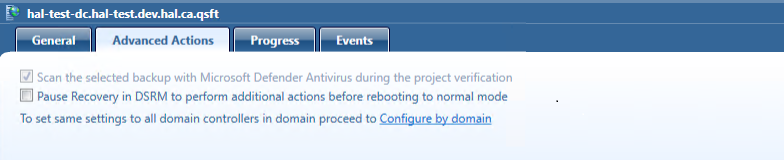
You can use this tab to make choices for scanning of malware or server maintenance during recovery. RMAD does not scan and remediate with this feature. The feature pauses the recovery during Directory Services Restore mode (DSRM) before the domain controller is restarted into normal mode allowing users to perform maintenance and run their own scans using third party tools and/or remediate if malware found.
The choices are:
Scan the selected backup with Microsoft Defender Antivirus during the project verification.
Pause recovery in DSRM to perform additional actions before booting to normal mode.
During the pause you have an option to run a script and quarantine files.
Pause recovery in DSRM to perform additional actions before booting to normal mode can be enabled for specific domain controllers by selecting the option from the Advanced Action tab from each domain controller in the project, or for all domain controllers in the entire domain/forest.
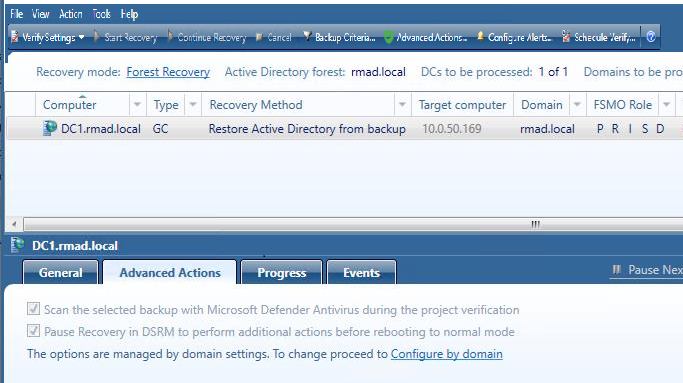
To select all of the domain controllers in a domain or forest to be paused during recovery in DSRM mode, select Configure by domain and select a domain or multiple domains within the forest.

Run Script
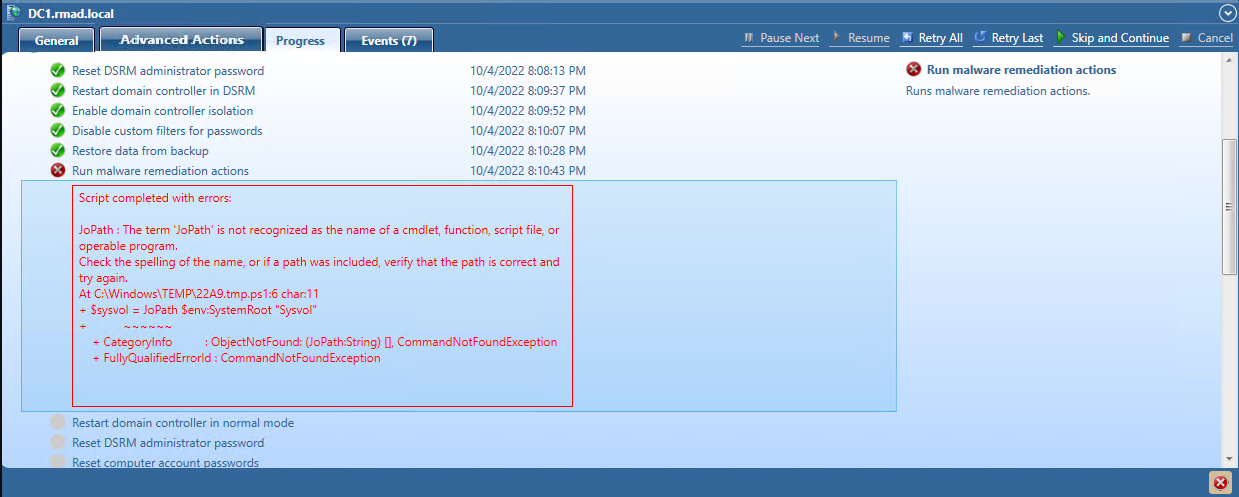
In addition to pausing, you can run a Powershell script on the domain controller after restoring Active Directory data from a backup. The script, for example, could be used to inspect SYSVOL, looking for any file extension that is executable (.exe, .dll, .bat, .cmd, .ps1, etc.), and then renaming by adding an extension that is not executable. The script can be used to perform any tasks on the domain controller after it is recovered from the backup.
A sample script can be found in C:\Program Files\Quest\Recovery Manager for Active Directory Forest Edition called MalwareRemediation.ps1

Quarantine Files
You can also quarantine files on the domain controller after restoring Active Directory data from a backup.
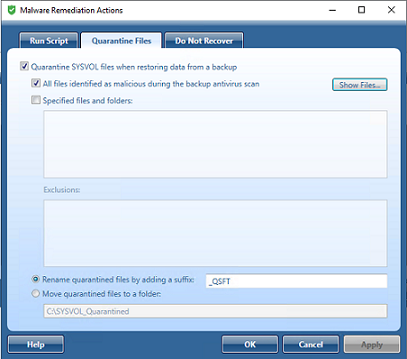
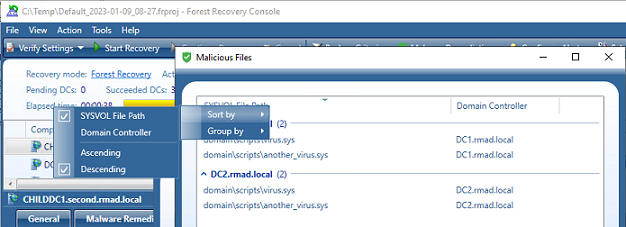
Click on the Show Files button to see a list of malicious files that will be automatically included in the quarantine rules (for both Quarantine Files and Do Not Recover tabs).
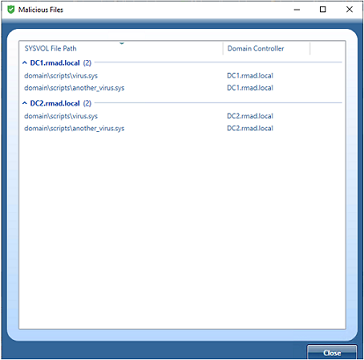
Malicious files are shown for each backup selected for a domain controller, and the list can be grouped and/or sorted by SYSVOL File Path and Domain Controller. A list of the files is also included in the Forest Recovery Report, click View | Report….
SYSVOL_Quarantined is created with the file detected as malicious by the antivirus.
In PowerShell, quarantine rules can be configured as follows:
$quarantineRule = (Get-RMADFEDomain -Domain "rmad.local").QuarantineSysvolFiles
$quarantineRule.IsEnabled = $true
$quarantineRule.MaliciousFiles = $false
$quarantineRule.SpecifiedFiles = $true
$quarantineRule.Filters = @("*.exe")
$quarantineRule.Exclusions = @("*\scripts\config\setup\*")
$quarantineRule.RenameFiles = $true
$quarantineRule.RenameSuffix = "_INFECTED"
$quarantineRule.MoveFiles = $false
Set-RMADFEDomain -Domain "rmad.local" -QuarantineSysvolFiles $quarantineRule
Do Not Recover
You can specify specific files from being restored from a backup.

When a domain is selected the Pause recovery in DSRM to perform additional actions before booting to normal mode is no longer available on each domain controller for the selected domain, and The option is managed by domain settings is displayed.
| NOTE |
When the Pause recovery in DSRM option is managed by domain settings, it applies to all domain controllers in the project for the selected domain. When enabled for entire domain, you can not individually enable the pause recovery in DSRM option for specific domain controllers. To do so, within Configure by Domain, unselect the domain(s). After a domain is unselected, within the project select each Domain Controller the pause is required for. From the Advanced Actions tab, select to enable Pause recovery in DSRM to perform additional actions before booting to normal mode. |
To Resume recovery when paused, select all or individual domain controllers in the recovery project. There are two choices which can be made:
 Resume All DCs which allows the resume function of all Domain Controllers in the recovery.
 Resume Selected DCs which will only allow the resume for the selected Domain Controllers.
Otherwise the Resume button will be unavailable.
You can use this tab to view progress of the recovery stages and steps applicable to the domain controller selected in the list. To view more information about a recovery step on this tab, point to that step, and then point to the question mark displayed next to it.
You can copy the information displayed on the Progress tab to the Clipboard and then paste it to another application (for example, a Microsoft Office Word file). To do so, point to the Progress tab, and then click the Copy button in the upper right corner of the tab. This copies all the information displayed on the Progress tab, including the current status of each recovery stage and step and any error messages displayed on the tab.
When a script is run, the results are displayed in the Progress Tab under the Run Advanced Actions process, for any errors encountered.
When a backup is created, a checksum is calculated for the backup file and saved in the backup file when the backup is registered. An integrity check is performed on the backup during the progress and any issues are displayed as seen below.
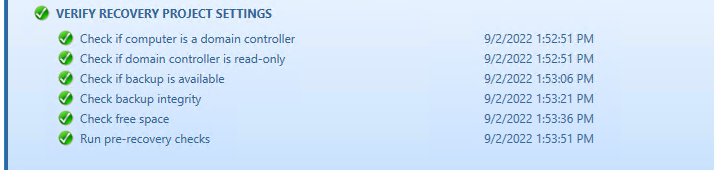
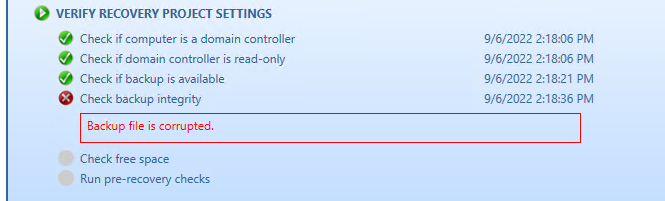
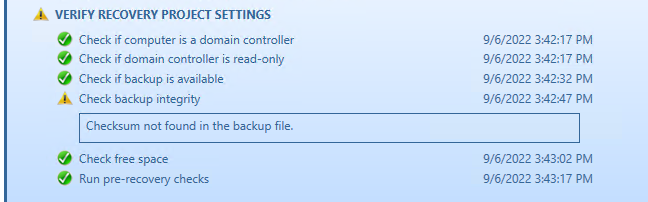
The following statuses can be displayed after running the integrity check:
| Status | Description |
|---|---|
| Passed | The newly calculated checksum value matches the previously calculated checksum stored in the backup file. |
| Unknown | The integrity check was not performed. |
| Running | The integrity check is in progress. |
| Failed | The backup is not accessible (wrong credentials) or may have been moved from the path. |
| No Checksum | The previously calculated checksum could not be read. This could be due to the backup being created by a previous version of the product. The backup also may have been damaged in such a way that the checksum was also affected. |
| Corrupted | The newly calculated checksum value does not match the previously calculated checksum stored in the backup file. |
