As a Nova administrator, you have the ability to automatically assign group management delegation based on properties of the group or group owner. This allows you to delegate responsibilities to localized IT support without granting them excessive access to your tenant(s).
To automate group management delegation:
1.From the Nova dashboard, go to Manage Administration, then Tenants.
2.Click on the ellipsis next to your desired tenant, and click New.
3.Click Add under Group Assignment Rule.
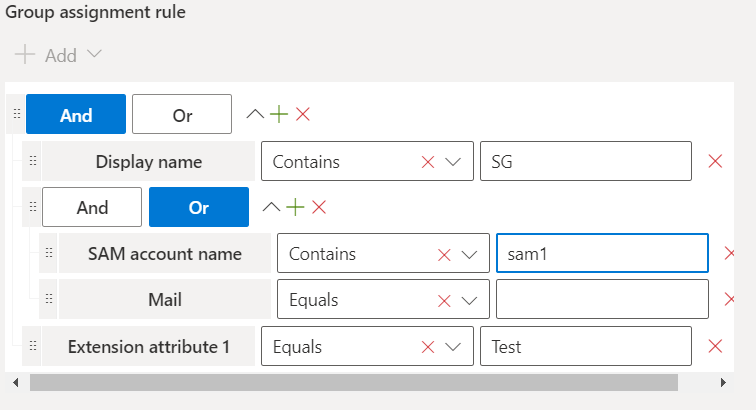
From here, provide your required group and/or properties, then save your organizational unit with this group assignment rule. View the image below for an example.
You can enable or disable OU rules for each user by selecting the user from your chosen tenant, then selecting Evaluate OU Rules, then either enabling or disabling these rules.
The Delegation and Policy Control (DPC) feature allows administrators to authorize rights and responsibilities to other users within their organization.
Nova facilitates Role-Based Access Control (RBAC). That means you use it to grant permission for someone to do something, against something. For example, an administrator might grant permission for people to access a certain application. Or, an office manager might grant access for others in the office to use certain resources.
A Nova administrator configures authorization policies to specify who can perform certain actions within a tenant, and the conditions associated with those actions.
There are four pieces to an authorization policy:
·Tenant: Authorization policy is applied to a certain tenant. For example, North America.
·Delegate: The person to which rights are granted. They can do something with the tenant. For example, VP of Operations.
·Action: The activity the person can perform. For example, update user.
·Conditions of the action: Any conditions related to the delegate performing the action. For example, when the VP of Operations updates a user's information, you can specify whether they can see/update all of the user's attributes or only some of them.
When an authorization policy grants someone rights to perform a certain action, that person logs in to Nova to perform the action.
For example, a manager can perform certain actions (like setting out of office messages and granting access to SharePoint resources) to the users on their team. The manager uses single sign-on (via their Microsoft Entra ID credentials) to log in to Nova and perform the actions. Actions performed by the manager are pushed to other applications (for example, Exchange Online). It is important to note the manager's Nova instance only shows options that are relevant to the activities they can perform in the application.
A video overview of authorization policies can be seen here.
Setting up a new authorization policy
Follow the steps below to create an authorization policy.
1.In the left menu, select Manage Administration > Authorization policies.
2.Click Add.
3.Enter a name for the policy.
4.Specify settings, if desired:
oDefault user policy: Select this option if the policy applies to all organizational units in a tenant. For example, select this option if you want the helpdesk to be able to update all users in the organization.
oSelf service: Select this option if you want a user to be able to perform a certain specific action on their own user object when they log in. For example, select this option if you want a user to be able to update their own phone number and address.
oIs template: Select this option if you want to create a template policy that you will use across tenants.
6.Using the Delegate to tab, assign the policy to users.
7.Using the Managed objects tab, specify where the delegated rights are assigned.
8.Using the Actions tab, add tasks you are delegating.
9.Using the Properties tab, add any conditions to the policy. For more information, click here.
10.Click Save to create the authorization policy.
Editing or deleting an authorization policy
To edit or delete an existing authorization policy:
1.In the left menu, select
2.Manage Administration > Authorization policies.
3.Locate the policy you want to edit or delete, and select it.
4.Either:
oClick Edit, make desired changes, and click Save to apply all the edits.
oClick Delete and confirm the delete action.
Delegating action(s) to an authorization policy
Follow these steps to delegate an action to an authorization policy:
1.In the left menu, go to
2.Manage Administration > Authorization policies.
3.Select an existing policy, and then click Edit.
4.In the Assignment frame, select the Actions tab, and then click Add.
5.Locate the action(s) you want to add, select it/them, and then click the Add button located in the top right corner of the window.
6.Select the Properties tab and select any conditions. For more information, click here.
7.Click the Save button.
Which policies apply?
After you have set up and assigned policies, here is how you can see which policies apply to a certain virtual organizational unit.
Granting permissions in Nova also grants those permissions in Microsoft 365. Follow the steps below to grant permissions for users for OneDrive.
|
|
NOTE: If you are not a System Administrator, ensure that you are in an authorization policy with the actions needed to configure OneDrive. |
1.In Nova, under Manage, go to Users.
2.Find the user to configure, then go to OneDrive, then Items.
3.Select Private/Sharing under the Sharing column for a OneDrive item. This will then open a list of users who have permissions on that OneDrive item.
4.Select which users you would like to grant permissions to that item, and click Grant Access.
5.On the Grant Access screen, select which type of permission to grant; View Only or Edit. Add recipients to that permission, and click Save.
These users' permissions should now be saved in OneDrive as well as Nova.