
Destination Settings
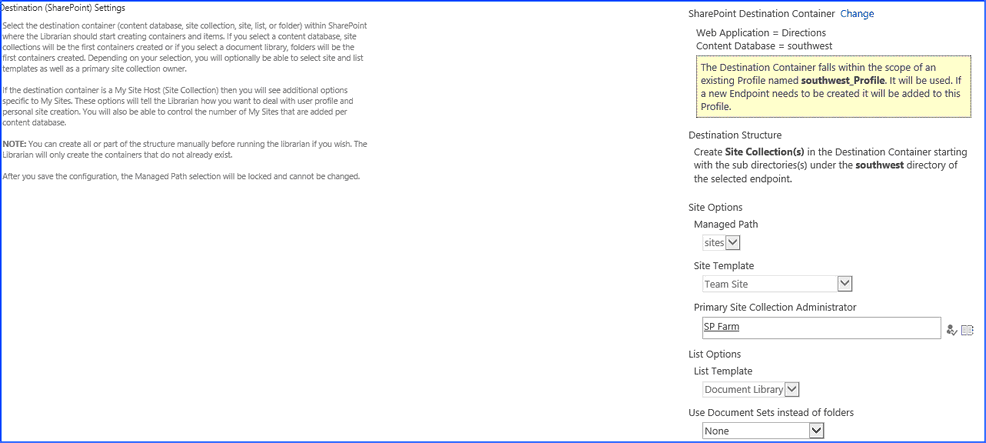
1.Click the Change link to select the SharePoint Destination Container. The structure of the SharePoint farm will display in another window. Use the URL search field to find a location, or select the location for the cataloged content to reside. Note that as stated above, if a Web Application is selected, the cataloged content will begin at the Site Collection level, and folders that are below the root of the source will become sites, and so forth.
If the destination container selected is already covered by an existing Metalogix StoragePoint storage profile and that profiles endpoint does not match the File Share to Catalog, the endpoint will be added to the existing storage profile.
|
|
NOTE: A broader scoped File Share Librarian configuration cannot be configured. For example, if a Site Collection is selected as the destination, there cannot also be a configuration for the content database or web app that hosts that site collection. |

If the destination container selected is not already covered by an existing Metalogix StoragePoint storage profile, one will be created for the most specific scope available. If the destination is a MySite Host, the scope of the created profile will be the web application.
The Destination Structure message will populate after a destination container is selected. The message will instruct on where the Librarian will start building containers in SharePoint.
Example:
If the source to be cataloged looks like this:
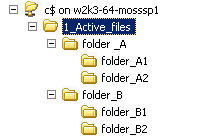
And the cataloging is configured to begin at the web application level, it would create:
1_Active_Files
folder_A = Site Collection
folder_A1 = Site
folder_A2 = Site
folder_B = Site Collection
folder_B1 = Site
folder_B2 = Site
Files will be found at their respective levels within the structure. If there are files in the folders that are to become Site Collections or Sites, those files will be found in the Shared Documents library of the respective site or site collection.
2.There may be additional configuration options based on the structure the Librarian will need to create. Those options are as follows:
a.Managed Path If the destination is a Web App or Content Database, the Managed Path option will be available. This field will be locked down once the configuration is saved.
b.Site Template select a template that will be used when site collections or sites are created.
|
|
NOTE: For SharePoint 2019, be sure that the correct Site Template is used if using Team Site. Team Site (Classic Experience) is the default. |
c.Primary Site Collection Administrator provide this value if the Librarian will create site collections.
d.List Template select a template that will be used when document libraries are created.
e.Use Document Sets instead of folders - None, For Parent Folders Only, or For All Folders (SharePoint 2013 Only). This option allows the creation of document sets, if available on the site collection, in place of where folders would normally be added. The document set will contain any documents within the folder. Pay special attention to the structure of the file share that is being cataloged, when using document sets, making sure that the correct level corresponds with the creation of document sets.
Destination Settings for MySite Host
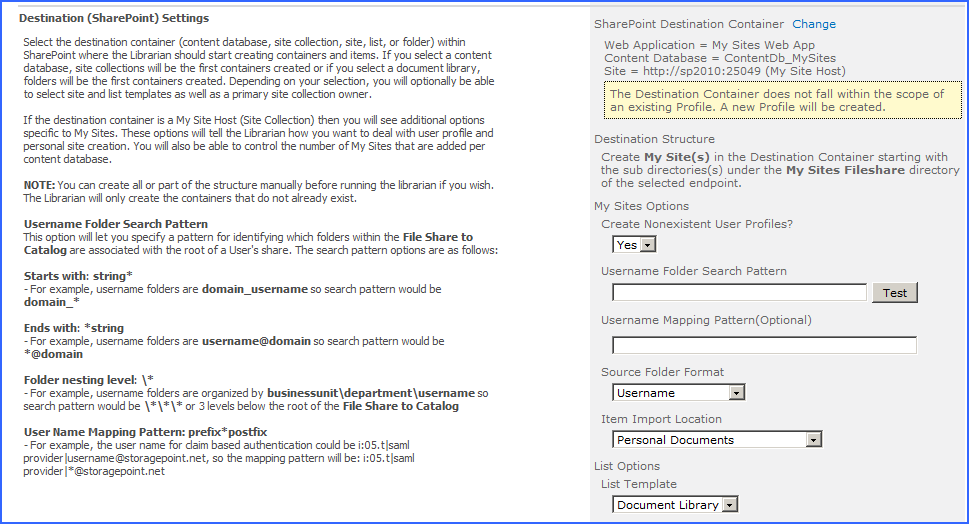
If the SharePoint Destination Container is a MySite Host then there will be additional options that will allow Librarian configuration for User Profile and Personal Site creation.
1.Create Nonexistent User Profiles? by default the Librarian will create User Profiles that are not already present in SharePoint. Setting this option to No will cause the Librarian to log exceptions for any User Profiles that do not already exist.
2.Username Folder Search Pattern this setting provides a means to find user folders within a non-flat folder structure either by some pattern or level. For example, all the folders may be username@domain, so set the search pattern to *@domain to identify folders with that pattern as user folders for cataloging. Set Source Folder Format to username@domain so the Librarian knows how to strip the username out of the folder name. If using a non-flat folder structure where the user folders are at the same level in the folder hierarchy, but grouped by business unit or region or some other dimensions, simply indicate the level with a series of \* sequences. For example, it may have a folder structure that is \\myfileserver\userdrives\businessunit\countrycode\username. In this scenario, \\myfilerserver\userdrives would be the File Share to Catalog and the search pattern would be \*\*\* indicating that the username folders are 3 levels below the File Share to Catalog root.
3.Username Mapping Pattern (Optional) use to provide parameters needed for claims based authentication.
4.Source Folder Format this selection simply tells the Librarian what to expect when it finds a username folder and how to extract the username from the folder name. The possible selections for this option are username, username@domain, and domain_username.
5.Item Import Location this selection tells the Librarian where to start cataloging items. By default, a SharePoint 2010 personal site contains two libraries, Personal Documents and Shared Documents. Librarian by default will start cataloging items into the Personal Documents library, but Shared Documents or Create New List(s) and Folder(s) can also be used. This field is locked down after the first successful run of the File Share Librarian cataloging timer job. For SharePoint 2013, the default library is Documents.
New File Externalization Settings
New content within the scope of the librarian configuration will need an endpoint if there isnt one already on an existing profile for that scope. If no other selection is made, new content will go to the Content Database (default). A new endpoint can be created from this screen by clicking the New link.

Note that in order to use the Large File Upload to upload files larger than the web application upload threshold, an endpoint must be selected. If Future File Externalization is left on Content Database, large files can be uploaded, but they will remain in System Cache because the Content Queue Migrator cannot find a suitable endpoint for the file. To resolve this, an unfiltered endpoint can be added to the profile, and the Content Queue Migrator will process the Large File on the next run of the timer job.
Timer Job Settings
The timer job to catalog data can be run once, or recurring to catalog content that gets added to the librarian endpoint.
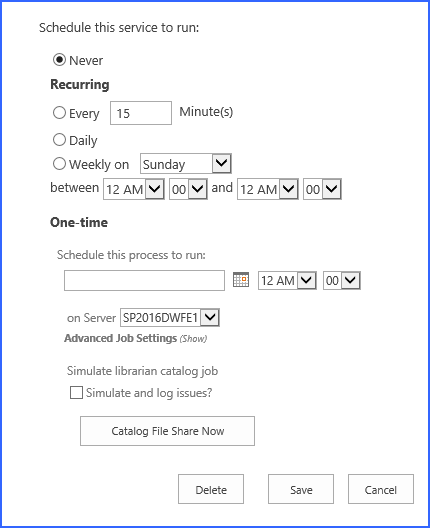
To run the job one time, at a scheduled time:
1.Leave Never selected.
2.Select a date and time to run the librarian job in the One-Time field. If this is a large job that will consume processing resources, this job can be scheduled to run in 'off' hours.
3.Click Save. This will also save the librarian configuration, and create the profile and endpoint if necessary.
To run the job manually one time:
4.Leave Never selected.
5.Click Catalog File Share Now. This will also save the librarian configuration, and create the profile and endpoint if necessary.
To run a recurring timer job:
6.Select the Every, Daily, or Weekly on option.
7.To run the job once an hour, enter a number between 1 and 59 to represent the frequency, in minutes, for this job to run in the Every field.
8.For Weekly, select the day of the week from the supplied dropdown.
9.For Daily or Weekly, select the start window time from the between dropdowns and the end window time form the and dropdowns.
10.In the Job Server field, select a WFE for this process to run.
11.(Optional) Click the Show link next to Advanced Job Settings.
12.(Optional) Enter the Number of Processing Threads to use during job execution. It will default to one thread per processor core if no value is supplied.
13.Under the Send Completion Notice: header:
a.Select the Always or Only when errors occur option for frequency of notification.
b.Check the Default Notifications Contacts box to have an email sent to the email address entered in General Settings. Note that for this feature to work, the Default Notification field on General Settings must contain a valid email address.
c.In the Additional Contacts box, enter a semi-colon delimited list of other email addresses that should receive the notification.
|
|
NOTE: Most fields are locked after clicking Catalog File Share Now. To edit these, either change the destination or delete the configuration and recreate. |
14.The Simulate and log issues? checkbox allows the running of the Librarian timer job without actually cataloging any content. It will look for conditions that may prevent an item from being cataloged and log them as exceptions, providing an opportunity to correct them before running the job.
|
|
NOTE: SharePoint container(s) will be created in Simulate mode. If changes are made to folder names in the share after running the Librarian in Simulate mode delete the structure that was created in SharePoint before running Librarian again. |
15.Click Save at the bottom of the page to save the settings or click Catalog File Share Now to begin cataloging BLOBs. Clicking Catalog File Share Now will automatically save the configuration; Cancel out of the page without losing the configuration.
|
|
NOTE: If the librarian configuration resulted in the creation of a profile that has a scope of Content Database or Web App, master key encryption needs to be done by opening and saving the profile. This will happen automatically the first time the profile is saved, but should be done manually, as soon as possible. |