
Quick Access Toolbar
|
Navigation: Content Matrix Console End User Interface > Quick Access Toolbar |
The Quick Access Toolbar can be accessed above the ribbon. The Quick Access Toolbar can also be moved just below the ribbon by selecting the drop down menu (on the top left-hand side) and choosing Show Quick Access Toolbar Below the Ribbon, or it can be placed back above the ribbon by choosing Show Quick Access Toolbar Above the Ribbon. Any option that is available under one of the menu group headings can have a shortcut for the option placed into the Quick Access Toolbar. This can be done by right-clicking on the option in the ribbon, and choosing Add to Quick Access Toolbar.
Shortcuts can also be removed from the Quick Access Toolbar either by selecting the option within the ribbon and opening the context (right-click) menu, or by selecting the shortcut option itself, opening the context (right-click) menu, and choosing Remove from Quick Access Toolbar.
Explorer Control View Tabs
|
Navigation: Content Matrix Console End User Interface > Explorer Control View Tabs |
The Metalogix Content Matrix Console user interface uses an Explorer Control style window which allows you to navigate, view, and select the desired content for migration. The Explorer Control window is broken up into three separate tab options, each of which contains its own set of options for viewing content and data. They are:
Explorer View Tab
|
Navigation: Content Matrix Console End User Interface > Explorer Control View Tabs > Explorer View Tab |
The Explorer view tab allows you to navigate through your various connections in a tree view. You can navigate to and selected a desired SharePoint site collect, site, list/document library or sub-folder or a under a specific connection.
There are a set of filtering options that are available in this tab, as well as a set of ordering options. This allows you to display, sort, and filter all of your connections as desired.
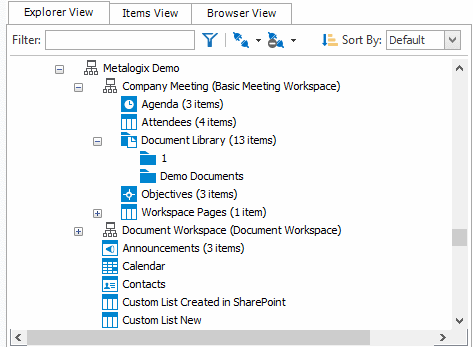
There are three primary Filtering options: Text Filter, Connections Filter, and Status Filter.
·Text Filter: For example, if you only want to view connections that contain "2010" in the URL, you can enter "2010" in the Filter text box, and click the Filter button to the right of the text value. The filter will then be applied to all connections in that Explorer View tab, and only connections that contain a "2010" value will be displayed.

NOTE: To remove a text box filter, delete the filter value from the text box and re-run the filter action.
·Connections Filter - This option consists of a drop down menu that allows you to filter by connection type. By default, all of these options are selected, but one or more can be DE-selected.
·Status Filter - This option consists of a drop-down list with the various connection status options.
§NotChecked Metalogix Content Matrix has not tried to validate the connection yet.
§Checking - Metalogix Content Matrix is currently trying to validate the connection.
§Valid - Metalogix Content Matrix has tried to validate the connection, and has been successful. A connection has been established.
§Invalid - Metalogix Content Matrix has tried to validate the connection, and has been unsuccessful. A connection has not been established.
§Warning - Metalogix Content Matrix has tried to validate the connection, and has been successful. A connection has been established, however, a warning message has been given.
By default all of the status types are selected but, as with the Connections Filter, one or more can be de-selected.

You can also Sort by
·Default - All of the connections in the order they were added.
·Type -These are the same types that are listed in the Connections Filter drop down menu. When selected, connection types will be sorted in the following order:
§SharePoint farms (this includes all Web App and Farm connection to a server, as well as Database connections)
§SharePoint Site connections, which include Site connection types, and Read-only connections to SharePoint
You can combine various filter and sort options.
Items View Tab
|
Navigation: Content Matrix Console End User Interface > Explorer Control View Tabs > Items View Tab |
The Items View tab displays any items/documents that exist directly under the selected node (that is, the content of any subfolders under the selected node-will not be displayed), along with column metadata.

There are four main options that are available through this tab. These options are:
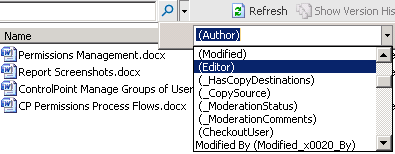
·Search To perform a full or partial text search, enter the string in the search box then either and either press <Enter>, or click the magnifying glass icon to run the search.
NOTE: The search will be run on the name column (the FileLeafRef) by default, but you can select a different column to search from the drop-down to the right of the search box.
·Refresh - This button will refresh all of the items in the Items View tab.
·Show/Hide Version History - This button option is only available when the selected document library/list has versioning configured. When this button is selected the Items View tab will be divided into two sections, a top section displaying all of the items/documents and a bottom section displaying all of the versions for the selected item/document.
When an item/document is selected in the top window, all of that item/document's versions will be listed in the bottom half of the window. You can then look at the metadata for each item/document version that exists. This option can be combined with the Show/Hide Properties button.
If the Show Version History button has already been selected, this will change to be a Hide Version History button instead. You can use this option to stop looking at item/document version histories.
·Show/Hide Properties - The Show Properties button allows you to see a list-style view of the available fields (columns) and their values, for a selected item/document. Any value listed in dark text can be edited and within the window.
The fields in the Properties window can also be ordered by category, or alphabetically. By default, the fields are ordered by category, and are listed alphabetically within each category. If listed alphabetically, then all property fields (columns) will be listed in alphabetical order, with no breakdown by category. There are two buttons at the top of the Properties window that can be used to determine what ordering type is used. This option can be combined with the Show/Hide Version History button.
If the Show Properties button has already been selected, this will change to be a Hide Properties button instead. Use this option to close the Properties window.