
Tags
In ArchiveWeb, user can sort emails and documents by adding various tags to them. Tags are logged-on user defined categories. They help the logged-on user quickly find and distinguish emails/documents of one category e.g. important emails, documents regarding one particular event etc.
All tags are listed, edited or deleted under Manage settings/Tags tab. At first we describe how to create tags. Then the process of adding tags to emails/documents is illustrated.
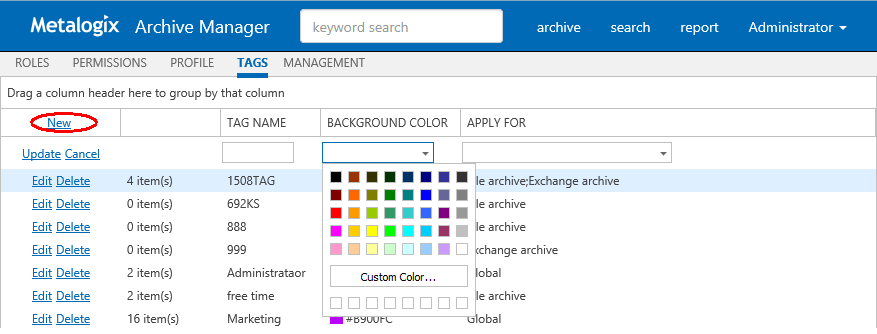
When you click on the Tags tab for the first time, no tags are created. The list view is empty. To create a tag click the New option in the list header. A new row will be added in the list view. You simply specify desired tag properties in the available text boxes:
·Tag Name enter descriptive name, e.g. Personal, Marketing or any other
·Background Color select the tag color or specify your Custom color
·Apply For tag can be available globally or can be applied only for specific section of ArchiveWeb Exchange archive, Files archive, Auditing etc. Should you check the e.g. Files archive option, the tag will be available only for File archive items
When all settings have been configured, click the Update option.
|
|
NOTE: Not all Tagged items tab functions may be available for the logged-on user. The functions must be allowed for the user. For more information see the Roles and Permissions sections. |

The tag will be added to the list of tags. Naturally, all tag attributes can be edited by clicking the Edit option for the given tag. When finished, click Update.
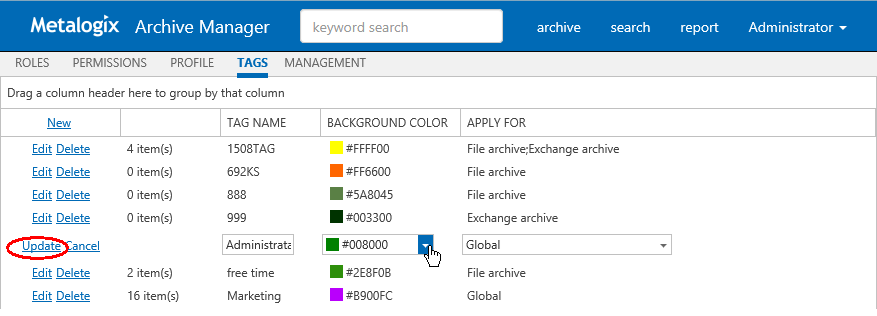
The list view also informs you on the number of items tagged by the given tag.
Adding tags to items
After the tag was defined, it can be added to:
·emails (in any mailbox folder or in a public folder)
·document
·auditing item
NOTE: Tag can be applied to all three type of items, if it is defined as a global tag (default). Otherwise it can be applied only to selected type of items (see above).
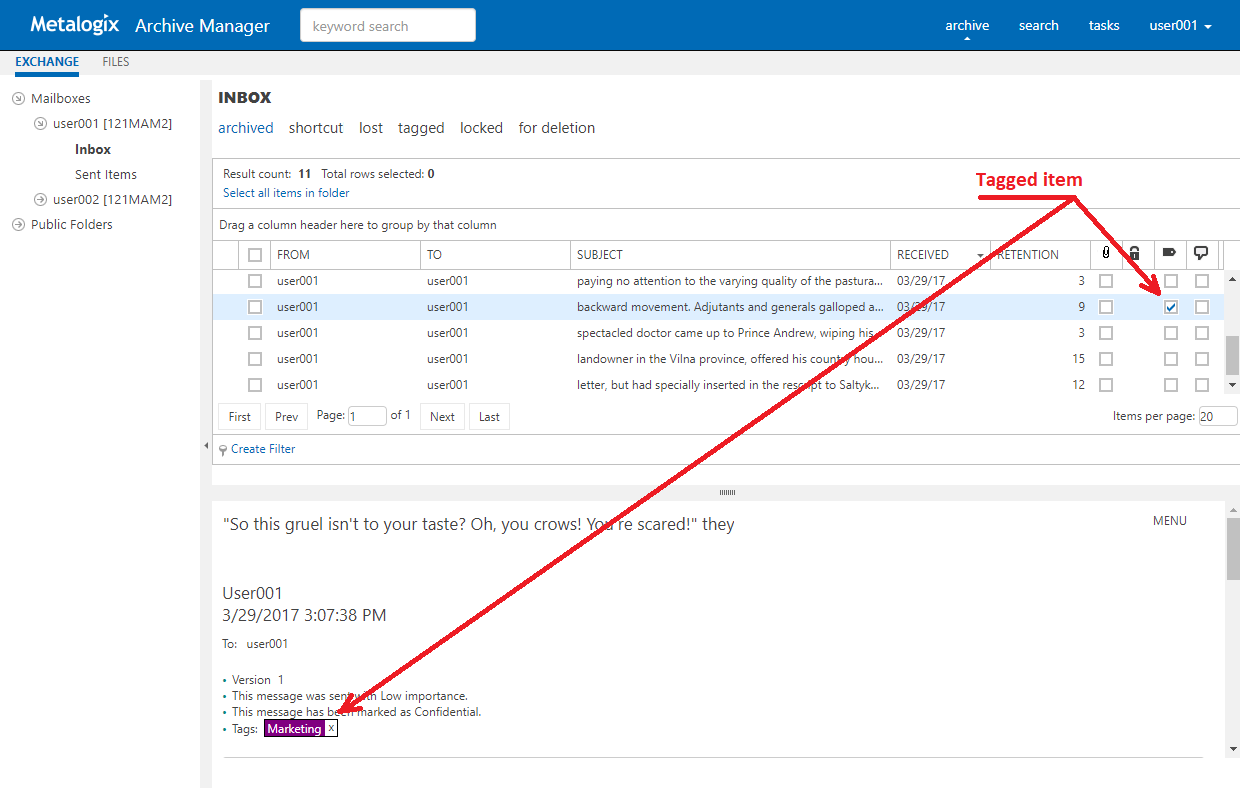
To apply the tag, locate the desired item under Archive/Exchange or Archive/Files or Report/Auditing tab and select it. Then open the More actions link (MENU) from the right upper corner in the preview pane. In the More actions menu click Add tag(s) command.
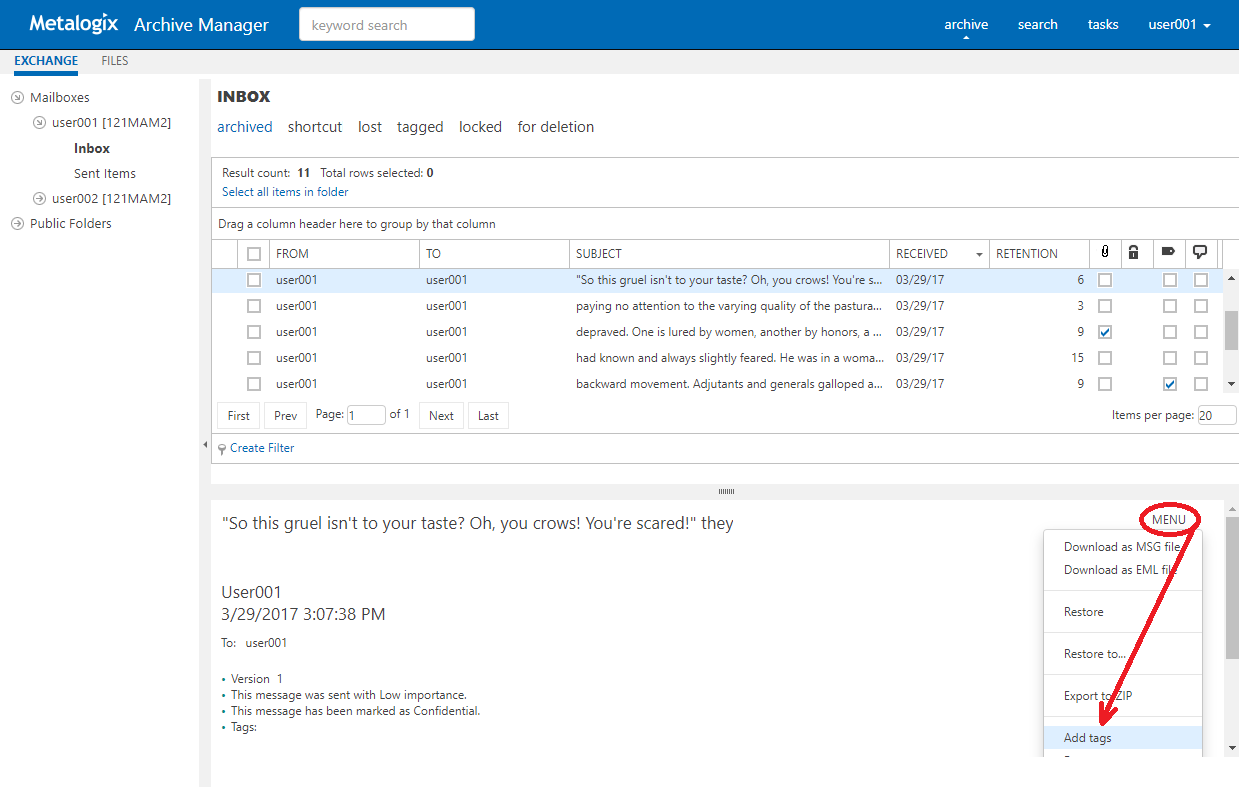
In the pop-up window select the tag(s) which you want to add to the item and click OK.
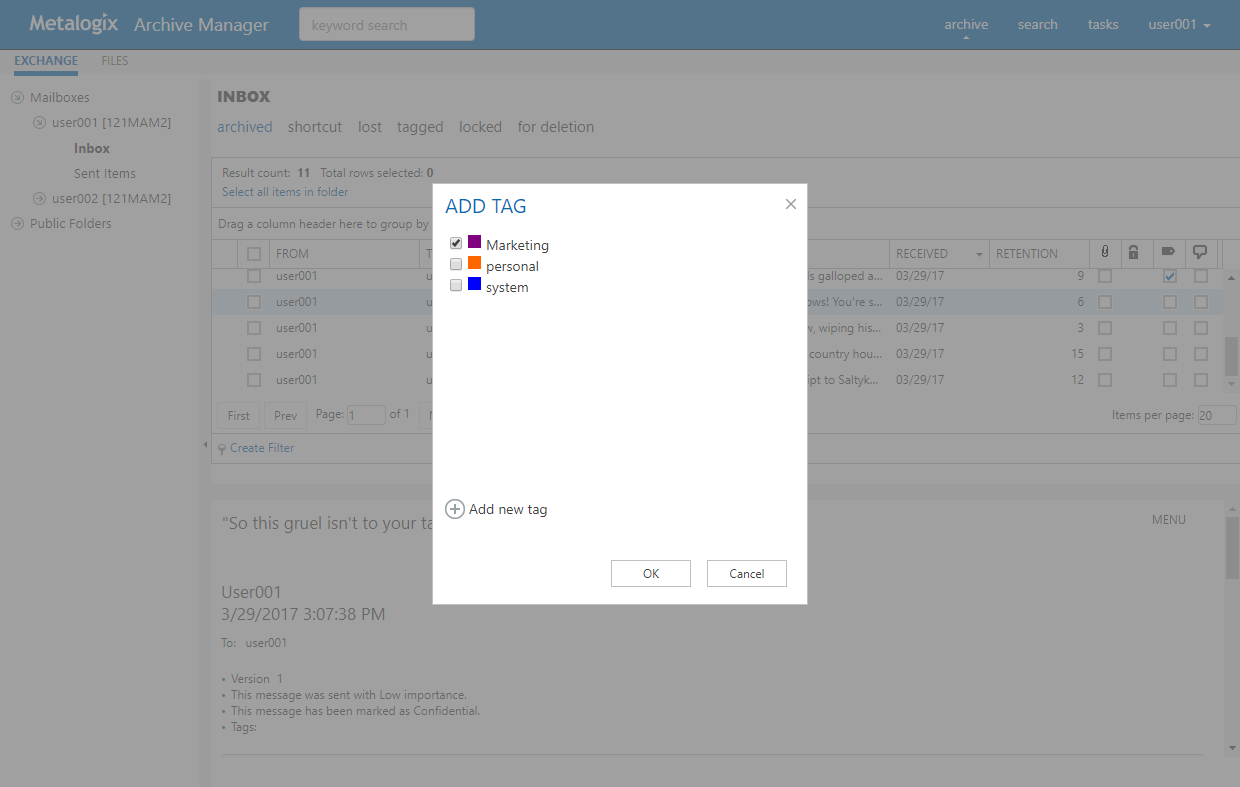
NOTE: You can also create a new tag if you click the Add new tag option and click Add. The Add New Tag dialog appears where a new tag can be defined.
Once the tag has been added to the items, it will be visible in the emails/documents list view (see the screenshot below) and also in the preview.
A tag can be removed in the preview or via the More actions link (MENU) by clicking the Remove tag command.
Management
Management section constitutes centralized dashboard where user with appropriate permissions can manage specific configuration settings in the following sections:
·File Management
Adding, editing and removing of Archive Manager for Files servers which together establish the file archive system. Additionally, with Scheduler capabilities, Archive Manager for Files jobs are easily managed in the same way as on the Scheduler tab of the Enterprise Manager (Archive Manager for Files).
·Search Management
Registering and managing search servers in the environment.
File Management
File management section under Manage Settings / Management is displayed only if Archive Manager for Files is installed and the appropriate permission is set for the user. This section allows managing Archive Manager for Files:
·Archive Servers - managing archive and retrieve servers
·Scheduler - managing scheduler jobs
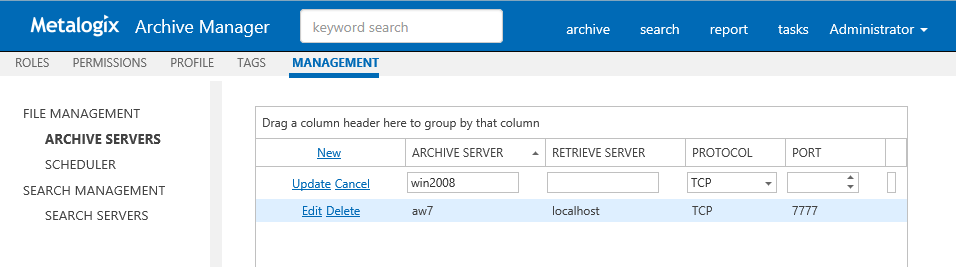
Archive Servers
After clicking the Archive Servers tab, the available Archive Manager for Files servers will be listed in the main pane.
You can change the display name, protocol or port for the given server by clicking the Edit option next to the given server.
By clicking the Delete option the respective server will be deactivated in the ArchiveWeb, i.e. it will not be accessible for the users via ArchiveWeb and it will not be possible to search it either.
To add a new Archive Manager for Files server click New option in the list header. It will add new row to the list where you can specify the File Archive Server properties. Each server (Archive Server) can be backed-up when you enter another server with installed Archive Manager for Files as a Retrieve Server. The Archive Server folders and files will be accessible via ArchiveWeb even when the server is decommissioned/inaccessible. (For more information on this feature see the Alternate Access Servers document.)
Finally click Update for the newly added server. The new server will be listed on the Files Archive tab.
Scheduler
After clicking the Scheduler tab, you can manage Archive Manager for Files jobs or preview job reports on you Archive Manager for Files server. This tab basically offers the same functionality as the Scheduler tab of the Enterprise Manager (Archive Manager for Files).
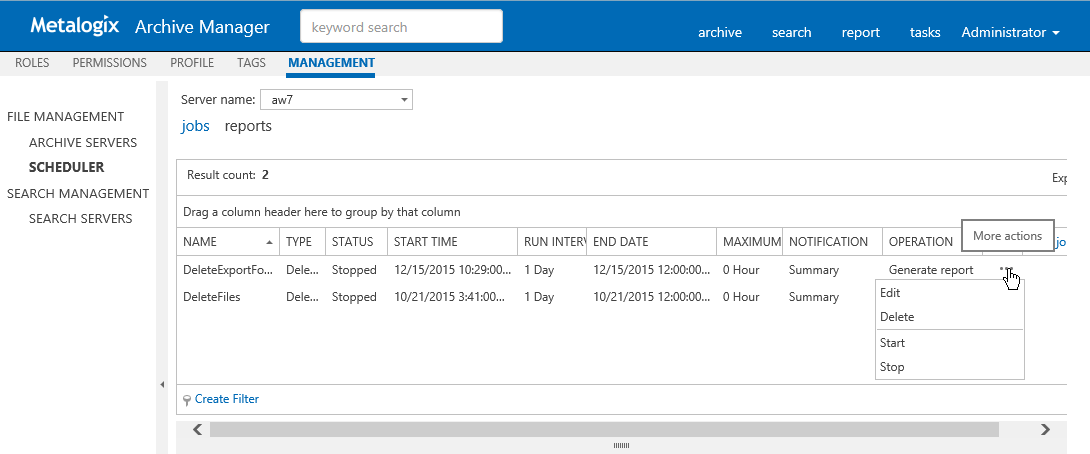
Jobs
To manage jobs user has to select a server from Server name drop-down. If any job exists (ArchiveWeb currently supports only Delete jobs) for the specified server, the grid will be populated.
For each listed job, a More actions menu appears by clicking the More actions icon "..." on a respective row. This menu contains functions for Edit, Delete, Start and Stop the job.
New job can be created by clicking New job link in the grid header.
Edit or new job pop-up window is the same (see below) and contains two tabs:
Settings - contains job description information
Folder - defines folders that will be affected by a job
NOTE: For job to process data, folders must be specified.
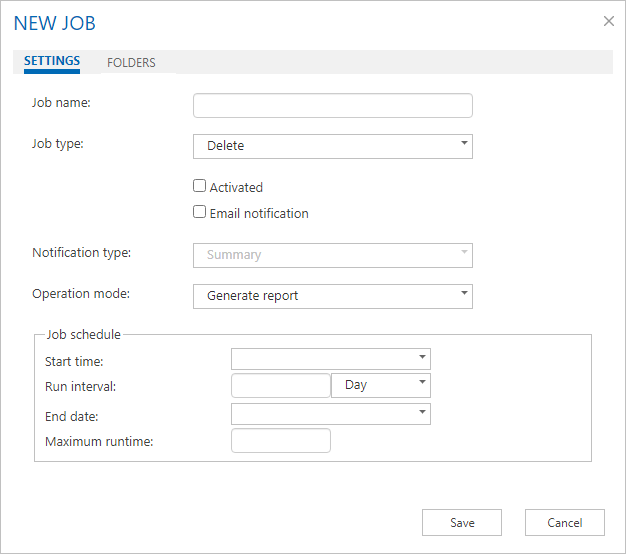
Settings tab
Job name - enter name for the job
Job type - in the drop-down select the desired job type (currently only Delete jobs are supported); for more information on job types see the Archive Manager for Files Administration Guide.
Activated - select the check box to activate the job.
Email notification - select the check box to send notifications about the given job as configured in the Archive Manager Administration Center on the Settings/Notification tab (for more information see the Archive Manager for Files Administration Guide)
Notification type - Summary or Detailed can be selected
Operation mode - this setting is available just for Delete job (and Synchronization job in the Archive Manager Administration Center)
Click on the Operation mode field. Then click on the down arrow and select the operation mode:
·Reporting mode - no action is being taken just a report is generated. This is useful as administrators first have a report on what is going to be done. The report can be checked and modified if necessary.
·Process report mode files from the previously generated report are processed. Administrator is able first to check and modify the list of files going to be processed (i.e. deleted or synchronized)
·Process immediately mode processing files without any report (not recommended)
The Report file field displays the path to the generated report (e.g.<installdir> \fsaPamLogs \sync \ sync.report).
Start time - specify the first day when the job should run
Run interval - specify how often the job should run
End date - specify the last day when the job should run
Maximum runtime - specify the maximum time (in hours) during which the job will be running
Folders tab
Job scope must be defined on the Folders tab. Folders for the job to process are selected by clicking in a respective check-box.
NOTE: Red check-box (
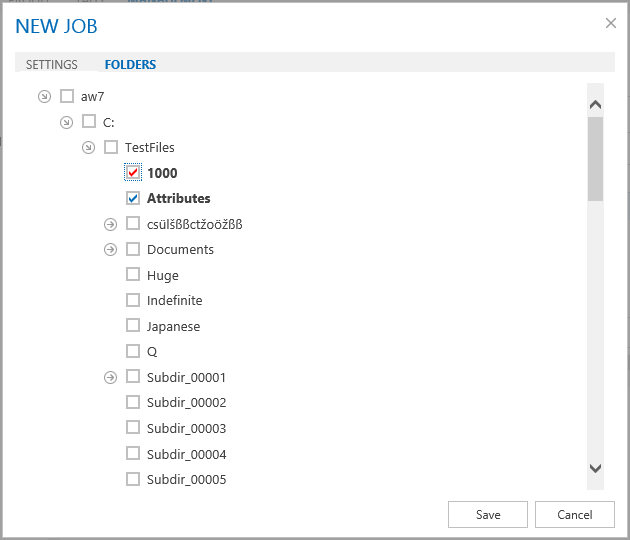
When all is configured as desired, click Save.
Reports
This section is a report viewer for jobs.
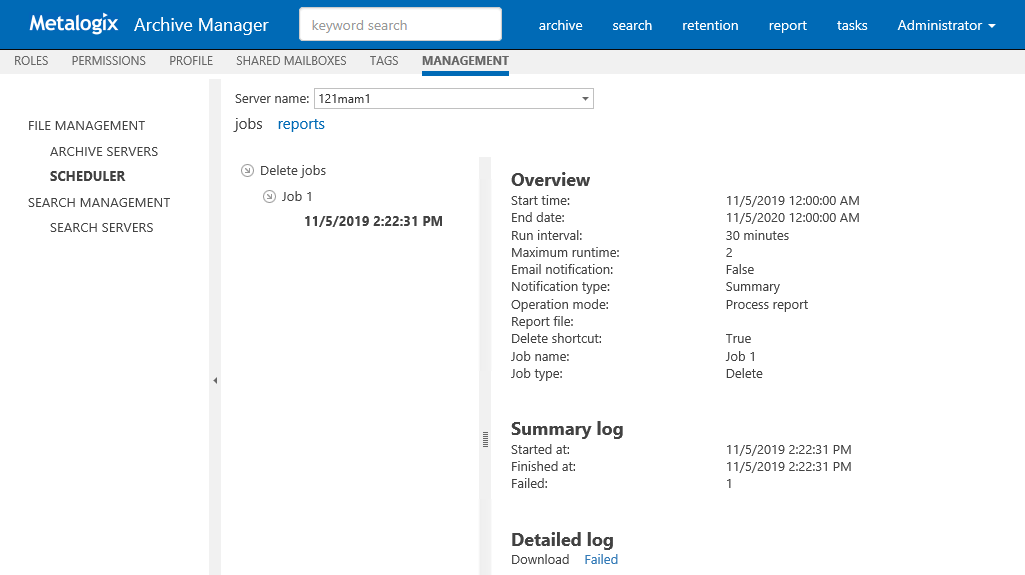
By selecting a job created/performed time the right pane will be populated by jobs information
Overview job description information
Summary log information about running
Detailed log contains links for download.
According to Operation mode (listed in overview):
·Generate report list of items to be Affected by a job
·Process report links to download Succeeded and if any Failed items
Search Management
Search Management section is displayed only if appropriate permission is set for the user. This section allows managing of Search servers installed in the environment. Specifying search servers on this tab is prerequisite of search functionality. With no search server defined, search is not available.
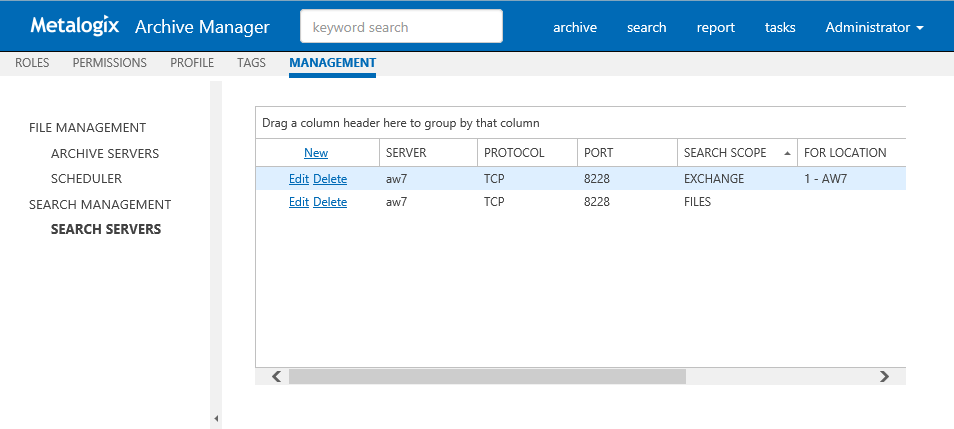
After clicking on the Search servers menu, the available Search servers will be listed in the main pane.
NOTE: If web.config file contains information about Search server(s) (this is applicable if upgrading from previous versions of ArchiveWeb) the list will be automatically populated.
By clicking the Delete option the respective Search server will be removed, i.e. it will not be used for Searches.
To add a new Search server click New option in the list header. It will add a new row to the list where you can specify the Search server properties.
NOTE: Avoid using localhost as Server Name.
By clicking the Edit option next to the given server, you can change server properties. The Search Scope marks for which Archive Manager the given search server has been installed (Archive Manager for Files/Exchange).
For Location - this property is applicable only for Archive Manager for Exchange search servers.
For a Search server you can specify a location which the respective Search server "covers" by selecting a location from a "FOR LOCATION" drop-down. This drop-down lists all locations defined in Archive Manager for Exchange in a location where the logged in user has active mailbox. (For more information on locations see the Archive Manager for Exchange Administration Guide.)
Provided there are more Archive Manager for Exchange locations in the environment and each has it own search server, the given search servers must be listed with correct location.
NOTE: Should there be more locations but only 1 search server for all, leave the For Location property blank.
Federated Search
If you're using more locations, you can setup a Search service for each location. Each Search service will index items on its location.
To setup Federated search (search over more search servers) in ArchiveWeb you have to modify the Search servers (Search Management) by specifying FOR LOCATION value.
Federated search allows you to collect results from more search servers in one search request.
You can perform federated search over all available (according to permissions) search areas:
·Exchange
·Files
·Common