Chat now with support
Chat with Support

KACE Systems Management Appliance 14.0 Common Documents - KACE Service Desk Administrator Guide

About the KACE Service Desk Getting started
Configuring the appliance
Requirements and specifications Power-on the appliance and log in to the Administrator Console Access the Command Line Console Tracking configuration changes Configuring System-level and Admin-level General Settings Configure appliance date and time settings Managing user notifications Enable Two-Factor Authentication for all users Verifying port settings, NTP service, and website access Configuring network and security settings Configuring session timeout and auto-refresh settings Configuring locale settings Configuring the default theme Configure data sharing preferences About DIACAP compliance requirements Configuring Mobile Device Access Enable fast switching for organizations and linked appliances Linking Quest KACE appliances Configuring history settings Configuring Content Security Policy
Setting up and using labels to manage groups of items Configuring user accounts, LDAP authentication, and SSO Deploying the KACE Agent to managed devices Using Replication Shares Managing credentials Configuring assets
About the Asset Management component Using the Asset Management Dashboard About managing assets Adding and customizing Asset Types and maintaining asset information Managing Software assets Managing physical and logical assets Maintaining and using manual asset information Managing locations Managing contracts Managing licenses Managing purchase records
Setting up License Compliance Managing License Compliance Setting up Service Desk Configure the Cache Lifetime for Service Desk widgets Creating and managing organizations Importing and exporting appliance resources
Managing inventory
Using the Inventory Dashboard Using Device Discovery Managing device inventory
About managing devices Features available for each device management method About inventory information Tracking changes to inventory settings Managing inventory information Finding and managing devices Registering KACE Agent with the appliance Provisioning the KACE Agent Manually deploying the KACE Agent Using Agentless management Adding devices manually in the Administrator Console or by using the API Forcing inventory updates Managing MIA devices Obtaining Dell warranty information
Managing applications on the Software page Managing Software Catalog inventory
About the Software Catalog Viewing Software Catalog information Adding applications to the Software Catalog Managing License assets for Software Catalog applications Associate Managed Installations with Cataloged Software Using software metering Using Application Control Update or reinstall the Software Catalog
Managing process, startup program, and service inventory Writing custom inventory rules
Deploying packages to managed devices
Distributing software and using Wake-on-LAN Broadcasting alerts to managed devices Running scripts on managed devices Using Task Chains
Patching devices and maintaining security
Using the Security Dashboard About patch management Subscribing to and downloading patches Creating and managing patch schedules Managing patch inventory Managing Windows Feature Updates Managing Dell devices and updates Managing Linux package upgrades Manage quarantined file attachments
Using reports and scheduling notifications Monitoring devices
Getting started with monitoring Working with monitoring profiles Managing monitoring for devices Working with alerts
Using the Service Desk
Configuring Service Desk Using the Service Desk Dashboard Managing Service Desk tickets, processes, and reports
Overview of Service Desk ticket lifecycle Creating tickets from the Administrator Console and User Console Creating and managing tickets by email Viewing tickets and managing comments, work, and attachments Merging tickets Using the ticket escalation process Using Service Desk processes Using Ticket Rules Run Service Desk reports Archiving, restoring, and deleting tickets Managing ticket deletion
Managing Service Desk ticket queues About User Downloads and Knowledge Base articles Customizing Service Desk ticket settings Configuring SMTP email servers
Maintenance and troubleshooting
Maintaining the appliance Troubleshooting the appliance
Appendixes Glossary About us Legal notices

View manual label details

View manual label details

You can view manual label details, such as the members of a label, label usage restrictions, and alternate location information.

1.
Go to the Label Detail page:
a.
Log in to the appliance Administrator Console, https://appliance_hostname/admin. Or, if the Show organization menu in admin header option is enabled in the appliance General Settings, select an organization in the drop-down list in the top-right corner of the page next to the login information.
b.
On the left navigation bar, in the Home section, click Label Management.
c.
On the Label Management panel, click View and edit master list of labels under the Labels section to display the Labels page.
2.
To show or hide label groups, select Show Label Groups or Hide Label Groups in the Choose Action menu.
The Label Detail page appears.
5.
In the Labeled Items section, click the Add button next to the section headers to expand or collapse the view: .

Delete manual labels

Delete manual labels

Before you can delete a manual label, you must remove the label from any items to which it is applied. You cannot delete manual labels that are applied to any items.

In addition, if a manual label contains a Smart Label or an LDAP Label, you must delete the Smart Label or LDAP Label before you can delete the manual label. Manual labels cannot be deleted if they contain Smart Labels or LDAP Labels.

1.
Log in to the appliance Administrator Console, https://appliance_hostname/admin. Or, if the Show organization menu in admin header option is enabled in the appliance General Settings, select an organization in the drop-down list in the top-right corner of the page next to the login information.
a.
Click Inventory.
The Devices page appears.
b.
In the View By drop-down list, select Label > Label Name.
The Devices page shows the items to which the label is applied.
d.
Select Choose Action > Remove Label > Label Name.
3.
The Labels page appears.
5.
Select Choose Action > Delete, then click Yes to confirm.

Managing Smart Labels

Managing Smart Labels

You can add Smart Labels for devices, applications on the Software page, patches, Discovery Results, and Dell Update packages.

Smart Labels cannot be created for applications on the Software Catalog page.

Add Smart Labels

Add Smart Labels

You can add Smart Labels from the Labels section and from list pages where Smart Labels are used, such as the Devices list.

1.
Go to the Label Detail page:
a.
Log in to the appliance Administrator Console, https://appliance_hostname/admin. Or, if the Show organization menu in admin header option is enabled in the appliance General Settings, select an organization in the drop-down list in the top-right corner of the page next to the login information.
b.
On the left navigation bar, in the Home section, click Label Management.
c.
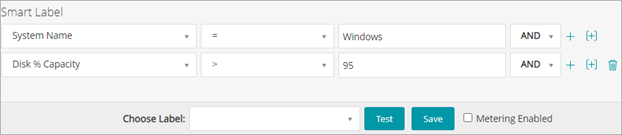
On the Label Management panel, click Automatic labeling based on advanced search criteria under the Labels section to display the Smart Labels page.
d.
Select Choose Action > New > Smart Label type.
The appliance displays the Smart Label criteria for the type of label that you selected. For example, if you select New > Software Smart Label, the software criteria are displayed. If you select New > Device Smart Label, the Devices criteria are displayed.
To add a subset of rules, select AND or OR from the operator drop-down list at the right of the Smart Label criteria, then click Add Group.

The image displays the Smart Label panel with search criteria entered.

3.
Click Test to display items that match the specified criteria.
5.
In the Choose label drop-down list, do one of the following:
Select an existing label to associate with the Smart Label. Type in the Choose label field to search for existing labels.
Enter a new name for the Smart Label in the Choose label field, then press Enter or Return.
NOTE: Press Enter or Return after you enter a new Smart Label name to move the text from the search field to the label field.
6.
Click Save.
Related Documents

The document was helpful.

Select Rating

I easily found the information I needed.

Select Rating