|
3 |
|
4 |
Click Administration. |
|
5 |
|
6 |
In the Edit Properties dialog box, edit the following properties, as needed. |
|
• |
Account Alias: The display name of this account. |
|
• |
|
• |
Secret Access Key: The secret access key retrieved in Getting authentication information through console . |
|
• |
Collect Memory Metric: Select this option to enable the collection of instance memory metrics. The default value is disabled. |
|
• |
Collect Linux Volume Utilization: Select this option to enable the collection of Linux volume utilization. The default value is disabled. |
|
• |
Specify an agent name (Optional): Specify the name of agent. |
|
• |
Configure regions to be monitored (Optional): Select AWS regions for monitoring. All regions will be monitored if this field is not configured. |
|
• |
Select Virtual Machines to Monitor: Specify to monitor all virtual machines or only monitor specified instance. |
|
• |
If Monitor All is selected: By monitoring all virtual machines any virtual machine that is running in the monitored cloud will be monitored 24x7 consuming a monitored virtual machine license. Every virtual machine that is monitored will count against the purchased license pool. Any Monitored Virtual Machine that is above the purchased license limit will require an additional Foglight Hybrid Cloud Manager per Monitored Virtual Machine license. |
|
• |
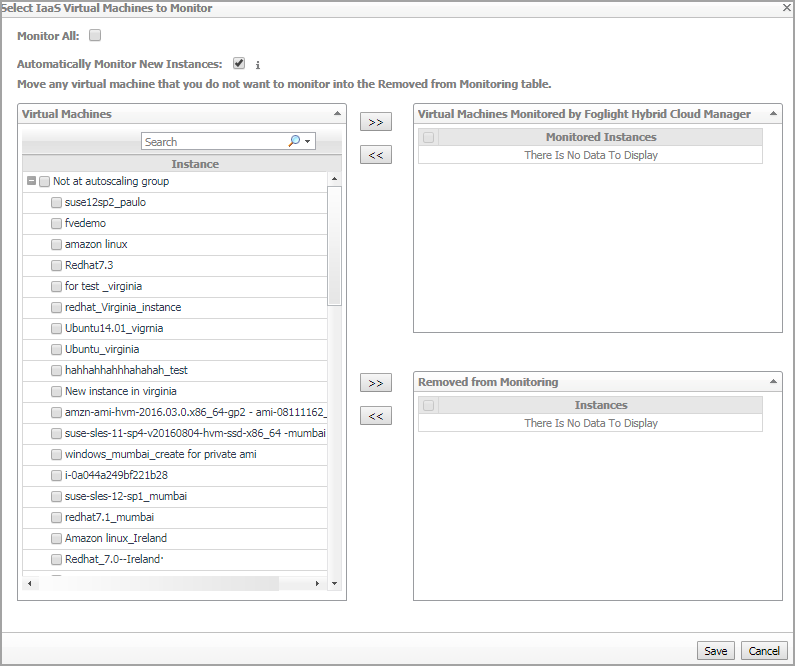
If Monitor All is not selected: The following view appears on the bottom of the Selected IaaS Virtual Machines to Monitor dialog box. |
|
• |
If Automatically Monitor New Instances is selected, select instances that you do not want to monitor, and then click >> to move selected instances to the Removed from Monitoring table. |
|
• |
If Automatically Monitor New Instances is not selected, select instances that you want to monitor, and then click >> to move selected instances to the Virtual Machines Monitored by Foglight Hybrid Cloud Manager table. |
|
• |
If the Removed from Monitoring and Virtual Machines Monitored by Foglight Hybrid Cloud Manager tables are empty, and Automatically Monitor New Instances is not selected, the AWS agent will not collect any instance data. |
|
• |
Collect Cost Metrics: Select the check box to enable and configure the cost metrics collection. Collections will start only after the AWS Cost and Usage Report are created on the AWS Console. See To create an AWS Cost and Usage Report. |
|
• |
Configure Monitor Account: Click Configure to select the accounts for which costs should be monitored. |
|
• |
Select Account: When Collect All Account Cost is cleared, a list of AWS accounts in your organization will be displayed. Note that accounts will only be displayed after a successful data collection. In the AWS Account table, select the accounts to monitor and click |
|
• |
Import/Export accounts: In addition to manually adding accounts, they can be imported (from a CSV file) to either the AWS Account or Target AWS Account table. Accounts can also be exported from the Target AWS Account table. |
|
• |
Click Save to save changes. |
|
• |
S3 Bucket for Cost and Usage Report: Enter the name of your S3 bucket according to the AWS Cost and Usage Report setting. See To create an AWS Cost and Usage Report to get this value. |
|
• |
S3 Bucket Region for Cost and Usage Report: Select the region of your S3 bucket according to the AWS Cost and Usage Report setting. See To create an AWS Cost and Usage Report to get this value. |
|
• |
Cost and Usage Report Name: Enter the name of your AWS Cost and Usage report. See To create an AWS Cost and Usage Report to get this value. |
|
• |
Cost and Usage Report Path: Enter the Report path prefix according to your Report setting. The value of Cost and Usage Report Path will be blank, if you don't set the Report path prefix in AWS. See To create an AWS Cost and Usage Report to get this value. |
|
a |
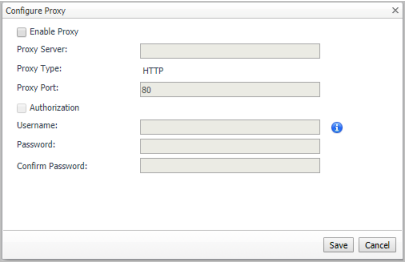
Select the Enable Proxy check box to enable the proxy settings. |
|
b |
Input the host name or IP address for the Proxy Server and input the Proxy Port number. |
|
c |
If the proxy requires an authorization, select the Authorization check box, and input the Username and Password. |
|
7 |
Click Save. The Edit Properties dialog box closes and the list of agent instances automatically refreshes in the display area. |
|
• |
<foglight_home> is a placeholder that represents the path to the Foglight Management Server installation. |
|
• |
<foglight_agent_mgr_home> is a placeholder that represents the path to the Foglight Agent Manager installation. This can be the location of the Foglight Agent Manager installation on a monitored host, or the home directory of the Foglight Agent Manager that comes embedded with the Foglight Management Server. For example: |
|
• |
<foglight_home> is a placeholder that represents the path to the Foglight Management Server installation. |
|
• |
<foglight_agent_mgr_home> is a placeholder that represents the path to the Foglight Agent Manager installation. This can be the location of the Foglight Agent Manager installation on a monitored host, or the home directory of the Foglight Agent Manager that comes embedded with the Foglight Management Server. For example: |
