
Introducing Dell™ NetVault™ Backup Plug‑in for MySQL
Dell NetVault Backup Plug‑in for MySQL – at a Glance
Key benefits
Feature summary
Target audience
Recommended additional reading
Installing and removing the plug-in
Installation prerequisites
Reviewing the recommended configuration
Installing the plug-in
Removing the plug-in
Removing a specific MySQL Instance
Configuring the plug-in
Backing up data
Restoring data
Restoring data – an overview
Restoring data in MySQL
Working with native MySQL replication
Setting restore options
Finalizing and submitting a job
Examples of restore scenarios for MySQL Standard/Community
Examples of restore scenarios for MySQL Enterprise Backup
Using advanced restore procedures for MySQL Standard/Community
Using the plug-in in a native environment – an overview
Enabling replication support
Backing up replication servers
Restoring replication servers
Using the plug-inin a Failover Cluster environment
MySQL Server Failover Clustering – an overview
Installing the plug-in
Licensing the plug-in
Configuring the plug-in
Backing up data
Restoring data
Troubleshooting
About Dell
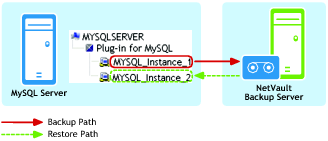
Restoring to a different MySQL Instance on the same server
In this form of relocation restore, a Plug‑in for MySQL backup is to be restored to the same MySQL Server machine, but to a different instance of MySQL that has been configured there.
Prerequisites
|
• |
Existing and target machines must have the same Installation configurations – Both machines must have the following established, in regards to MySQL: |
|
• |
New target instance must be successfully configured in Plug‑in for MySQL – The process outlined in Configuring the plug-in must have been successfully performed to add the new MySQL Instance (that is, the target instance must be revealed and accessible within the Plug‑in for MySQL node on the NetVault Backup Selections page). |
Setting up and launching the restore
|
1 |
In the Navigation pane, click Create Restore Job. |
|
2 |
On the Create Restore Job - Choose Saveset page, select Plug‑in for MySQL from the Plugin Type list. |
|
3 |
When you select a saveset, the following details are displayed in the Saveset Information area: Job ID, Job Title, name of the NetVault Backup Server, name of the client from which the data was backed up, plug-in used to create the saveset, saveset creation date and time, saveset retirement setting, whether it is an Incremental Backup, whether it is an Archive, and saveset size.
|
5 |
To continue, click Next. |
|
6 |
On the Create Selection Set page, select the data that you want to restore. |
|
7 |
With the applicable databases selected, click Edit Plugin Options, and then click the Restore Destination tab. |
|
8 |
In the Restore Destination Details section, enter the following: |
|
• |
Username – Enter the logon account name used to access the target MySQL Instance. |
|
• |
Password – Enter the password associated with the logon account. |
|
• |
Instance Name – Enter the NetVault Backup name established for the new instance of MySQL, based on what was established during its configuration in NetVault Backup (this is the name established as the MySQL Instance Name in the Configure dialog ; for more information, see Configuring the plug-in). |
|
9 |
If desired, select the applicable options on the Point-in-Time Recovery tab. |
These options are not required to perform this form of restore. For more information, see Setting restore options.
|
10 |
|
11 |
In Job Name, specify a name for the job if you do not want to use the default setting. |
|
12 |
In the Target Client list, select the machine on which you want to restore the data. |
|
|
|
13 |
Use the Schedule, Source Options, and Advanced Options lists to configure the any additional required options. |
|
14 |
Click Submit to submit the job for scheduling. |
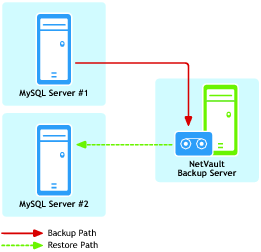
Recovering to an alternate MySQL Server
Similar to Plug‑in for MySQL’s ability to restore databases or individual table(s) to a different MySQL Instance on the same MySQL Server, a different MySQL server can targeted during the restore process. This is used during disaster recovery operations.
|
• |
Existing and target machines must have the same Installation configurations – Both machines must have the following established, in regards to MySQL: |
|
• |
NetVault Backup software and Plug‑in for MySQL installed on all clients – NetVault Backup (Client/Server version) and the plug-in must be installed and configured on both machines in use for this process (that is, the existing MySQL machine and the new restore target). |
|
• |
All Client machines added to the NetVault Backup Server – With all software installation requirements met, the target NetVault Backup Client machines must be added to the NetVault Backup Server via the NetVault Backup WebUI (that is, the existing MySQL machine and the new restore target). |
|
• |
Instance of MySQL must exist on the new restore target – The relocation process requires that an instance of MySQL exist on the new restore target. This instance will serve as the target of the relocation restore. This instance must be properly set up and configured in MySQL, and you must add it to the plug-in on the new restore target (follow the steps outlined in Configuring the plug-in). |
|
During set up of a relocation restore, the plug-in requires that you enter these values on the Options tab to gain proper access to the targeted MySQL Instance. |