Desktop Authority's Report Scheduler dialog displays a list of the reports scheduled, their scheduled date and time, and the recurrence of the schedule. Scheduled Reports can recur by running once, daily, weekly, monthly, or end of month. The scheduler can automatically e-mail reports once the report is complete.
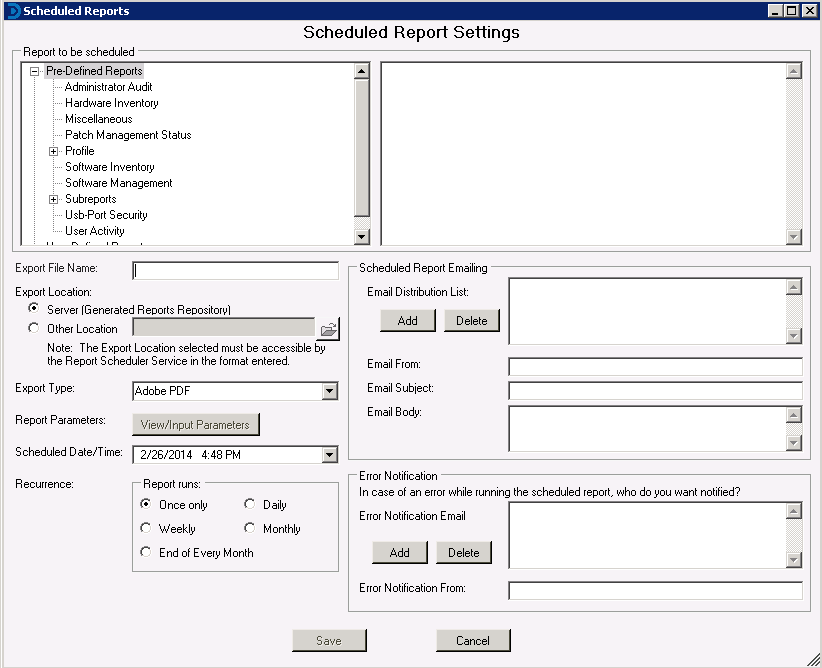
Select a Report category and then the report from the report list.
Specify the name of the final report output file. The current date/time will be appended to the end of the file name.
Ex. ThisScheduledReport (5-15-2005 12 45 16).pdf
Select Server to generate the scheduled report into the default reports repository (\Desktop Authority Manager\Repositories). Select Other Location in order to specify some other location to save the report to.
Select the type of report to create. Reports can be exported to HTML, Adobe PDF, Word/Rich Text Format, Text, Tiff, Excel and Active Report RDF.
If the selected report uses runtime parameters, click View/Input Parameters to set the default runtime values. The first column in the list contains the runtime field name and the second column contains the value of the parameter.
When upgrading Desktop Authority or importing reports from an updated SLI file, parameters from all scheduled reports will become null and void. These parameters must be re-entered for the scheduled report before the report can be successfully executed.
Select the Date and Time for the report to be run. For recurring reports this will be the starting Date and Time. Click to select a date.
Reports can be scheduled to run one or more times based on a recurring basis. Select from Once, Daily, Weekly, Monthly or End of Every Month. Only one recurrence period can be selected per scheduled report.
The Email Distribution List contains all email addresses to which the report output will be delivered. If the report results in an error, no report will be sent to this distribution list. Click Add to add an email address to the list. Click Delete to remove the selected email address from the list.
Enter the source of where the email is coming from. Usually this will be the senders email address.
Enter the subject of the email that will be used to distribute the report.
Enter the text to appear in the body of the email that will be used to distribute the report.
If an error occurs in a report, an email will be sent to all email addresses in the Error Notification Email Distribution List. A report will also be generated showing the error message. This error report will be saved to the Generated (Saved) Reports repository.
Click Add to add an email address to the list. Click Delete to remove an email address from the list.
Enter the email address from whom the Error Notification Email will come.
When saving a scheduled report it will be saved to the User-Defined Report Repository.
The SQL Reporting Wizard is used to create User-Defined reports using a wizard style interface. The wizard will automatically populate selected fields to the report layout and generate the necessary SQL statement including sorting and filtering the data. No need to know SQL, the wizard will write it all for you! The wizard can create reports for the Software Inventory, Hardware Inventory, and Administrator Audit categories.
Select your report category from the Welcome to the Report Wizard. Choose from Software Inventory, Hardware Inventory, and Administrator Audit.
Click Next to continue. Click Cancel to quit the Wizard.
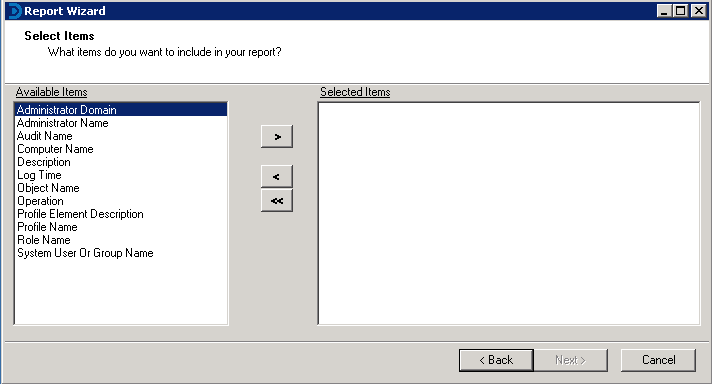
Based on your report category selection, this page of the wizard will present all of the items that correspond to the type of report to be built. Select the items that you want to appear on your report by first, highlighting the field and then click . Click
to remove a previously selected item from the list.
Click Next to continue. Click Cancel to quit the Wizard.
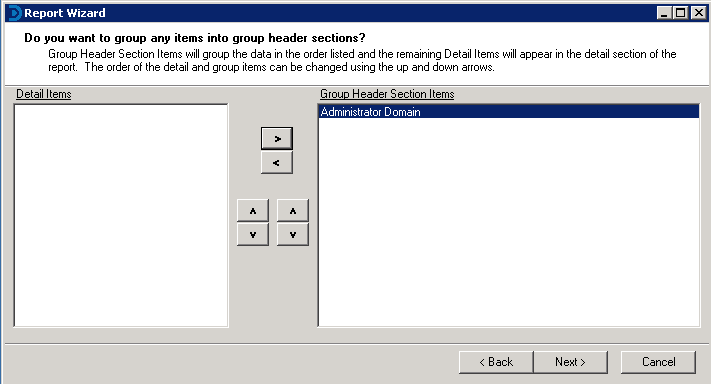
From the items selected for the report detail, optionally select one or more to represent a group header for the report. The group header section is printed immediately before the detail section and contains the items selected for the group header. Each time the group header data changes a new group header is printed. Creating a group header will sort the report data by the group header items. All other items will remain in the detail portion of the report.
Select the items that you want to appear in your group header by first, highlighting the field, and then clicking . Click
to remove a previously selected item from the list.
Click Next to continue. Click Cancel to quit the Wizard.
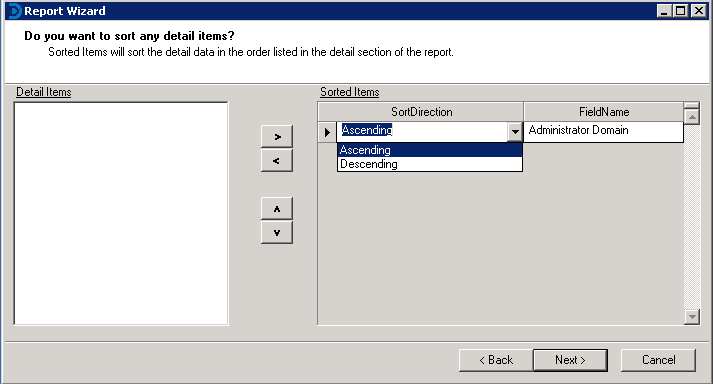
This page provides the ability to sort the report detail section. Select the items that you want to appear in your group header by first, highlighting the field and then click . Click
to remove a previously selected item from the list. Select Ascending or Descending sort order from the Sort Direction list.
Click Next to continue. Click Cancel to quit the Wizard.
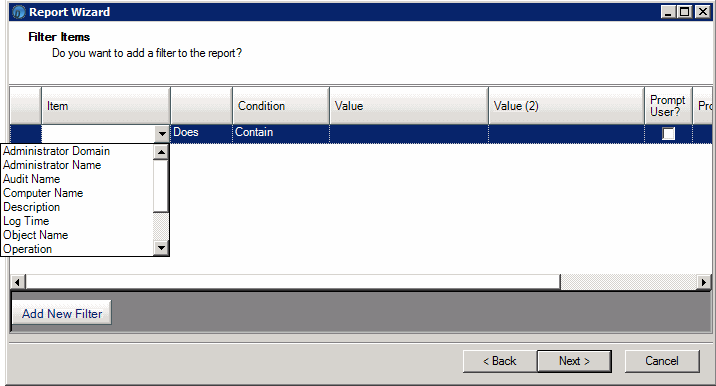
Adding a Filter to a report will restrict certain data from appearing on the report. This will generate the "WHERE" clause of the SQL statement. Click Add New Filter to begin the filter definition.
For each column, click the down arrow to select the appropriate field or condition for the filter. Available conditions are [Does, Does Not, Is, Is Not] [Contain, Start With, End With, Between, Equal To, Less Than, Less Than or Equal To, Greater Than, and Greater Than or Equal To].
Select the Prompt User box to allow the user to supply the Value(s) for the report when it is run. Click to remove the selected filter.
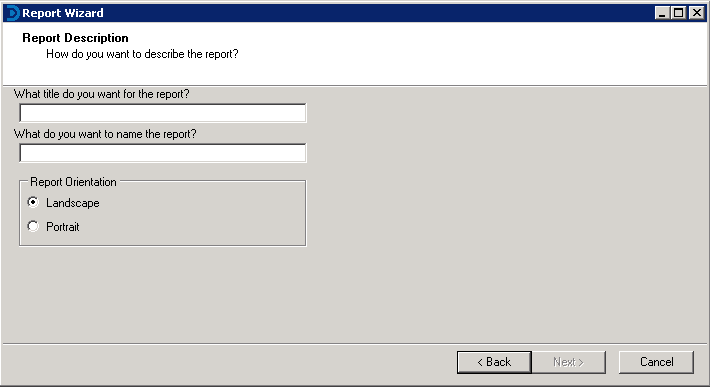
Enter the title of the report. This will appear in the reports Page Header.
Enter the name of the report as it will be shown in the list of User-Defined reports.
Select either Landscape or Portrait report orientation.
At this point all of the report design specifications have been selected and designed. The report will now be saved to the User-Defined report repository.
Select this option to save the report and execute it.
Select this option to save the report and load the report for further design modifications.
Select this option to save the report and then schedule it.
Click Finish to complete the SQL Reporting Wizard.
|
KACE® Desktop Authority 11.2.1 |
|
Reporting Guide |
The Alignment toolbar icons are available to format the alignment and layering of controls on the report design surface. The toolbar icons are available for use only when one or more controls are selected.
|
Icon |
Action |
Description |
|---|---|---|
|
|
Bring to Front |
Moves the selected control in front of all other controls in the band. |
|
|
Send to Back |
Moves the selected control behind all other controls in the band. |
|
|
Align Lefts |
Aligns the selected group of controls with the leftmost position of the control that was selected last. |
|
|
Align Centers |
Centers the selected group of controls based on the horizontal center of the control that was selected last. |
|
|
Align Rights |
Aligns the selected group of controls with the rightmost position of the control that was selected last. |
|
|
Align Tops |
Aligns the selected group of controls with the topmost position of the control that was selected last. |
|
|
Align Middles |
Aligns the selected group of controls based on the vertical center of the control that was selected last. |
|
|
Align Bottoms |
Aligns the selected group of controls with the bottommost position of the control that was selected last. |
|
|
Align to Grid |
Moves selected controls to line up with the report grid. |
|
|
Same Size Width |
Makes the selected controls the same width based on the control that was selected last. |
|
|
Same Size Height |
Makes the selected controls the same height based on the control that was selected last. |
|
|
Same Size Height and Width |
Makes the selected controls the same height and width based on the control that was selected last. |
|
|
Decrease Horizontal Space |
Decreases the horizontal separation between three or more selected controls. |
|
|
Set Horizontal Space Equal |
Moves the selected controls so there is an equal horizontal distance between them. |
|
|
Increase Horizontal Space |
Increases the horizontal separation between three or more selected controls. |
|
|
Decrease Vertical Space |
Decreases the vertical separation between three or more selected controls. |
|
|
Set Vertical Space Equal |
Moves the selected controls so there is an equal vertical distance between them. |
|
|
Increase Vertical Space |
Increases the vertical separation between three or more selected controls. |
|
|
Lock |
Locks the position and size of all controls on the report. |
