
ArchiveWeb Setup
ArchiveWeb is configured and ready for use right after installation. No user action is required. However, should the need arise, default configuration can be adjusted in Configuration tool.
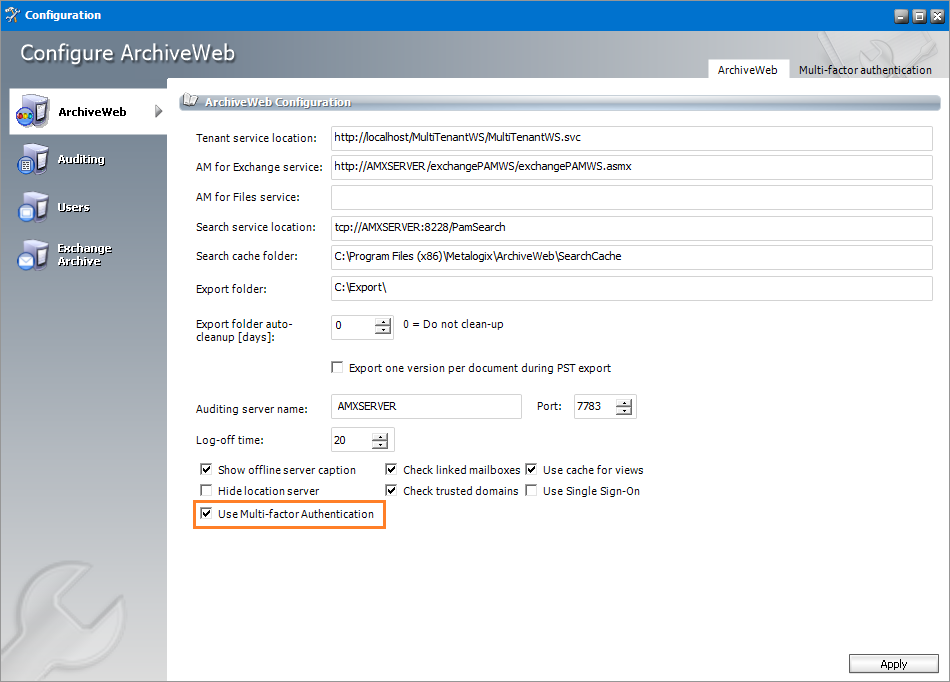
The Configuration tool is available on the ArchiveWeb server under <installdir>/Program Files (x86)/Common Files/PAM/PAMConfig/PamConfig.exe. Its ArchiveWeb tab list available configuration options. (For more information on the Multi-factor authentication tab see the section Multi-factor authentication (MFA).)
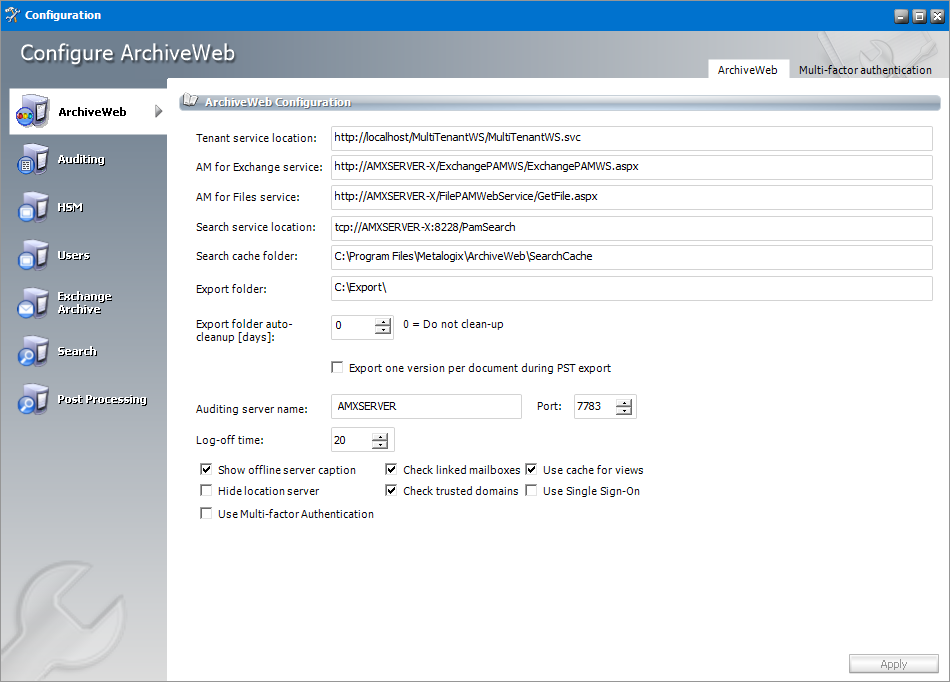
Specify the properties as described below:
Tenant service location - URL for MultiTenantWS web service
AM for Exchange service - URL for ExchangePAMWS web service if Archive Manager for Exchange is installed.
AM for Files service - URL for FilePAMWebService web service if Archive Manager for Files is installed.
Search service location - URL for PamSearch web service
Search cache folder - user's temporary storage folder to store e.g. messages downloaded from Exchange server for preview functionality
Export folder - folder where exported files (PST export, ZIP export) are stored (download link points to this folder)
Export folder auto-cleanup [days] - files older than the specified number of days will be deleted from the Export folder.
Export one version per document during PST export - indicates whether to export one version per document during PST export
Auditing server name & port - machine where auditing component is installed
Log-off time - time in minutes to log off when inactive
Show offline server caption - check to show [OFFLINE] suffix for decommissioned servers in servers' list if Archive Manager for Files is installed.
Hide location server - unchecked by default; indicating whether to hide Location Server Name from user's mailbox displayed in Mailboxes tree-view; if not checked, Location Server Name will be displayed as a suffix to user's email, e.g. administrator@[VMMVC5]
Check linked mailboxes - checking whether currently logging user has a linked mailbox associated. When unchecked, the entire login process can be accelerated because no additional Active Directory search is performed
Check trusted domains - checking trusted domains and reading information from trusted relationships. When unchecked the entire login process can be accelerated because no additional reads (from trusted domains) are performed
Use cache for views - when checked, all grid source data are cached after first load. Then all operation on grid that do not change the data will be performed quicker
Use Single Sign-On - when this option is checked, it will set Single Sign-On feature for ArchiveWeb login.
Multi-factor Authentication
ArchiveWeb supports multi-factor authentication (MFA) for O365 user accounts. Setting up MFA is a two-step process:
1.Create a new application in the Azure portal.
2.Configure ArchiveWeb with the Archive Manager configuration tool.
Create a new application in the Azure portal
ArchiveWeb requires a specific Azure site to be created that is used to return an authentication token back to the ArchiveWeb after a user is authenticated via Microsoft portal.
1.Login to your Azure Portal using your administrator credentials (https://portal.azure.com). If your account gives you access to more than one tenant, select your account in the top right corner, and set your portal session to the Azure AD tenant that you want.
2.In the left-hand navigation pane, select the Azure Active Directory service, and then select App registrations > New registration. The App registrations page appears.
3.Click New registration. The Register an Application page appears.

4.Provide the information on this page as described below:
a.Name - Enter a meaningful application name that will be displayed to users. For example, Archive Manager ArchiveWeb.
b.Supported account types - Select the account type you would like your application to support that best meets your company policy.
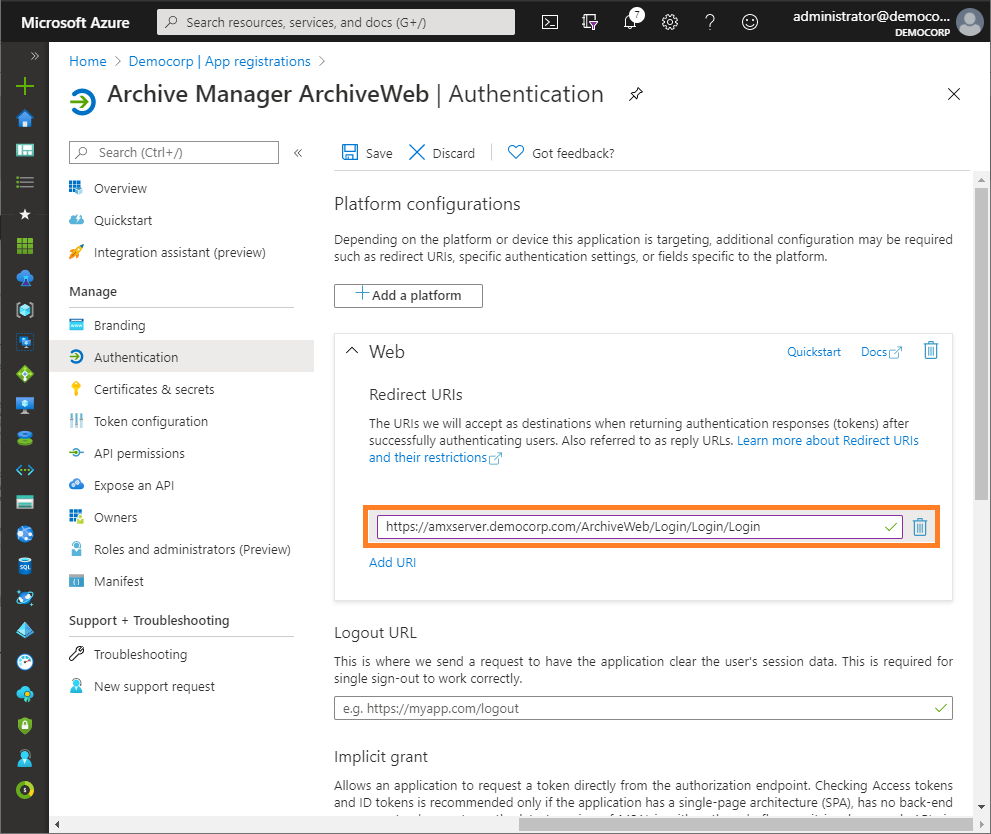
c.Redirect URI - from the application type drop down select Web. In the URI field enter the ArchiveWeb URI where the user will be redirected after multi-factor authentication (eg. https://<fullservername>/ArchiveWeb/Login/Login/Login)
|
|
NOTE: The HTTPS protocol is required for MFA to work with O365. To ensure the HTTPS can be used, follow the steps below; 1.On the ArchiveWeb server, open the IIS Management Console. 2.Expand the server node and then expand the Sites node. 3.Select Default Web Site and right-click to open the context menu. Then select Edit Bindings. The Site Bindings window opens. 4.Click Add. The Add Site Bindings window opens. 5.Select https from the Type drop down and fill in the other details as required. 6.Click OK to save the https site binding. 7.Restart the IIS service from the server node and then close the IIS Management console. |

5.Click Register. Azure AD assigns a unique application (client) ID to your app, and the application's Overview page opens.
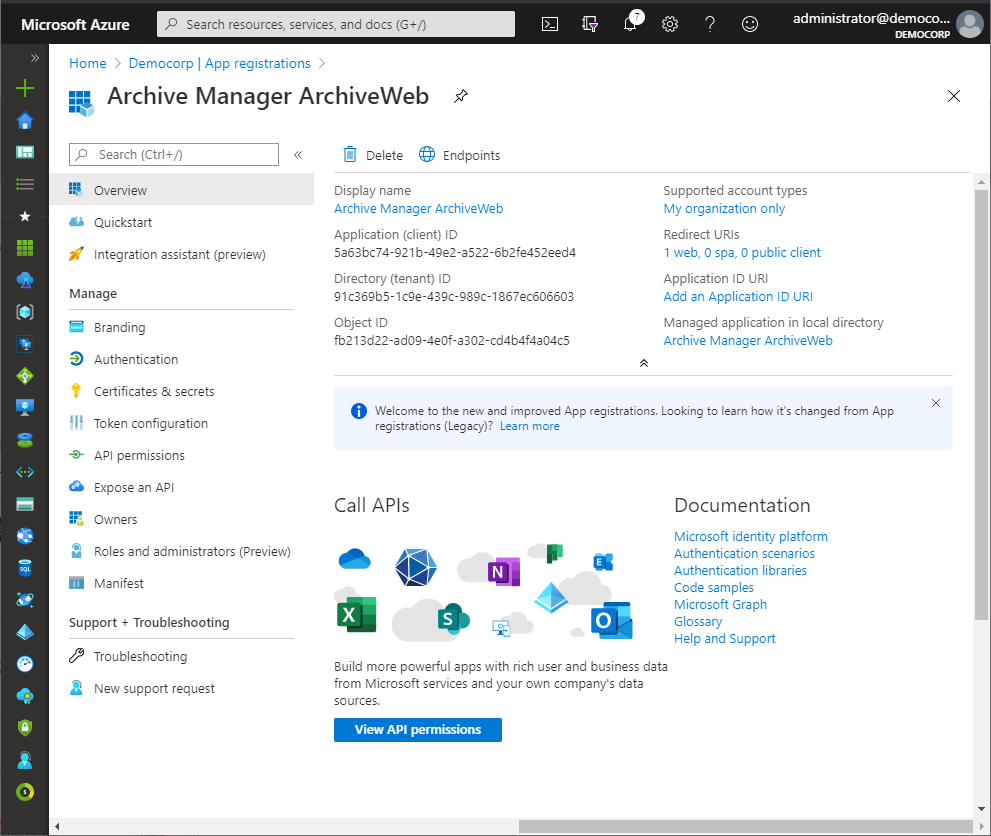
6.From the navigation menu, click Branding. Enter the URLs that your organization may use for the different branding artifacts.
7.From the navigation menu, click Authentication and verify that the Redirect URI parameters are as expected.
8.From the navigation menu, click Certificates & Secrets.
9.In the Client secrets section click New client secret. the Add a client secret page opens.
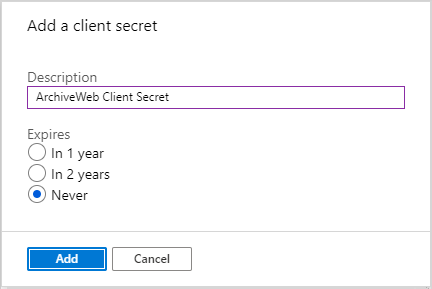
10.Enter values as described below:
a.Description - enter a meaningful description. For example, ArchiveWeb Client Secret.
b.Expires - set the expiry term that best meets your company policy.
11.Click Add. the client secret is displayed on the Certificates & Secrets page.
|
|
IMPORTANT: Copy and save the client secret in a safe place. It will not be available when you navigate away from this Azure blade. |
12.From the navigation menu, click API Permissions. and then click Add a permission. The Request API permissions page appears.
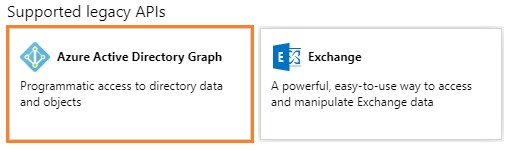
13.From the Microsoft APIs category, scroll down to the Supported legacy APIs section and select Azure Active Directory Graph.
14.From the Request API permissions page for Azure Active Directory Graph that appears, select Delegated permissions.
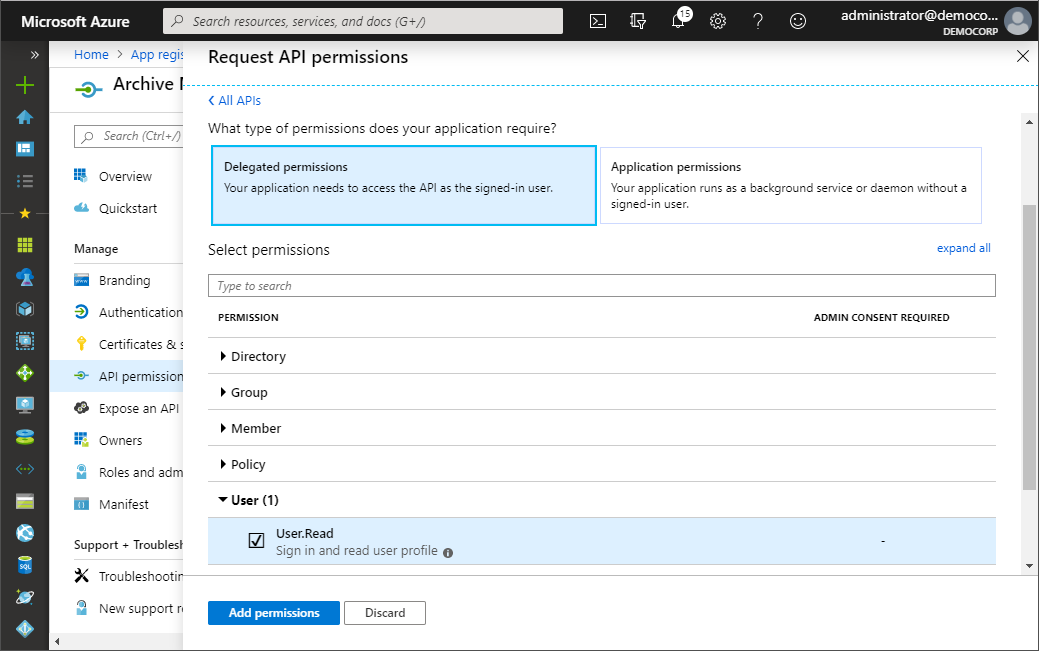
15.Click Add permission.
16.From the navigation menu, click Expose an API.
17.In the Scopes defined section, click Add a scope. The Add a scope page opens.
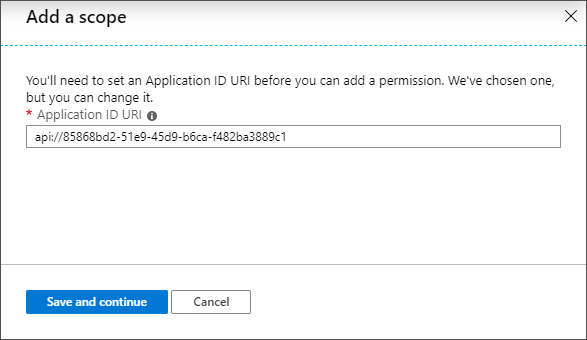
18.Microsoft Azure generates an Application ID URI automatically. It is a globally unique URI used to identify this web API. It is the prefix for scopes and in access tokens,and is also referred to as an identifier URI. You can keep this value or specify a unique value in the same format.
|
|
IMPORTANT: Copy and save this value in a safe place. |
19.Click Save and continue. The Add a scope page displays more options.
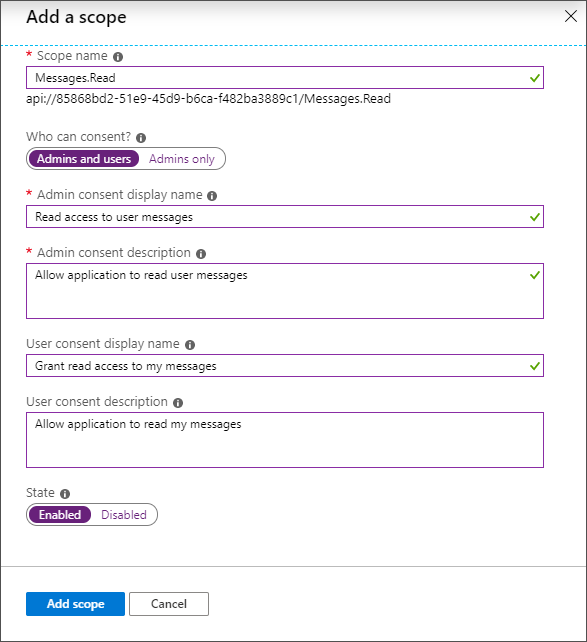
20.Click Add scope to complete the registration.
Configure ArchiveWeb with the Archive Manager configuration tool
1.Open the Archive Manager Configuration Tool from C:\Program Files (x86)\Common Files\PAM\PAMConfig\PamConfig.exe
2.From the sidebar, click ArchiveWeb.
3.Click the ArchiveWeb tab. The ArchiveWeb Configuration page appears.
4.Select the Use Multi-factor Authentication check box to activate the fields in the Multi-factor authentication Configuration window.
5.Click the Multi-factor authentication tab. The Multi-factor authentication Configuration window appears.
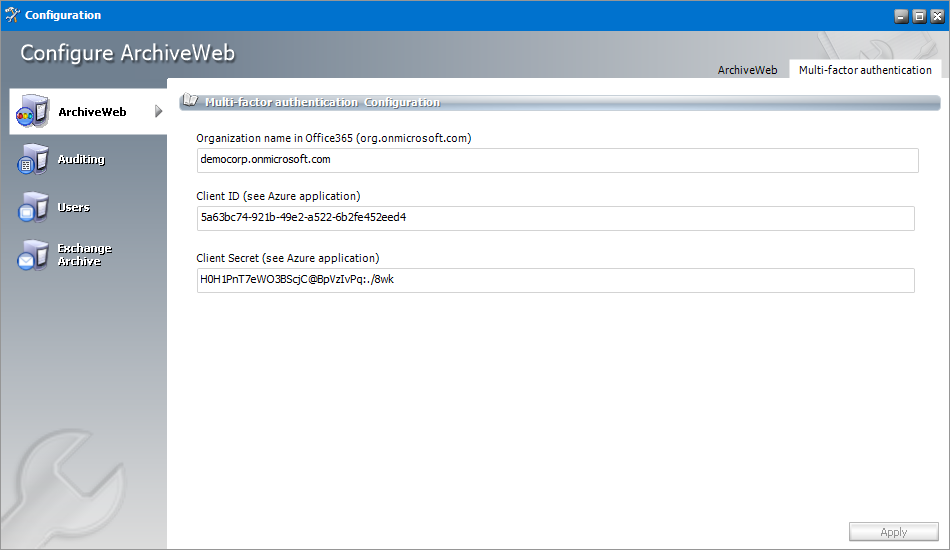
6.Enter the field values as described below:
a.Organization Name in Office365 - enter the name of your O365 organization URL. For example, democorp.onmicrosoft.com
b.Client ID - enter the Client Id that you saved from the Azure application registration steps.
c.Client Secret - enter the Client Secret that you saved from the Azure application registration steps.
7.Click Apply.
|
|
IMPORTANT: When at least one user in an organization has MFA set, the Organization, Client ID and Client Secret should be set in Multi-factor authentication tab as a readiness exercise. If only a few users in your organization have MFA activated, the Use Multi-factor Authentication check box should stay unchecked. The settings in the Multi-factor authentication tab will persist when the Use Multi-factor Authentication check box is unchecked. The users who have MFA activated will be prompted to enter the credentials (user email and password) and then they will be redirected to the Microsoft site where the user has to authenticate again. After a successful authentication by Microsoft, the user will be redirected back to ArchiveWeb. When all users accounts in an organization have MFA activated, the Use Multi-factor Authentication check box can be selected. This will allow ArchiveWeb to use multi-factor authentication for all users that log in to ArchiveWeb. Users will be prompted to enter only the login email address and they will be redirected to the Microsoft login form to finish the login process. |
Search Scopes
The Archive Manager Search installer installs the Search and Post Processing services which allows a user to search and run specific tasks on each archived message. Search scopes must be configured to allow searching for archived emails with ArchiveWeb. A search scope is a specified Archive server.
|
|
NOTE: If you install Archive Manager for Files with the Express or Advanced installation option, Search Scopes is automatically configured for you. If you install Archive Manager for Files manually, you must configure the Search Scopes manually. |
Steps to configure Search Scopes
1.From the feature panel on the left in the Configuration wizard, click Search and select the Search Scopes tab.
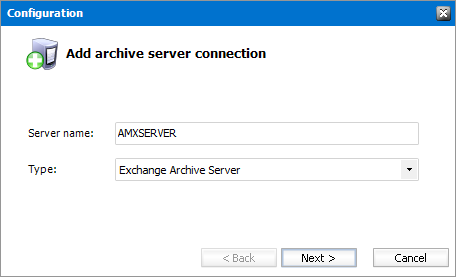
Enter the information and described below:
a.Server name - name of the Archive Manager for Files server (eg. AMFSERVER).
b.Type - Select File Archive Server.
2.Click Next. The Set up the Archive database connection window opens.
3.If the database already exists, click Import. Otherwise click Configure to setup the Archive Manager for Files database. The Database Connection Wizard opens.
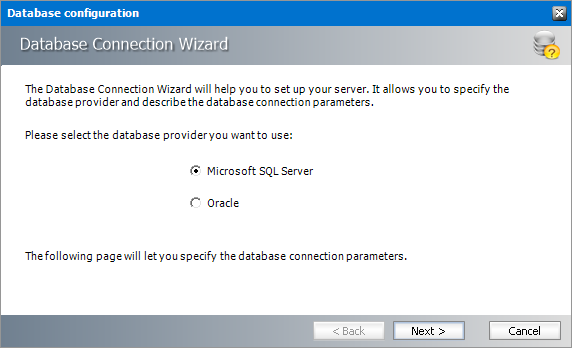
4.Select either Microsoft SQL Server or Oracle and click Next. The database connection information window opens for the selected database.
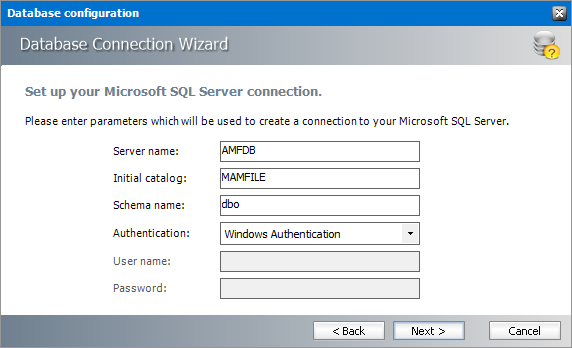
For Microsoft SQL Server
a.Server name - name of the SQL server (eg. AMFDB)
b.Initial catalog - name of the Archive Manager for Files database (e.g. MAMFILE which is the default name of the Archive Manager for Files database)
c.Schema name - name of the SQL Schema (e.g. dbo)
d.Authentication authentication type used for the database. Choose either Windows authentication or SQL Server authentication
e.User name - database login user name if SQL Server authentication is the selected as the authentication mode.
f.Password - password of the database user if SQL Server authentication is the selected as the authentication mode.
For Oracle
g.Oracle net name - net service name that describes the network address of the HSM database in your tnsnames.ora file (eg. AMFDB)
h.Schema - name of the Archive Manager for Files database (e.g. MAMFILE which is the default name of the Archive Manager for Files database)
i.User name - database login user name
j.Password - password of the database user
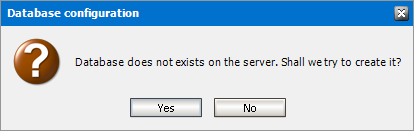
5.Click Next and then click Yes on the confirmation dialog that opens.
6.If the database connection is setup successfully, the configuration confirmation window opens.
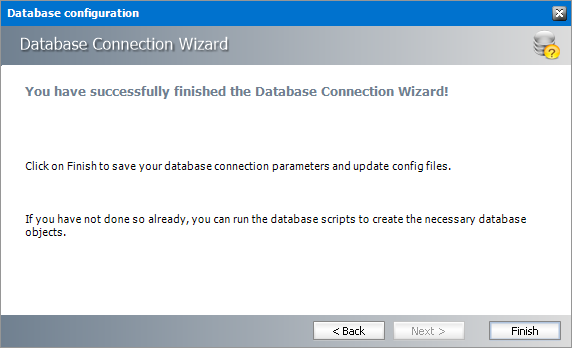
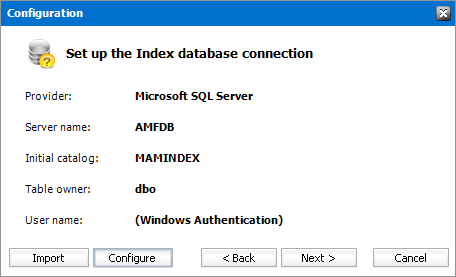
7.Click Finish to close the Database Connection wizard. The Setup the Index database connection window opens.
8.If the database already exists, click Import. Otherwise click Configure to setup the Index database connection. The Database Connection Wizard opens.
9.Select either Microsoft SQL Server or Oracle and click Next. The database connection information window opens for the selected database.
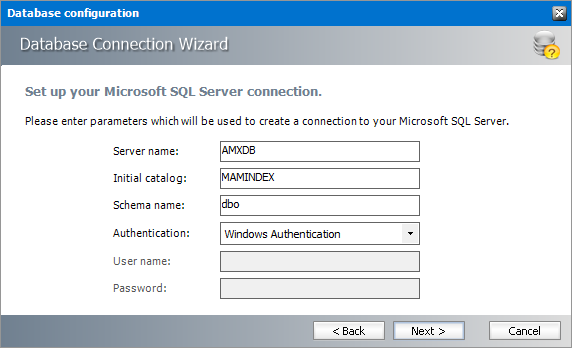
For Microsoft SQL Server
a.Server name - name of the SQL server (eg. AMFDB)
b.Initial catalog - name of the Archive Manager for Files database (e.g. MAMINDEX which is the default name of the Archive Manager for Files database)
c.Schema name - name of the SQL Schema (e.g. dbo)
d.Authentication authentication type used for the database. Choose either Windows authentication or SQL Server authentication
e.User name - database login user name if SQL Server authentication is the selected as the authentication mode.
f.Password - password of the database user if SQL Server authentication is the selected as the authentication mode.
For Oracle
g.Oracle net name - net service name that describes the network address of the HSM database in your tnsnames.ora file (eg. AMFDB)
h.Schema - name of the Archive Manager for Files database (e.g. MAMINDEX which is the default name of the Archive Manager for Files database)
i.User name - database login user name
j.Password - password of the database user
10.Click Next and then click Yes on the confirmation dialog that opens.
11.If the database connection is setup successfully, the configuration confirmation window opens.
12.Click Finish to close the Database Connection wizard. The Set up the Index database connection window reopens.
13.Click Next. The Configuration window for the Index directory opens.
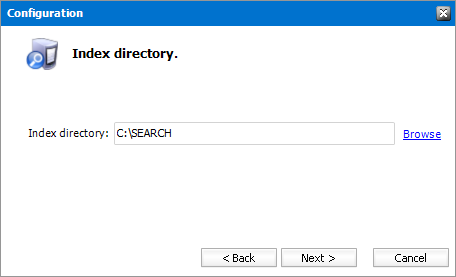
14.Click Browse to select or create a folder for the search index and then click Next. The Apply the configuration changes confirmation window opens.
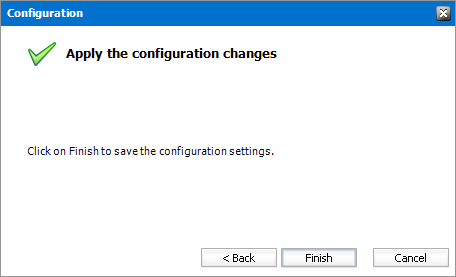
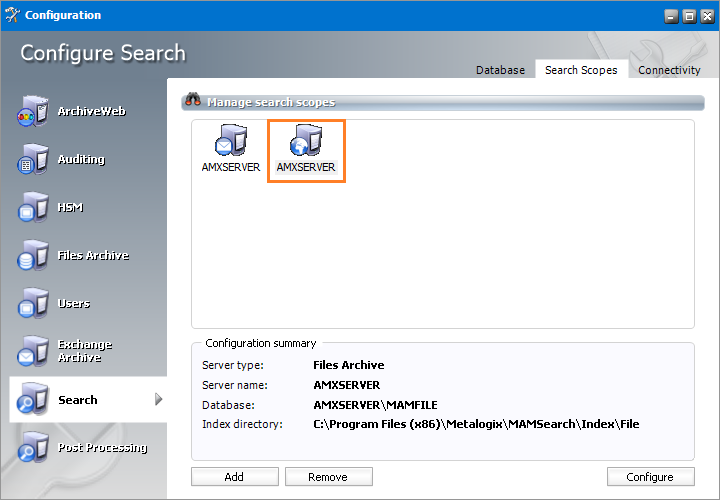
15.Click Finish. The Archive server for Server type = Files Archive is added to the Manage search scopes section. Click the icon for the Archive server that you added, and verify the information in the Configuration summary section.
|
|
NOTE: Search scopes for Archive Manager for Exchange and Archive Manager for Files are separate entities based on the Server type. |
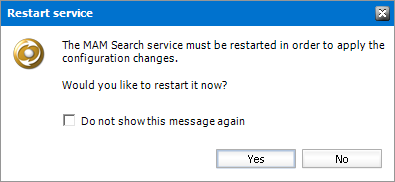
16.If the Restart service window opens, click Yes to restart the MAM service. Otherwise you must start the windows service manually.
17.Close the Configuration wizard.
Post-processing
The Archive Manager Search installer installs the Search and Post Processing services which allows a user to search and run specific tasks on each archived message. Post processing scopes must be configured to allow specific tasks from search results in ArchiveWeb. A Post Processing scope is a specified Archive server.
|
|
NOTE: If you install Archive Manager for Files with the Express or Advanced installation option, Post Processing Scopes is automatically configured for you. If you install Archive Manager for Files manually, you must configure the Post Processing Scopes manually. |
In this topic:
·Steps to configure Post Processing Scopes
Steps to configure Post Processing Scopes
1.From the feature panel on the left in the Configuration wizard, click Search and select the Search Scopes tab.
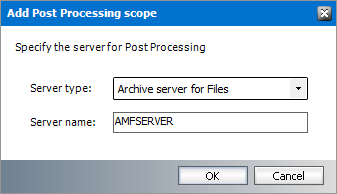
Enter the information and described below:
a.Server type - select Archive server for Files
b.Server name - specify the name of the Archive Manager for Files server.
2.Click OK.