
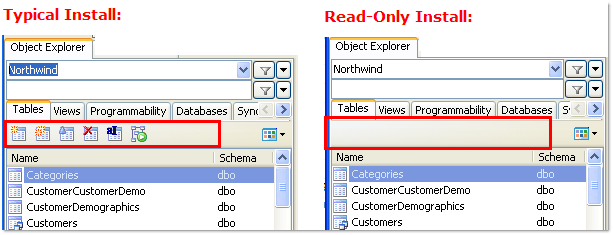
Read-Only Installation
During installation, you can select an option to install Toad as a read-only application. This lets you query data and view objects using Toad, but all actions that can impact the database (Create, Alter, Drop, Insert, Update, etc.) are disabled or hidden. This ensures that you can use Toad without worrying about committing a change to a sensitive production instance. The following image shows an example of the differences between a typical and a read-only installation:
To install a read-only version of Toad Data Point
-
During installation, select the Read-only option.

To change an existing installation to read-only
- Reinstall Toad and select Read-only Install on the Install Type page.
Additional Considerations and Limitations of Read-Only Install
Review the following additional considerations/limitations before using a Toad read-only installation.
| Consideration/Limitation | |
|---|---|
| Additional limitations for IBM DB2 z/OS connections |
When using an IBM DB2 z/OS connection in a read-only install of Toad, please note the following additional limitations:
|
Install Toad Silently
Silent installation provides a convenient method for deploying Toad to multiple machines. With some customization, you can also deploy the license key and settings at the same time.
Determine Which Installer to Use
Before performing a silent installation, review the following to determine which installer to use:
|
Installer |
Advantages |
Disadvantages |
|
Executable file (.exe) |
Silent installation using the .exe file has the following advantages:
|
Silent installation using the .exe file has the following disadvantages:
|
|
Microsoft Installer file (.msi) |
Supports deployment of Toad settings files and license keys. |
Silent installation using the .msi file has the following disadvantages:
|
Silent Installation Prerequisites
Before you can perform a silent installation, the following software must be installed on every computer where you are installing Toad:
- Microsoft .NET Framework 4.7.1
- (Installation using .msi Microsoft installer only) Visual C++ Redistributable for Visual Studio 2015. See Visual C++ Redistributable for VS 2015 for downloads. See KB2999226 - Update for Universal C Runtime in Windows for additional information.
Silent Installation Using the Executable
Use the executable file to perform a silent install to the default directory (or to a different directory) and to specify options such as logging installation messages.
To perform a silent install using the executable file
- At a Windows command prompt, switch to the drive or directory where the executable for Toad is located. (This file can be downloaded from the Quest Software Web site or can be found on the Toad installation CD-ROM.)
-
For a standard installation with all features enabled, enter the following command:
“ToadInstaller.exe” /S
For a read-only installation with create, alter, and drop functionality disabled, enter the following command:
“ToadInstaller.exe” /S READONLY=TRUE
You can customize MSIEXEC command-line options and overrides for your installation similar to the following command:
“ToadInstaller.exe” /S /Lx “C:\temp\installLog.txt” INSTALLDIR=”Drive:\your_install_path” USERNAME=”some_user” COMPANYNAME=”your_company” ALLUSERS=1
Use the following descriptions to customize the command-line options and overrides for your installation.
Command-Line Options
The following MSIEXEC command-line options are used in this example:
Option
Description
/L “C:\temp\installLog.txt”
(Optional) Write installation messages to the specified log file.
Substitute “C:\temp\installLog.txt” in the example with the fully qualified name of the log file. Enclose this value in double quotations. The installation process creates this file if it does not exist. Otherwise, the existing file is overwritten.
You can add additional parameters to the logging option to indicate what type of information to log.
- /Lx—Adds extra debugging information to the log (used in previous example)
- /Lv—Specifies verbose output
- /L*—Log all information, except that specified by x and v
- /L*v—Log all information, including v (verbose output)
- /L*x—Log all information, including x (extra debugging info)
- /L*vx—Log all information, including that specified by v and x
See the log section at http://msdn2.microsoft.com/en-us/library/aa367988.aspx for more information about additional logging parameters.
/32BIT Setup installs a 32-bit version of Toad.
This parameter applies only if written right after the path to the executable, e.g.:
C:\Users\JDoe\Downloads\ToadDataPoint_pro_5.0.2.20.exe" /32BIT /S /Lx “C:\temp\installLog.txt” INSTALLDIR=”C:\Program Files\Quest Software\Toad”
/64BIT Setup installs a 64-bit version of Toad.
This parameter applies only if written right after the path to the executable, e.g.:
C:\Users\JDoe\Downloads\ToadDataPoint_pro_5.0.2.20.exe" /64BIT /S /Lx “C:\temp\installLog.txt” INSTALLDIR=”C:\Program Files\Quest Software\Toad”
License="full_path"
Specify the full path to a license file, e.g. License="C:\ProgramData\Quest Software\Toad Data Point". Toad Data Point to use Toad with the desired license.
Toad Default Installation Option Overrides
You can specify the following values to override Toad’s default installation options. Enclose each value in double quotations.
Option
Description
INSTALLDIR
(Optional) Specify the absolute path for the directory in which you want to install Toad. If you do not include this path, the installation program defaults to:
C:\Program Files (x86)\Quest Software\Toad Data Point5.6.
ALLUSERS
(Optional) Specify one of the following:
- For a per-machine installation, specify 1. This value allows any user to use the Toad shortcut on the desktop after the installation completes.
- For a per-user installation, enter the empty string value (“”) This value allows only the user specified for USERNAME (and the user that installed Toad) to see the Toad shortcut on the target desktop. If USERNAME is omitted, only the user that installed Toad sees the shortcut.
Note: If you do not specify this property, the installation program defaults to a per-user installation.
USERNAME
(Optional) Specify the user that intends to use Toad on the target computer.
Notes:
- If ALLUSERS is omitted or defined with the empty string value (""), only the user specified here (and the user that installed Toad) can see the Toad shortcut on the desktop after the installation completes.
- If ALLUSERS is omitted or defined with the empty string value ("") and you omit the USERNAME option, only the user that installed Toad sees the Toad shortcut on the desktop.
- If ALLUSERS is 1, the USERNAME value is ignored during installation.
COMPANYNAME
(Optional) Specify the name of the company that owns this installation.
ALLOWPASSWORDS=FALSE (Optional) Set in order to prohibit users from saving their passwords in Toad.
OPTIONSTEMPLATE (Optional) Enter a full path to the Options Template that you generated in Tools | Options | General. Notes:
- All default installation option overrides are case-sensitive.
- Enclose all values (except for the ALLUSERS value) in double quotations.
Silent Installation Using the Microsoft Installer
Note: (MSI installs on Windows 7) If you are using MSI to install Toad on Windows 7 with UAC enabled, you can install a file that adds a "Run as administrator" option when right-clicking the MSI file: http://www.symantec.com/connect/downloads/msi-run-administrator-context-menu-vista.
Note: The installer does not verify that system requirements have been met before installing. If you do not want to manually verify system requirements, you should use the .exe file for the silent install.
MSI Prerequisites
Visual C++ Redistributable for Visual Studio 2015 is required by Toad, however it is not installed when you use the Microsoft (.msi) installer. Ensure that this software is installed prior to performing an install using the .msi installer. For downloads, see Visual C++ Redistributable for VS 2015. For related information, see KB2999226 - Update for Universal C Runtime in Windows.
If your operating system is 32-bit, install vc_redist.x86.exe. If your operating system is 64-bit, install both vc_redist.x86.exe and vc_redist.x64.exe.
This software is required to enable some features in Toad Data Point, such as Local Storage. This software is included in installation when using the executable (.exe) installer.
Perform Silent Installation Using MSI
You can deploy the license key, custom settings, and connections files when installing using the .msi installer. See Create Transform (MST) Files for more information.
To perform a silent install using msi
- At a Windows command prompt, switch to the drive or directory where the msi installer for Toad is located.
-
For a standard installation with all features enabled, enter the following command:
msiexec /i “ToadInstaller.msi” /q
For a read-only installation with create, alter, and drop functionality disabled, enter the following command:
msiexec /i “ToadInstaller.msi” /q READONLY=TRUE
You can customize command-line options and overrides for your installation similar to the following:
msiexec /i “ToadInstaller.msi” INSTALLDIR= “Drive:\your_install_path” /q USERNAME=”someone” COMPANYNAME=”your_company” ALLUSERS=1
Command-Line Options
The following MSIEXEC command-line options are used in this example:
Option Description /i Run the installation. /q Specify the user interface (UI) that displays during installation. You can append other options, such as n to hide the UI or b to hide the Cancel button during the installation.
Note: All command-line options are case-insensitive. See http://msdn2.microsoft.com/en-us/library/aa367988.aspx for a complete list of command-line options.
Toad Default Installation Option Overrides
You can specify the following values to override Toad’s default installation options. Enclose each value in double quotations.
Option
Description
INSTALLDIR
(Optional) Specify the absolute path for the directory in which you want to install Toad. If you do not include this path, the installation program defaults to:
C:\Program Files (x86)\Quest Software\Toad Data Point5.6.
ALLUSERS
(Optional) Specify one of the following:
- For a per-machine installation, specify 1. This value allows any user to use the Toad shortcut on the desktop after the installation completes.
- For a per-user installation, enter the empty string value (“”) This value allows only the user specified for USERNAME (and the user that installed Toad) to see the Toad shortcut on the target desktop. If USERNAME is omitted, only the user that installed Toad sees the shortcut.
Note: If you do not specify this property, the installation program defaults to a per-user installation.
USERNAME
(Optional) Specify the user that intends to use Toad on the target computer.
Notes:
- If ALLUSERS is omitted or defined with the empty string value (""), only the user specified here (and the user that installed Toad) can see the Toad shortcut on the desktop after the installation completes.
- If ALLUSERS is omitted or defined with the empty string value ("") and you omit the USERNAME option, only the user that installed Toad sees the Toad shortcut on the desktop.
- If ALLUSERS is 1, the USERNAME value is ignored during installation.
COMPANYNAME
(Optional) Specify the name of the company that owns this installation.
ALLOWPASSWORDS=FALSE (Optional) Set in order to prohibit users from saving their passwords in Toad.
OPTIONSTEMPLATE (Optional) Enter a full path to the Options Template that you generated in Tools | Options | General. Notes:
- All default installation option overrides are case-sensitive.
- Enclose all values (except for the ALLUSERS value) in double quotations.
Additional Options
Option Description TRANSFORMS (Optional) Specify the name and location of the .mst file.
TRANSFORMS="filename.mst"
See Create Transform (MST) Files for more information.
Create Transform (MST) Files
You can create a Microsoft transform (.mst) file that deploys the license key, custom settings, and connections for users when performing a silent install using the .msi file.
If you do not already have the license key, settings, and connections files that you want to deploy in a silent install, you can create them in Toad.
To create license, settings, and connections files in Toad
- License file. In Notepad, do the following:
- Enter the license key in the first line.
- Enter the site message in the second line.
- Save the file with license.key as the file name in the Toad install directory. Make sure the file extension is .key not .txt.
- Start Toad. The application should open without prompting you to enter a license key.
-
Settings file. Select Tools | Configuration Wizard from the Toad menu and complete the Configuration wizard. This wizard creates an initial settings file (Settings.xml).
- ModuleSettings files. Select Tools | Options from the menu in Toad to open the Options window.
- Select each page in the window and set any options you want to deploy. These options create a module settings folder and files.
- Connection file. Select View | Connection Manager from the menu in Toad to open the Connection Manager.
- Create any connections you want to deploy.
- Exit Toad. Upon exiting, a Connections file is created.
-
Locate the files you created. See the following table for file locations.
File
Location Settings.xml C:\Users\ username\AppData\Roaming\Quest Software\Toad Data Point 5.6.
ModuleSettings folder and files C:\Users\username\AppData\Roaming\Quest Software\Toad Data Point 5.6\ModuleSettings.
Connections.xml C:\Users\username\AppData\Roaming\Quest Software\Toad Data Point 5.6.
To create a Transform (.mst) file
- Select the tool of your choice to create a Transform (.mst) file using the ToadInstaller.msi.
- Package the files created in the previous procedure. When creating the Transform file, select the Toad Installation directory as the Destination.
For example, C:\Program Files\Quest Software\<product> <version>
When the user starts Toad for the first time, if these files are located in the Installation directory then the files are copied to the appropriate location.
- Generate and save the Transform file.
- Perform a silent install. See Perform Silent Installation Using MSI for more information.
Install Toad on Citrix Systems
Toad must be installed on the Citrix server by the Citrix administrator. Users then connect to this instance through their Citrix login.
To install Toad on a Citrix system
-
Connect to the Citrix Environment as an administrator.
-
Copy Toad to the Citrix server, if needed.
-
Start the Toad installation process.
-
-
Repeat steps 2 through 4 for each server in the Citrix farm.
Note: Although you must install Toad on every server in the Citrix farm, you only need to publish Toad once.
-
Review the following considerations regarding licensing:
- A license supplied by an administrator always overrides a user-supplied license in a Citrix environment.
- If you need to provide the same Toad functionality to all users, you can enter the default license key for all users.
Upgrade Toad
To upgrade Toad
- Run the ToadInstaller.exe installation program from the DVD or downloaded file.
- Select Uninstall Toad and continue with install.
- Complete the wizard.
If you are upgrading from a previous version of Toad, you are prompted to migrate your settings the first time you start Toad. The settings files include database connections, layout customizations, shortcut keys, and options customized in the Options pages.
To migrate the settings again, remove or rename the current version's Application Data folder and migrate the files from the previous version's Application Data folder.
Note: Local Storage databases and database objects persist between versions (releases) of Toad Data Point.