This process is not plug-in-specific. For more information, see the topic on deploying clients and plug-in packages in the Quest NetVault Backup Administrator’s Guide.
|
1 |
In the Navigation pane, click Guided Configuration. |
|
2 |
|
3 |
|
4 |
In the Package Store list, select the applicable repository. |
|
5 |
Click Add NetVault plug-in package. |
|
6 |
In the Select packages for deployment dialog, select the file entitled “sql-x-x-x-x-x.npk,” where xxxxx represents the version number and platform, and click OK. |
|
7 |
Click Next. |
|
8 |
On the Machines to Have NetVault Software Installed page, select the applicable machines. |
|
9 |
If you are installing an upgrade, select Allow existing NetVault client installations to be upgraded. |
|
10 |
Click Install Software/Add Clients. |
|
11 |
After the plug-in is successfully installed, click Next to complete the process. |
Installation of the plug-in in a high-availability environment is completed through the creation of a Virtual Client on the NetVault Backup Server. A Virtual Client is a group of nodes within the cluster. NetVault Backup Server views this group as a single client that is created to back up a single clustered resource, for example, a SQL Server Virtual Server. During the Virtual Client creation process, the plug-in is transferred from the NetVault Backup Server to selected nodes within a cluster and installed there.
As noted earlier, the Virtual Client creation process is not plug-in-specific, and you can find complete details in the Quest NetVault Backup Administrator’s Guide. However, consider the following points during the Virtual Client creation process:
|
• |
Assign a name to the Virtual Client: Quest strongly recommends that you use the Virtual Server network name (that is, the Fully Qualified Domain Name [FQDN]) assigned to the SQL Server as the NetVault Backup Virtual Client name. When you browse a Virtual Client, NetVault Backup locates the node currently in control of the clustered application, and reveals the SQL Server Instance, for example, on the NetVault Backup Selections page. With a Virtual Client name set up as the SQL Server Virtual Server network name, you can recognize the SQL Server Instance for which the Virtual Client was created. |
|
• |
Only include relevant cluster nodes in the Virtual Client: Include only the hosts that are relevant to the SQL Server Virtual Server that is to be backed up and restored. |
After the creation of the Virtual Client, the plug-in is transferred to all designated cluster nodes and installed locally. You use the installed plug-in by using the Virtual Client to back up and restore shared data; you can only perform backups and restores of data shared within the cluster.
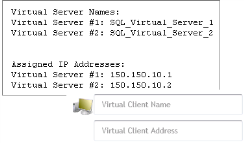
SQL Server supports the ability to create multiple Virtual Servers in a cluster. However, each Virtual Server can have only one instance of SQL Server running. In addition to the provisions outlined earlier, account for the following provisions when using Plug‑in for SQL Server in this configuration.
|
• |
Create an individual NetVault Backup Virtual Client for each SQL Server Virtual Server: For each SQL Server Virtual Server in the cluster, create a separate Virtual Client. During the creation process, ensure that the following are included: |
|
• |
IP Address of the SQL Server Virtual Server: In the Virtual Client Address field of the Virtual Client page, enter the IP Address assigned to the appropriate SQL Server Virtual Server. For example, if you are creating the first of the two SQL Server Virtual Servers in a failover cluster, enter the IP address assigned to the first Virtual Server. |
|
• |
Give a name to the Virtual Client that corresponds to the network name of the SQL Server Virtual Server: Enter the network name associated with the SQL Server Virtual Server in the Virtual Client Name field. |
|
• |
Copy the “nvsqlserver.cfg” file before creating the next NetVault Backup Virtual Client: Because creating a new Virtual Client overwrites the configuration file, which includes the Logon Detail information, Quest recommends that you perform the following steps: |
|
1 |
Store a copy of the first “nvsqlserver.cfg” file in a safe location. |
|
2 |
Create the next Virtual Client, store a copy of its “nvsqlserver.cfg” file in a safe location, and repeat this step for every new Virtual Client that you need to create. |
|
3 |
When you have finished creating Virtual Clients, copy the information from the [Security-<instanceName>] and [ServerList:List] sections in each “nvsqlserver.cfg” file to the same sections in the “nvsqlserver.cfg” file on the primary node. |
|
4 |
If you have browsed the Virtual Client, close and reopen the NetVault Backup Selections page. |
