Editing service accounts
You can change the password on a service account and reassign the default account. A green check mark displays next to the service account that is used as the default account to access any domains that cannot be reached through the current configuration. See Adding service accounts and Deleting service accounts.
|
1 |
Select Tools | Access Explorer Configuration. |
|
2 |
Click Configure Access Explorer. |
|
3 |
Open the Configuration tab, if necessary. |
|
4 |
Click Configure service accounts for Access Explorer. |
|
6 |
Click Edit. |
|
9 |
Click OK. |
Deleting service accounts
|
1 |
Select Tools | Access Explorer Configuration. |
|
2 |
Click Configure Access Explorer. |
|
3 |
Open the Configuration tab, if necessary. |
|
4 |
Click Add new Service Accounts. |
|
6 |
Click Delete. |
|
7 |
Click OK to confirm deletion of the service account. |
|
8 |
Click Refresh to update the display. |
Collecting Access Explorer data
Setting up a managed computer
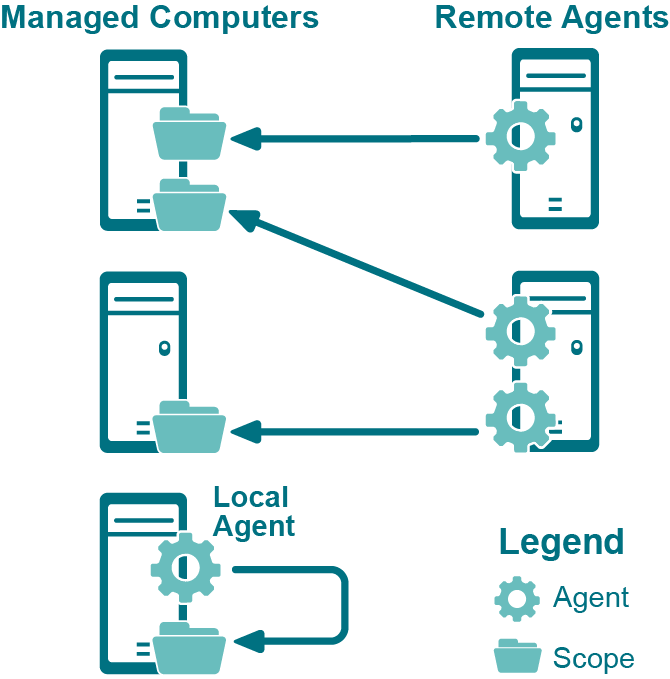
Figure 2 depicts the possible deployment scenarios for Access Explorer agents and managed computers in remote and local installations.
A locally managed computer is one on which the Access Explorer agent is installed and scanning security data on the same server. Local installation is available only for Windows® Servers. With a local installation, you also can choose automatic or manual installation. See Installing the Access Explorer agent locally.
A remotely managed computer is one that has its security data scanned and collected by Access Explorer agents running on different servers. Other than Windows® Servers, all other server types require remote installation. There is no option to install the agent manually. See Installing the Access Explorer agent remotely.

