Toad allows you to create a full-featured, native Teradata connection. This type of connection provides complete Query Builder, Query Editor, and Database Explorer functionality.
Notes:
To install the Teradata data provider
| » | Download and install the Teradata .NET Data Provider from the Teradata Web site. Use the version supported by your database version. |
To create a Teradata connection
 on the Connections toolbar (ALT+F+N).
Enter the connection information in the Create New Connection dialog. Review the following for additional information:
| Login | |
|
Server name |
Enter the name of the server hosting the database to which you want to connect. |
|
Use Single Sign On |
Select if the user is using a single sign-on authentication system. |
|
Password |
Enter the password to use when connecting. Tip: After connecting, you can set a master password to further secure your connection in Tools | Options| Environment | Security. |
|
Session mode |
Displays the session mode, which is always Teradata in a Toad Teradata connection. |
|
Default database |
(Optional) Enter a default Teradata database for the connection. |
|
Category |
(Optional) Select an existing category or create a new one. |
|
Advanced |
|
|
Mechanism |
(Optional) Select an authentication mechanism from the list. |
|
Parameter |
(Optional) Enter the parameters required by the selected authentication mechanism. See your system administrator for these values. |
|
Account string |
(Optional) Enter a new account string. |
|
Character set |
Select a character set. Note: When querying or viewing data in a column defined with GRAPHIC or CHARACTER SET GRAPHIC data type, you must specify a Character set of UTF-16 for the session. |
|
Use data encryption |
Select if using data encryption. |
|
Response buffer size |
Specify a Response Buffer Size (in bytes). This allows you to govern the number of rows returned in a single response. To increase the number of rows per response, increase the response buffer size. This strategy might help to improve performance with larger data sets. The default value in Toad is set to the maximum, 1040000 bytes. |
Click Connect to connect immediately while saving the connection information. Optionally, click Save to save the connection without connecting.
Tip: Connections are stored in the connections.xml file and can be found by clicking the Application Data Directory link in Help | About.
To install a Teradata ODBC driver
| » | Download and install a Teradata ODBC driver from the Teradata Web site. For a list of supported Teradata ODBC drivers, please see the Release Notes for your version of Toad Data Studio. |
Notes:
Review the following solutions to help troubleshoot Access issues pertaining to missing functionality and object information and other problems in Toad.
See Create Access Connections for more information about Access connections.
| Issue | Cause/Solution |
|---|---|
|
Some queries display in the View tab of the Object Explorer, but do not display in the Query tab. |
The Access ODBC driver handles saved queries in the following manner:
|
|
Primary key information is unavailable. |
The Microsoft Access ODBC driver does not return primary key information for databases. However, in some cases, Toad can obtain this information through additional methods. |
| Issue | Cause/Solution |
|---|---|
|
A delay occurs between writing a value to a database via one connection and seeing the updated value via another connection. |
This delay is the default when you are writing and reading data between two different Jet connections. The delay occurs even if the two connections reside in the same client process. Solution: Use a single connection when updating data. |
Toad allows you to connect to a Hive data warehouse system. Apache Hive is one of the NoSQL data sources supported by Toad. Toad allows you to connect to Hive using Kerberos authentication.
To create a Hive connection
 on the Connections toolbar (ALT+F+N).
Enter the connection information in Create New Connection. Select HiveServer2 in Server Type
| Username |
Enter the user name to use for this connection in the following format: user@REALM or domain\user |
| Hive host realm |
Enter the Kerberos realm of the HiveServer2 host. |
| Hive host FQDN |
Enter the fully-qualified domain name (FQDN) of the HiveServer2 host. Note: If necessary, contact your IT department to obtain this information. |
| Service name | Enter the service name of the Hive server. The default is hive. |
To set User name
Toad Data Studio needs to use full name in Kerberos Key Distribution Center (KDC) in the following format:
Userid/host@realm
Note: Please contact your Kerberos/IT administrator for more info on your userid and host name
Before you can successfully connect to Hive using Kerberos authentication, the Toad client computer must have a Kerberos Key Distribution Center (KDC) address entry for the Hive host realm. To define the KDC entry, use the following procedure.
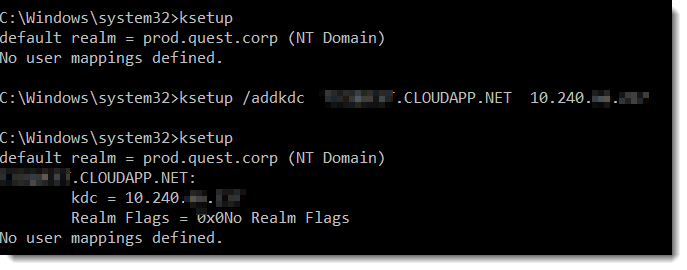
You only need to run this command once for the given realm. To confirm the setting, enter the following command: ksetup. This command should return both the name of the Hive host realm and the KDC name you specified.
Open a Windows Command Prompt as Administrator and enter the following command:
ksetup /addkdc <REALM> <KDC name>
Where <REALM> is the name of the Hive host realm and <KDC name> is the DNS name of the computer running the KDC service for the given realm. ksetup is the Kerberos setup tool in Windows.
Run the command ksetup again to confirm the realm has been added.

To check the port and hive setting in Hive server
These settings may differ in each Hadoop release package:
Hortonworks
Toad Data Studio does not use JDBC for connecting to Hive, so do not use HiveServer2 JDBC URL here. Do not use the URL and port information below in Toad Data Studio HIVE connection.

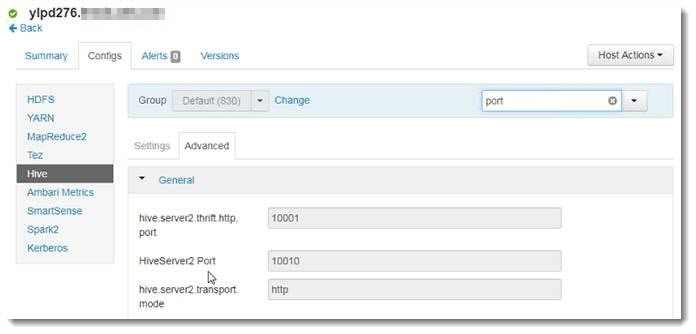
Enter “port” in the filter search box to know the hive transport mode and port configuration in this Hive server.

If hive.server2.transport == HTTP, then check “http mode” in Toad, and port number in Toad should use ‘hive.server2.thrift.http.port’.
If hive.server2.transport == binary, then uncheck “http mode” in Toad, and port number in Toad Data Studio should use “HiveServer2 Port”.
Note: HDP does not use SSL when Kerberos authentication is enabled.
Cloudera
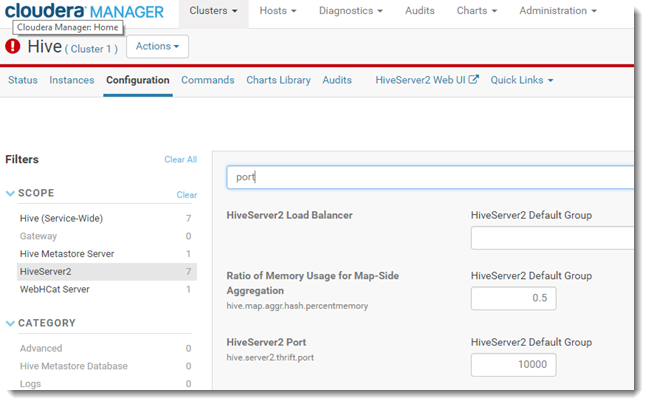
Enter “Port” in the search box to check the HiveServer2 Port in CDH because CDH does not support using the Thrift HTTP mode to connect to HiveServer2.

Enter “SSL” in the search box to check if the SSL has been enabled. By default SSL is not used.
