Cleanup of service attributes used by the Directory Synchronization Agent during migration and synchronization can be performed by using the Active Directory Cleanup Utility for Quest Migration Manager, which is included in the Migration Manager for Active Directory Resource Kit.
This is the last step of the migration process. If all previous steps were successful, you can switch off your source domain controllers and re-use the freed-up hardware.
|
|
CAUTION: Do not switch off or demote your source domain controllers if there are servers (Exchange, SQL, or other servers running specific applications and services) that are still members of the source domain. Perform decommissioning only when you are sure that there are no member servers or workstations currently accessed by users left in the source domain. |
In multi-forest Active Directory deployments, users from several forests might have mailboxes in one Exchange organization. This deployment type is sometimes referred to as Exchange Resource Forest or Multiple Forests/Single Org.
|
|
CAUTION: If you are performing calendar synchronization on Microsoft Exchange 2007, make sure that the Public Folder database exists in your Exchange 2007 environment. |
The main characteristic of such deployments is that users have mailboxes that are not in the forest in which they get authenticated. Thus, security directory is separate from the Exchange directory.
Migration Manager supports migration and deployment of such configurations. The product will migrate the Exchange org in such a way that users get switched to the new messaging system while remaining in their existing forest from a security perspective.
However, this scenario described below can be used also when Active Directory migration has already been completed; that is, Active Directory objects and resources have already been migrated from the source to the target forest by means of the other migration tools, such as Microsoft Active Directory Migration Tool (ADMT), and all users already log on to the target domain. In this case also, only Exchange data must be migrated from the source to the target Exchange organization.
The Exchange Migration scenario is shown schematically in the figure below:
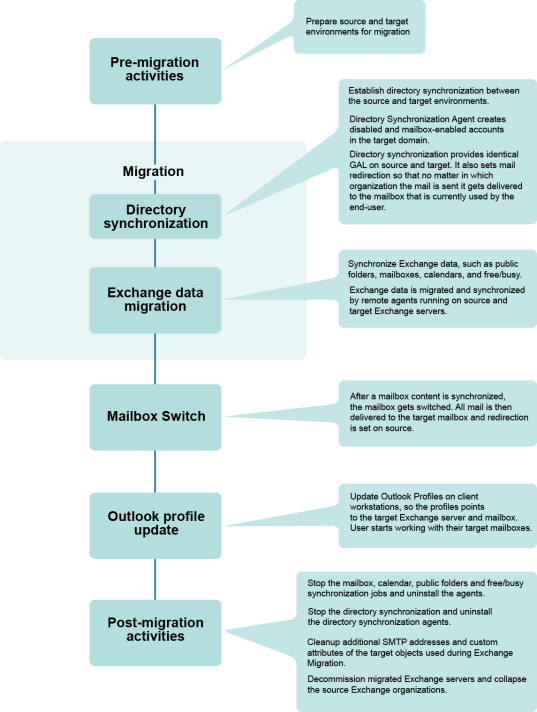
Figure 2: Overview of the Exchange migration process.
To migrate Exchange data, complete the following steps:
Directory Synchronization Agents
Mailbox Synchronization Agents
Synchronization Agents
Public Folder Synchronization Agents
Free/Busy Synchronization Agents (if they were used)
Clean up the additional SMTP addresses and service attributes. Clean up the additional SMTP addresses set for redirection purposes and the custom attributes of the target objects used during Exchange migration.
You always need to establish directory synchronization when you migrate user mailboxes from one Exchange organization to another. Configure the Directory Synchronization Agent to create disabled and mailbox-enabled user accounts in the target domain.
The initial directory synchronization creates new user accounts in the target domain and a mailbox for each user corresponding to a source mailbox. This should be completed for all source mailboxes you want to migrate to the new Exchange organization before any other activity is started, for the following reasons:
When the Directory Synchronization Agent creates a disabled account in the target domain that corresponds to the source user account, it automatically sets the source user account as the Associated External Account (i.e., the SID of the source user is added to the msExchMasterAccountSID property of the target user). This ensures that source users will be able to access all target Exchange resources with the old (source) accounts.
If security accounts have been created in the target domain prior to Exchange migration (Active Directory migration has been completed previously), you should configure the Directory Synchronization Agent to search for the matching objects in the target domain for each source object within the specified synchronization scope. The following matching rules can be used:
All three matching rules are turned on by default. We recommend you select only those rules that are relevant for your previous migration and switch off the other rules that do not apply to your situation. For example, if you have migrated accounts and added SIDHistory to the target accounts, use the SIDHistory matching rule. If you have migrated accounts without SIDHistory but did not change the account names (source and target accounts have the same names), use matching by account name.
Directory synchronization sets mail redirection so that mail is delivered to the mailbox currently used by the end user, regardless of which organization the mail is sent from. The additional SMTP addresses are used for redirection. These addresses are generated upon the template you specify when you configure directory synchronization, and are automatically added to the source and target mailboxes.
Directory synchronization also ensures that account properties and Global Address Lists are identical in the source and target organizations.
Once the initial synchronization is completed, you can proceed to Step 2. However, directory synchronization should continue to run until the last user is migrated to the target Exchange organization. This ensures that changes made by the administrators in the source or target directory are automatically propagated to the other directory.
For more information about directory synchronization, see the Directory Synchronization topic.

