| Component | License/License URL | Copyright Notice |
|---|---|---|
| JQuery 1.6.2.0 |
MIT N/A http://www.opensource.org/licenses/mit-license.php |
|
| Microsoft.Exchange.WebServices 15.00 |
MIT 1.0 http://www.opensource.org/licenses/mit-license.php |
|
| Microsoft.Exchange.WebServices.Auth 15.00 |
MIT 1.0 http://www.opensource.org/licenses/mit-license.php |
|
| Microsoft.Web.Administration 6.1 |
MICROSOFT ASP.NET MODEL VIEW CONTROLLER 3 TOOLS UP N/A http://www.microsoft.com/web/webpi/eula/aspnetmvc3update-eula.htm |
|
| Newtonsoft.Json.Net 13.0.1 |
MIT Json.NET N/A http://json.codeplex.com/license |
|
| NLog 3.2.0 |
BSD 3-Clause License N/A http://opensource.org/licenses/BSD-3-Clause |
|
| Redemption 6.3.0.6164 |
dimastr n/a http://www.dimastr.com/redemption/EULA_Redemption_Assured.htm |
|
| Telerik UI for WPF 2020.3 |
Telerik for WPF UI TMPLT07Nov2022 https://www.telerik.com/purchase/license-agreement/wpf-dlw-s |
Migrator Pro for Exchange has the ability to migrate mailboxes between two or more Exchange organizations. From the Migrator Pro for Exchange Settings page, you can easily add additional organizations whose mailboxes you want migrated to your target. However, for this function to work there must be a mail-enabled (not mailbox-enabled) account in the target forest to receive the migrated mail content. In addition, this target account must have the msExchMailboxGuid attribute copied from the Source to the Target account. Migrator Pro for Exchange and Microsoft PowerShell use this attribute to authoritatively identify the relationship between the source and target objects.
Migrator Pro for Exchange has no particular preference on how this relationship is established. To perform this association, you can use the Directory Sync Pro product, the Prepare-MoveRequest.ps1 script located on your Exchange 2010/2013 server, Forefront Identity Manager, or any other product capable of creating a Mail-Enabled user object and stamping the correct msExchMailboxGuid value. This flexibility makes for an easier implementation as you develop your migration project plan.
Getting Mailbox Statistics
When performing Inter-org (cross forest) migrations, mailboxes housed on source forest, Exchange 2010 and Exchange 2013 servers do not display mailbox sizes and item counts within the Migrator Pro for Exchange Administrative and User portals.
Migrator Pro for Exchange uses native Exchange protocols to query mailbox sizes and item counts. Exchange 2013 does not support Windows Management Instrumentation (WMI) as a method for gathering this information. Instead, either Exchange Web Services (EWS) or Remote PowerShell must be utilized to gather this information.
Perform either of the following two procedures to gather mailbox size and item count information from these platforms.
Option 1:
Open the Exchange Management Shell on either Exchange 2010 or Exchange 2013 and execute the following command. This must be executed only once for each messaging server version, to allow Migrator Pro for Exchange to query mailbox size information from these systems.
For Exchange 2010/2013, type the following command:
New-ManagementRoleAssignment -Name:ImpersonationAssignmentName -Role:ApplicationImpersonation -User:Domain\Administrator
Option 2:
Identify an Exchange 2010/2013 Server with a valid (non self-signed) trusted SSL certificate that has the IIS service assigned to it. Open the Exchange Management Shell on this Exchange 2010/2013 server and type these two commands:
Enable-PSRemoting
Set-PowerShellVirtualDirectory "$env:COMPUTERNAME\PowerShell (Default Web Site)" -BasicAuthentication $true
Once completed, open the Migrator Pro for Exchange Admin Portal and click Forests:

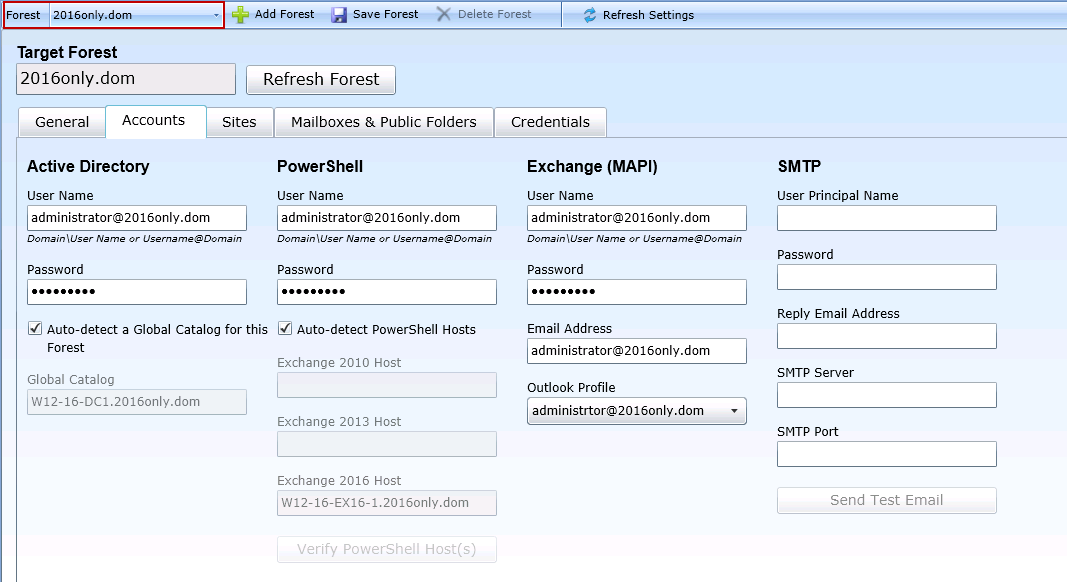
... and select the desired source forest in the Forest drop-down list (shown here in the red box):

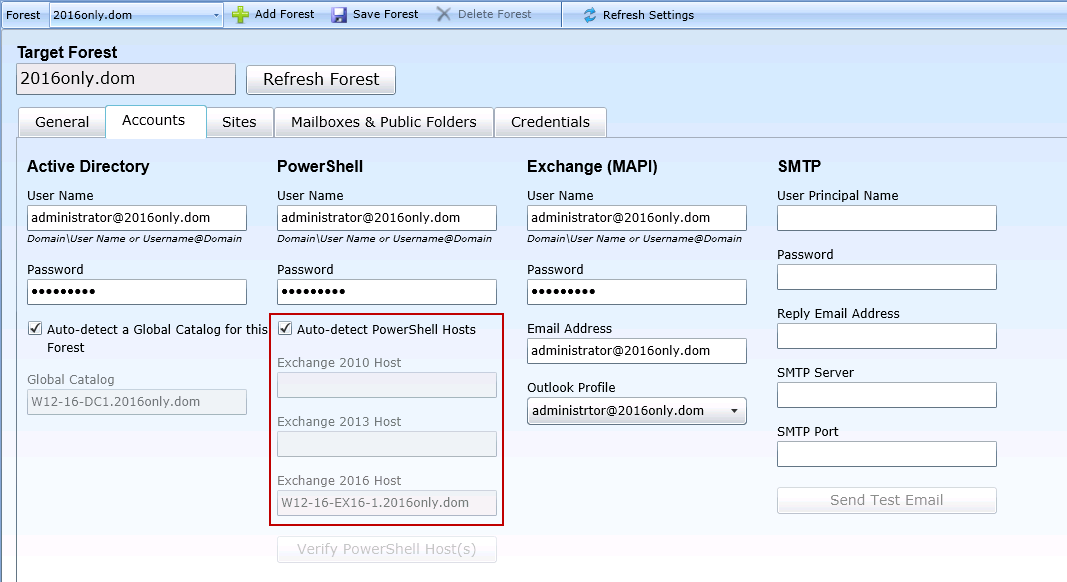
Then, on the Accounts tab, clear the checkbox for Auto-detect the PowerShell Hosts for this Forest, and type the appropriate value into the appropriate PowerShell Host field (Exchange 2010, 2013 or 2016):

And then click Save Forest (in the toolbar above the tabs).
Mailbox migrations to Office 365 are processed the way that Intra-Org and Inter-Org migrations are executed, by using the New-MoveRequest PowerShell cmdlet. This enables us to use the same Project Management and Workflow features of the Migrator Pro for Exchange application available to Intra-Org and Inter-Org migration projects.
For these commands to function, your source environment must meet certain requirements. While this document does not seek to provide guidance on how to successfully enable a hybrid coexistence strategy, Migrator Pro for Exchange requires the following two conditions to be true.
There must be an internet facing Exchange 2010 Client Access Server (CAS) running the Mailbox Replication Service (MRS) Proxy service. The CAS is used to upload data from your Exchange 2010 mailboxes.
The environment must be synchronizing its users with Office 365 by way of the Microsoft Online Services Directory Synchronization tool. The Microsoft Online Services Directory Synchronization tool is used to create accounts with the proper msExchMailboxGuid values.
|
|
For cross-forest migrations with Migrator Pro for Exchange, the home forest where you configure Migrator Pro for Exchange usually is also the Target forest. However, in the case of Office 365 migrations, it becomes your source. The AD groups that are in the Office 365 target environment will be rationalized in Migrator Pro for Exchange when the Office 365 forest is added, but the members of those groups will not be rationalized in Migrator Pro for Exchange until the second rationalization pass has occurred. By default, rationalization updates occur every 60 minutes. The Update Forest setting in the Activities settings can be set for shorter time periods (fewer minutes) between updates. However, it is not recommended to set for less than 10 minutes depending on the size of your Exchange environment. On-premises Exchange mailboxes and archives migrate to Office 365 with no issues. There is no need to enable the archive feature in Office 365. If the on-premises mailbox has a server-based archive associated with it, the New-MoveRequest will enable the archive feature in Office 365 and migrate the on-premises archive to the Office 365 archive. Migrations of on-premises Exchange mailboxes to Office 365 will fail and log an error if the source site's Office 365 proxy servers are not set. |
Migrator Pro for Exchange Office 365 Migration License Options
You can either manually license users in the Microsoft Online Services portal before selecting them for migration in Migrator Pro for Exchange, or allow Migrator Pro for Exchange to auto-license them automatically.
To allow Migrator Pro for Exchange to auto-license users:
Within the Admin Portal, go to the Settings view.
Click the Licenses tab to select Office 365 license packs and related service plans to use for auto-licensing Exchange Online mailbox migrations.
Migrator Pro for Exchange uses PowerShell as a platform to extend the product and provide external functionality that can be integrated with other applications and services. Migrator Pro for Exchange's PowerShell scripts let you:
Diagnose connection and configuration problems
Extract operational reports in .csv format
Customize and extend the migration pipeline functionality
Trigger auto-migrations outside of the Migrator Pro for Exchange Admin Portal
Export and import group information between disconnected forests
The Migrator Pro for Exchange Diagnostic scripts are installed in C:\Program Files\Binary Tree\Scripts\E2E\Diagnostic, and include:
Get-BTForest.ps1
Test-ExchangePowerShellHost.ps1
The Migrator Pro for Exchange Operational Report scripts are installed in C:\Program Files\Binary Tree\Scripts\E2E\Report), and include:
Get-BTMigrationReport.ps1
Get-BTBlackoutReport.ps1
Get-BTThroughputReport.ps1
Diagnostic Report Scripts
Get-BTForest.ps1 : Used to quickly scan a forest, validate credentials and access via Active Directory.
PowerShell Command:
.\get-btforest.ps1 –<parameter>
Test-ExchangePowerShellHost.ps1 : Used to validate the PowerShell host connection in the forest using specified credentials. This is a thorough diagnostic tool to aid in configuring the environment for initial Exchange / PowerShell / Migrator Pro for Exchange usage.
PowerShell Command:
.\test-exchangepowershellhost.ps1 –<parameter>
Operational Report Scripts
Get-BTMigrationReport.ps1 : Provides reports on the Mailbox Jobs, and the migrations which have been completed. These reports can be displayed on the screen or output to a CSV file.
PowerShell Command:
.\get-btmigrationreport.ps1 –<parameter>
Get-BTBlackoutReport.ps1 : Provides reports on the blackouts which have been defined in Migrator Pro for Exchange. These reports can be displayed on the screen or output to a CSV file.
PowerShell Command:
.\get-btblackoutreport.ps1 –<parameter>
Get-BTThroughputReport.ps1 : Provides reports on the Throughput results for completed migrations. These reports can be displayed on the screen or output to a CSV file.
PowerShell Command:
.\get-btthroughputreport.ps1 –<parameter>
Executing Diagnostic and Operational Report Scripts
To execute a script:
Open the Windows PowerShell command prompt.

Navigate to the location of the scripts.

Enter the name of the script and provide any additional parameters. For example:
.\Get-BTMigrationReport.ps1 –archive –csv c:\migrationreport.csv

The –csv parameter lets you output a report to a new .csv file on the local drive:

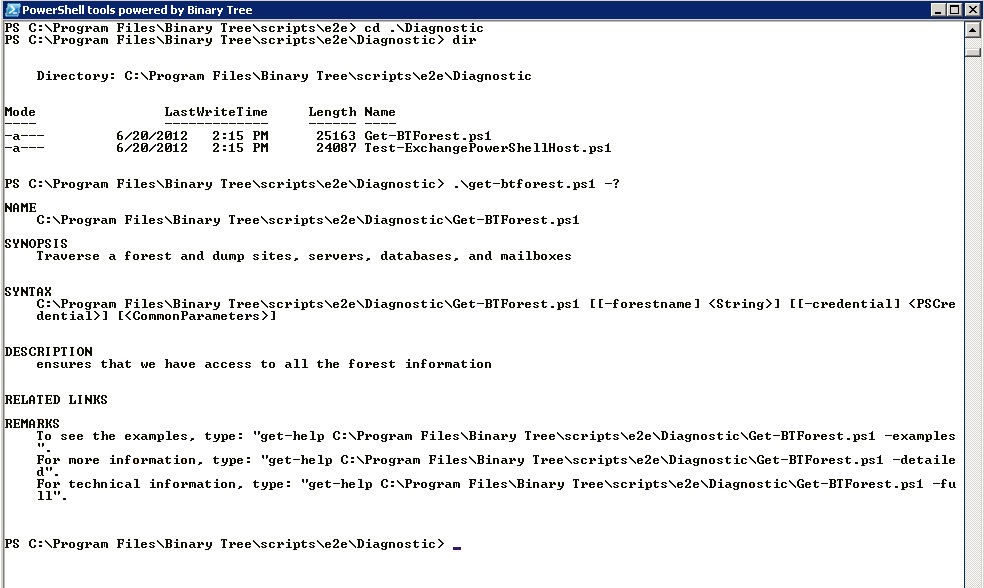
You can use the -? parameter to get additional information on the script and available parameters:
