If you perform public folder synchronization using Migration Manager Public Folder agents, you should create a special public folder called Aelita EMW Recycle Bin. Replicate this folder to all the public folder servers involved in the public folder synchronization process.
This folder will help prevent data loss in case of accidental public folder deletion. When a public folder is deleted in one of the environments, the public folder synchronization agents move the corresponding folder in the other environment to the Aelita EMW Recycle Bin folder, if it exists, instead of permanently deleting the folder. You can use this folder to check whether important information has been deleted, and restore any data deleted by mistake.
|

|
Caution: If don't want to use Aelita EMW Recycle Bin, you must manually turn off using the Aelita EMW Recycle Bin folder during public folder synchronization (set the UseRecycleBin parameter to 0). See the Use Fine-Tuning the Agents section of this document for details. |
|

|
NOTE: If you move a public folder out of the public folder synchronization scope or to the Aelita EMW Recycle Bin folder then the synchronization of that public folder will be stopped, but the public folder itself will not be deleted in the target organization. Thus it will become orphaned until you return the public folder back to the synchronization scope. However, if you move contents out of a public folder which is within the public folder synchronization scope, those contents will not be moved to Aelita EMW Recycle Bin and will be permanently deleted in the target organization. When you return the contents back to the public folder, they will be synchronized to the target organization as new contents. |
The public folder synchronization job should be started after all the target mailboxes already exist and have been matched to the source mailboxes. The matching step is critical for synchronization of public folder permissions.
To start the public folder synchronization agents, perform the following:
- Select the public folder synchronization job in the navigation tree, and then click the Agent Manager toolbar button.
- After that in the agent host pane select all necessary agent hosts.
- Finally, in the Actions pane click Start Agents.
Free/busy synchronization is performed by the Free/Busy Synchronization Agent. While processing the free/busy synchronization job, the agent synchronizes all the free/busy messages it finds in the organizations selected for free/busy synchronization.
To add a new free/busy synchronization job, right-click the Free/Busy Synchronization node in the management tree and select Add Free/Busy Synchronization Job from the shortcut menu.
This will start the Add Free/Busy Synchronization Job Wizard. The wizard will help you add a new free/busy synchronization job, install the Free/Busy Synchronization Agent, and configure the job.
The following sections guide you through each step of the wizard and explain the free/busy synchronization options.
Step 1. Select Exchange Organizations
The Free/Busy Synchronization Agent will synchronize the free/busy messages for all the mailboxes of the Exchange organizations you select in this step of the wizard.
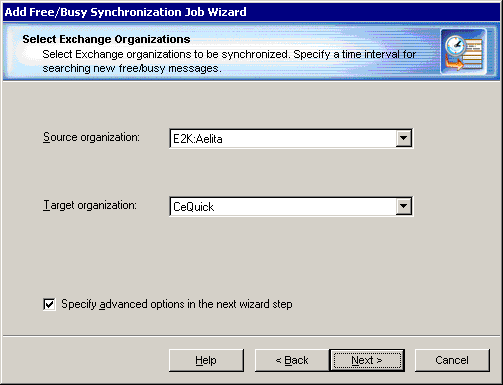
Source organization—Select one of the source Exchange organizations registered in Migration Manager.
Target organization—Select one of the target Exchange organizations registered in Migration Manager.
Specify advanced options in the next wizard step—Select this option if you want to specify the desired period for searching for the new free/busy messages, the Administrative groups where the agent should search for the new free/busy messages, and other advanced settings.
Step 2. Select Administrative Groups
This step will be displayed only if the Specify advanced options in the next wizard step check box was selected in the previous step.
By default, the Free/Busy Synchronization Agent synchronizes free/busy messages from all the administrative groups of the source organization. If you want the agent to synchronize the free/busy messages located in the selected source administrative groups only, this step allows you to select these administrative groups.
If new users are added to the environments, new free/busy messages located in the selected administrative groups will be copied to the target and further synchronized. In this step you can also specify the time interval at which the agent will search for the new free/busy messages.
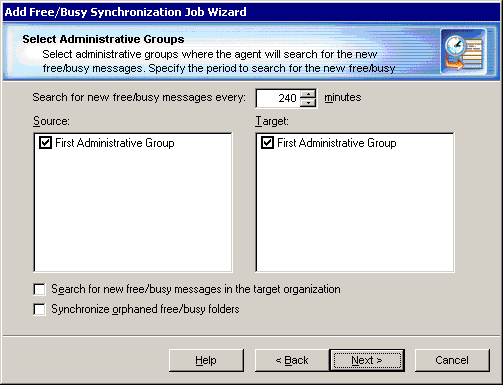
In the Search for new free/busy messages every ... minutes control, specify the time interval at which the Free/Busy Synchronization Agent should check whether any new free/busy messages were created in the selected Administrative group.
Source—Select the source administrative groups for which free/busy messages should be synchronized.
Target—Normally, system administrators prefer to administer only one environment. Thus, if the users are connecting to the source Exchange organization, the new users are also created in this organization. However, in some environments, new users are added both to the source and target organizations.
If you want to synchronize the existing target free/busy messages with the source free/busy messages, select the target administrative groups for which free/busy messages should be synchronized.
If you want the Free/Busy Synchronization Agent to synchronize new free/busy messages created in the target administrative groups, select the target administrative group and the Search for new free/busy messages in the target organization check box. Note that if the target administrative group is selected and no source administrative groups are selected, the free/busy data will be synchronized from target to source only.
Synchronize orphaned free/busy folders—The LegacyExchangeDN attribute of some users might contain the DN of a non-existing administrative group. This may happen if the administrative group where the users were originally located was deleted or renamed. In this case, you may want to select this check box to make the agent synchronize the free/busy messages for such users.
Step 3. Select Administrative Mailboxes
The Free/Busy Synchronization Agent requires two mailboxes, one hosted on the source server and one hosted on the target server, to access the users’ free/busy folders on the servers. Specify the mailboxes for the Free/Busy Synchronization Agent to use.
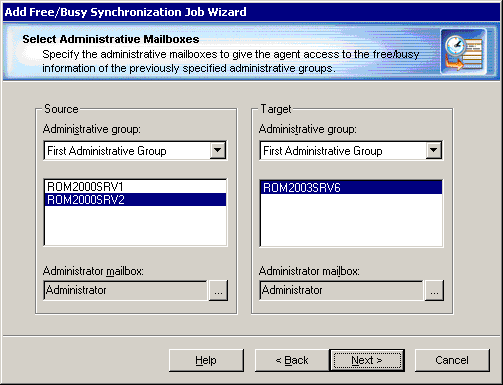
The Free/Busy Synchronization Agent must have full access to the specified mailboxes to get administrative access to the free/busy messages being synchronized.
Step 4. Specify Agent Installation Path
You can now select which server to install the agent on. If the agent has already been installed on one or both of the servers, you can select Use the agent running on target server or Use the agent running on source server to make the installed agent perform this synchronization job.
By default, the agent is installed in the %systemroot%\system32 folder. On Microsoft Exchange x64 the default shared folder is created in the %SystemRoot%\SysWOW64 folder. To change the agent’s installation folder, specify the full local path to the folder on the source or target server.
Step 5. Completing the Wizard and Committing Changes
After the agent is installed, the wizard will inform you that you can start the free/busy synchronization job.
When a new job is created, it is marked with an exclamation mark. This means that you need to update the Free/Busy Synchronization Agent’s database before starting the job. Right-click the job in the management tree and click Commit Changes on the shortcut menu to update the agent’s task list on the remote server.
You can also commit changes for all the free/busy synchronization jobs you have created. Simply right-click the Free/Busy Synchronization node in the management tree and select Commit All Free/Busy Synchronization Jobs from the shortcut menu.
