Portlet
|
• |
JBoss® Portal Server 2.6 |
|
• |
WebLogic® Portal 10 |
Deploy and Run
In order to test your Foglight™ portlet, you will need to have a portal server available in which you can place the portlet’s war file. JBoss Portal, Apache Jetspeed2, and WebLogic Portal are suitable choices for testing a remote portlet.
|
1 |
Locate the Foglight remote portlet war file: ${Foglight Server Home}/tools/foglight-remote-portlets.war |
Configuration
You need to configure the portlet by setting its host, port, and viewId before attempting to run it.
|
• |
host: The Management Server host you would like to connect with. |
|
• |
port: The Management Server port you would like to connect with. |
|
• |
viewId: The Web Component Framework fully qualified ID, for example, system:fsmhome.0. There are also predefined view mappings available for use. |
SharePoint Web Part with Windows Single Sign-On
Users without a Foglight™ account cannot have access to Foglight dashboards appearing in SharePoint® Web pages. Configuring Foglight to support Windows® Single Sign-on, grants Active Directory users access to Foglight views embedded in SharePoint Web pages.
For complete information about configuring Foglight with Windows Sign-on, see “Configuring Windows Single Sign-On” in the Administration and Configuration Help.
Active Directory® users who need to have access to Foglight dashboards in SharePoint Web pages must have proper permissions granted to their Active Directory user accounts in Foglight. For more information, see “Managing Users and Security” in the Administration and Configuration Help.
|
a |
|
b |
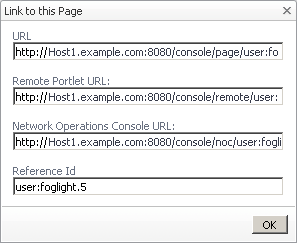
Click Link to this page in the menu. |
|
c |
|
d |
|
a |
On the action panel, open the Design tab. |
|
b |
|
c |
On the Definition tab, under Configuration > Sizing, copy and record the preferred width and height. |
|
7 |
Start editing the Page Viewer Web Part by choosing Modify My Page > Modify My Web Parts > <Newly Added Page Viewer Web Part>. |
|
9 |
|
10 |
Expand the Appearance section and specify a title for the Foglight dashboard. |
|
12 |
|
14 |
Click Apply to apply your changes. |
|
15 |
Click Save. |

