The Analyze Changes view allows you to analyze what is changing performance-wise in a selected environment, during a selected timeframe.
|
1 |
Click the Analyze Changes icon on the Change Analyzer tab > Menu bar. |
For additional information about this view, see Analyze Changes view.
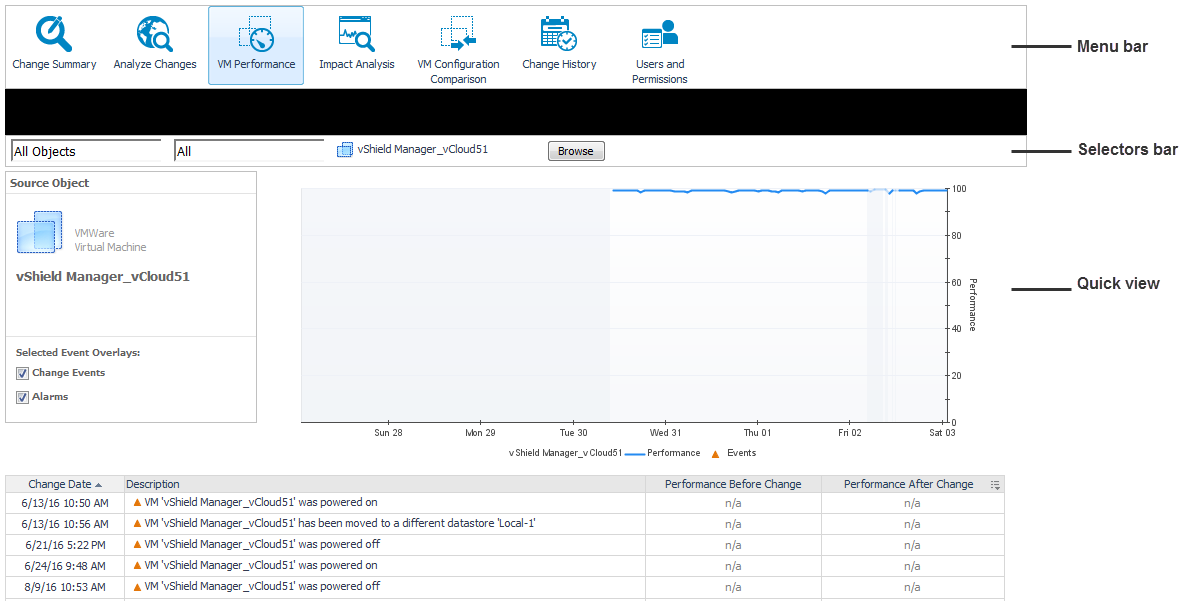
The VM Performance view allows you to analyze the performance of a selected VM, during a selected timeframe.
|
1 |
Click the VM Performance icon on the Change Analyzer tab > Menu bar. |
|
b |
|
c |
Optional. Select the Powered-On VMs Only check box to display only the VMs that are powered on. |
|
e |
|
4 |
Analyze the VM performance in more detail, by reviewing the information in the Quick View graph. To change the display settings, click the Customizer icon |
For additional information about this view, see VM Performance view.
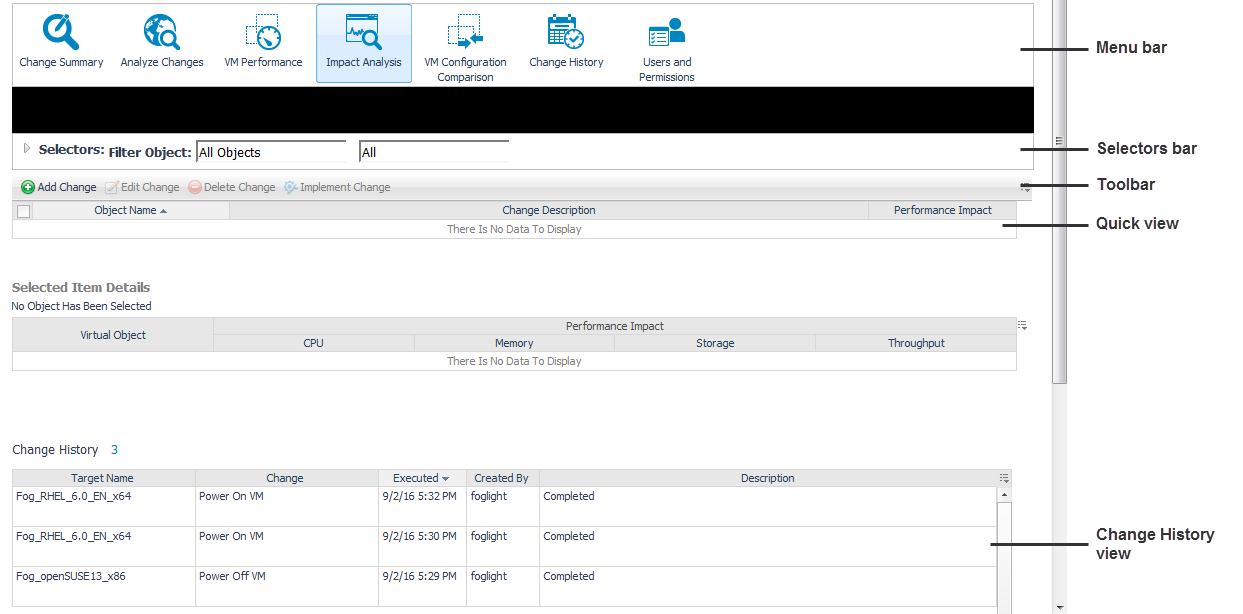
The Impact Analysis view allows you to define a sequence of changes and see what impact those changes have on your system’s performance. It also allows you to trigger the execution of these changes immediately or schedule these changes within Foglight or Foglight for Virtualization, Enterprise Edition. The Change History embedded view displays the history of changes implemented using the Impact Analysis functionality. For detailed information about how the performance impact is calculated, see Performance impact assessment.
|
1 |
Click the Impact Analysis icon on the Change Analyzer tab > Menu bar. |
|
1 |
Click the Impact Analysis icon on the Change Analyzer tab > Menu bar. |
|
2 |
|
3 |
From the Change Type drop-down list select a type for the new change model. |
|
4 |
|
• |
VM Name. Choose the VM that should be powered off/ powered on. Click Browse to open the Select the Virtual Machine dialog box. Select the VM from the Object Name’s table, or by typing its name in the Search box. Click Select to close the Select the Virtual Machine dialog box. |
|
5 |
|
• |
VM Name. Choose the VM that should be moved. Click Browse to open the Select the Virtual Machine dialog box. Select the VM from the Object Name’s table, or by typing its name in the Search box. Click Select to close the Select the Virtual Machine dialog box. |
|
• |
Destination. Choose the environment where the VM should be moved. Click Browse to open the Select the Destination dialog box. Select a virtual object from the Object Name’s table, or by typing its name in the Search box. Click Select to close the Select the Destination dialog box. |
|
• |
Storage. Choose the storage where the VM should be moved. Click Browse to open the Select the Storage dialog box. Select a virtual object from the Object Name’s table, or by typing its name in the Search box. Click Select to close the Select the Storage dialog box. |
|
6 |
|
• |
VM to Configure. Choose the VM that should be configured. Click Browse to open the Select the Virtual Machine dialog box. Select the VM from the Object Name’s table, or by typing its name in the Search box. Click Select to close the Select the Virtual Machine dialog box. The Model a Change dialog box is updated to display the current CPU and memory configuration settings for the selected VM. |
|
• |
CPU Allocation. Change the number of vCPUs allocated to this VM by typing the new value in the Change To field. |
|
• |
CPU Reservation. Change the CPU reservation for the selected VM by typing the new value in the Change To field. |
|
• |
CPU Limit. Change the CPU limit for the selected VM by typing the new value in the Change To field. To use unlimited CPU resources, select the Unlimited check box. |
|
• |
Memory Allocation. Change the memory resources allocated to this VM by typing the new value in the Change To field. |
|
• |
Memory Reservation. Change the memory reservation for the selected VM by typing the new value in the Change To field. |
|
• |
Memory Limit. Change the memory limit for the selected VM by typing the new value in the Change To field. To use unlimited memory resources, select the Unlimited check box. |
|
7 |
|
• |
RP to Configure. Choose the resource pool that should be configured. Click Browse to open the Select the Resource Pool dialog box. Select the RP from the Object Name’s table, or by typing its name in the Search box. Click Select to close the Select the Resource Pool dialog box. The Model a Change dialog box is updated to display the current CPU and memory configuration settings for the selected RP. |
|
• |
CPU Reservation. Change the CPU reservation for the selected RP by typing the new value in the Change To field. |
|
• |
CPU Limit. Change the CPU limit for the selected RP by typing the new value in the Change To field. To use unlimited CPU resources, select the Unlimited check box. |
|
• |
Memory Reservation. Change the memory reservation for the selected RP by typing the new value in the Change To field. |
|
• |
Memory Limit. Change the memory limit for the selected RP by typing the new value in the Change To field. To use unlimited memory resources, select the Unlimited check box. |
|
8 |
|
• |
Cluster to Configure. Choose the cluster that should be configured. Click Browse to open the Select the Cluster dialog box. Select the cluster from the Object Name’s table, or by typing its name in the Search box. Click Select to close the Select the Cluster dialog box. |
|
• |
Select a failover mechanism from the HA Failover drop-down list: |
|
• |
HA Failover Disabled. Use this option to disable the failover mechanism configured for the selected cluster. |
|
• |
Host Failures the Cluster Will Tolerate. Use this option to configure how may host failures the cluster can tolerate before its performance is affected. Specify the number of hosts in the Count field. |
|
• |
Percentage of Resources Reserved as Failover Capacity. Use this option to configure the resources reserved for the cluster in case of a failover. Specify the number of CPUs and the amount of memory reserved for failover, in the CPU(%) and Memory(%) fields, respectively. |
|
• |
Specify Failover Hosts. Use the arrows to move (from the Available Hosts table to the Failover Hosts table) the hosts that should be used as failover in case other hosts in the cluster fail. |
|
9 |
|
• |
VM Name. Type in this field the name of the VM that should be deployed. |
|
• |
VM Selection. Choose the size of the deploying VM from the options available in the drop-down list: |
|
• |
Default. Use this option to set the default VM size, with the following pre-configured parameters: CPU=2GHz, Memory=4GB, Storage=25GB, Throughput=1MB/s. |
|
• |
Existing VM. Use this option to set the VM parameters according to a specific existing VM. In this case, the parameters of the deploying VM (CPU, Memory, Storage, and Throughput) are equal the parameters of the selected VM. |
|
• |
New Custom Size. Use this option to set custom resource allocation (CPU, Memory, Storage, and Throughput) for the deploying VM. |
|
• |
Select VM. This option is available only when Existing VM is selected from the VM Selection drop-down. Click Browse to open the Select the Virtual Machine dialog box. Select the VM from the Object Name’s table, or by typing its name in the Search box. Click Select to close the Select the Virtual Machine dialog box. The Model a Change dialog box is updated to display the current CPU, memory, storage, and throughput configuration settings for the selected VM. |
|
• |
Container. Choose the container for the VM to be deployed. Click Browse to open the Select the Container dialog box. Select a virtual object from the Object Name’s table, or by typing its name in the Search box. Click Select to close the Select the Container dialog box. |
|
• |
Storage. Choose the storage for the VM to be deployed. Click Browse to open the Select the Storage dialog box. Select a virtual object from the Object Name’s table, or by typing its name in the Search box. Click Select to close the Select the Storage dialog box. |
|
• |
Template. Choose the template for the deployment. Click Browse to open the Select the Template dialog box. Select a virtual object from the Object Name’s table, or by typing its name in the Search box. Click Select to close the Select the Template dialog box. |
|
• |
Utilization. Define the values and units for each of the following configuration settings: CPU, Memory, Storage, and Throughput. |
|
10 |
|
1 |
Click the Impact Analysis icon on the Change Analyzer tab > Menu bar. |
|
3 |
|
4 |
If you selected a Power Off a VM or a Power On a VM change model, edit the following settings, as necessary: |
|
• |
VM Name. Choose the VM that should be powered off/ powered on. Click Browse to open the Select the Virtual Machine dialog box. Select the VM from the Object Name’s table, or by typing its name in the Search box. Click Select to close the Select the Virtual Machine dialog box. |
|
5 |
If you selected a Move a VM change model, edit the following settings, as necessary: |
|
• |
VM Name. Choose the VM that should be moved. Click Browse to open the Select the Virtual Machine dialog box. Select the VM from the Object Name’s table, or by typing its name in the Search box. Click Select to close the Select the Virtual Machine dialog box. |
|
• |
Destination. Choose the environment where the VM should be moved. Click Browse to open the Select the Destination dialog box. Select a virtual object from the Object Name’s table, or by typing its name in the Search box. Click Select to close the Select the Destination dialog box. |
|
• |
Storage. Choose the storage where the VM should be moved. Click Browse to open the Select the Storage dialog box. Select a virtual object from the Object Name’s table, or by typing its name in the Search box. Click Select to close the Select the Storage dialog box. |
|
6 |
If you selected a Change VM Configuration change model, edit the following settings, as necessary: |
|
• |
VM to Configure. Choose the VM that should be configured. Click Browse to open the Select the Virtual Machine dialog box. Select the VM from the Object Name’s table, or by typing its name in the Search box. Click Select to close the Select the Virtual Machine dialog box. The Model a Change dialog box is updated to display the current CPU and memory configuration settings for the selected VM. |
|
• |
CPU Allocation. Change the number of vCPUs allocated to this VM by typing the new value in the Change To field. |
|
• |
CPU Reservation. Change the CPU reservation for the selected VM by typing the new value in the Change To field. |
|
• |
CPU Limit. Change the CPU limit for the selected VM by typing the new value in the Change To field. To use unlimited CPU resources, select the Unlimited check box. |
|
• |
Memory Allocation. Change the memory resources allocated to this VM by typing the new value in the Change To field. |
|
• |
Memory Reservation. Change the memory reservation for the selected VM by typing the new value in the Change To field. |
|
• |
Memory Limit. Change the memory limit for the selected VM by typing the new value in the Change To field. To use unlimited memory resources, select the Unlimited check box. |
|
7 |
If you selected a Change RP Configuration change model, edit the following settings, as necessary: |
|
• |
RP to Configure. Choose the resource pool that should be configured. Click Browse to open the Select the Resource Pool dialog box. Select the RP from the Object Name’s table, or by typing its name in the Search box. Click Select to close the Select the Resource Pool dialog box. The Model a Change dialog box is updated to display the current CPU and memory configuration settings for the selected RP. |
|
• |
CPU Reservation. Change the CPU reservation for the selected RP by typing the new value in the Change To field. |
|
• |
CPU Limit. Change the CPU limit for the selected RP by typing the new value in the Change To field. To use unlimited CPU resources, select the Unlimited check box. |
|
• |
Memory Reservation. Change the memory reservation for the selected RP by typing the new value in the Change To field. |
|
• |
Memory Limit. Change the memory limit for the selected RP by typing the new value in the Change To field. To use unlimited memory resources, select the Unlimited check box. |
|
8 |
If you selected a Change HA Failure Configuration change model, edit the following settings, as necessary: |
|
• |
Cluster to Configure. Choose the cluster that should be configured. Click Browse to open the Select the Cluster dialog box. Select the cluster from the Object Name’s table, or by typing its name in the Search box. Click Select to close the Select the Cluster dialog box. |
|
• |
Select a failover mechanism from the HA Failover drop-down list: |
|
• |
HA Failover Disabled. Use this option to disable the failover mechanism configured for the selected cluster. |
|
• |
Host Failures the Cluster Will Tolerate. Use this option to configure how may host failures the cluster can tolerate before its performance is affected. Specify the number of hosts in the Count field. |
|
• |
Percentage of Resources Reserved as Failover Capacity. Use this option to configure the resources reserved for the cluster in case of a failover. Specify the number of CPUs and the amount of memory reserved for failover, in the CPU(%) and Memory(%) fields, respectively. |
|
• |
Specify Failover Hosts. Use the arrows to move (from the Available Hosts table to the Failover Hosts table) the hosts that should be used as failover in case other hosts in the cluster fail. |
|
9 |
If you selected a Deploy a VM change model, edit the following settings, as necessary: |
|
• |
VM Name. Type in this field the name of the VM that should be deployed. |
|
• |
VM Selection. Choose the size of the deploying VM from the options available in the drop-down list: |
|
• |
Default. Use this option to set the default VM size, with the following pre-configured parameters: CPU=2GHz, Memory=4GB, Storage=25GB, Throughput=1MB/s. |
|
• |
Existing VM. Use this option to set the VM parameters according to a specific existing VM. In this case, the parameters of the deploying VM (CPU, Memory, Storage, and Throughput) are equal the parameters of the selected VM. |
|
• |
New Custom Size. Use this option to set custom resource allocation (CPU, Memory, Storage, and Throughput) for the deploying VM. |
|
• |
Select VM. This option is available only when Existing VM is selected from the VM Selection drop-down. Click Browse to open the Select the Virtual Machine dialog box. Select the VM from the Object Name’s table, or by typing its name in the Search box. Click Select to close the Select the Virtual Machine dialog box. The Model a Change dialog box is updated to display the current CPU, memory, storage, and throughput configuration settings for the selected VM. |
|
• |
Container. Choose the container for the VM to be deployed. Click Browse to open the Select the Container dialog box. Select a virtual object from the Object Name’s table, or by typing its name in the Search box. Click Select to close the Select the Container dialog box. |
|
• |
Storage. Choose the storage for the VM to be deployed. Click Browse to open the Select the Storage dialog box. Select a virtual object from the Object Name’s table, or by typing its name in the Search box. Click Select to close the Select the Storage dialog box. |
|
• |
Template. Choose the template for the deployment. Click Browse to open the Select the Template dialog box. Select a virtual object from the Object Name’s table, or by typing its name in the Search box. Click Select to close the Select the Template dialog box. |
|
• |
Utilization. Define the values and units for each of the following configuration settings: CPU, Memory, Storage, and Throughput. |
|
10 |
|
1 |
Click the Impact Analysis icon on the Change Analyzer tab > Menu bar. |
|
3 |
|
4 |
Click Yes to confirm the operation. |
|
1 |
Click the Impact Analysis icon on the Change Analyzer tab > Menu bar. |
|
3 |
|
4 |
On the Implement tab: |
|
• |
Choose whether the change should be applied immediately (select the Now option button) or later (select the Later option button and a Date and Time from the drop-down lists) |
|
5 |
On the Notifications tab: |
|
• |
To add an email address to the list of available options, click the Add icon, type a valid email address in the available field, then click Add. |
|
• |
To delete an email address from the list of available options, select its check box, click the Delete icon. The address is deleted from the list immediately. |
|
6 |
Click Save. |
For additional information about this view, see Impact Analysis view.
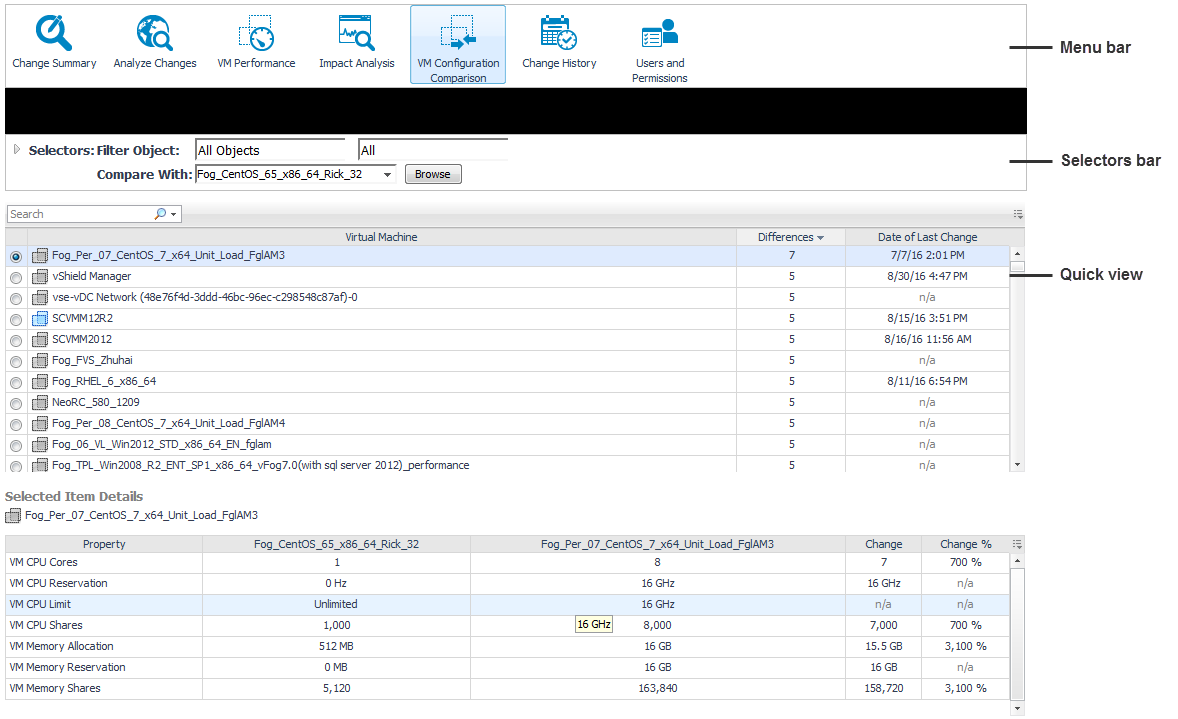
The VM Configuration Comparison view allows you to compare all VMs within a selected environment to a specific “gold standard” template or reference VM. If they differ, it displays a detailed list of all the configuration differences.
|
1 |
Click the VM Configuration Comparison icon on the Change Analyzer tab > Menu bar. |
|
a |
Select the VMs to be compared (from the Filter Object drop-down lists). |
|
b |
Select the “gold standard” template (from the Compare With drop-down list). Alternatively, click Browse to open the Select the Virtual Machine or Template dialog box, choose a virtual machine or a template from the list, and click Select. |
For additional information about this view, see VM Configuration Comparison view.