The following is a list of steps required to create a DropBox User Mapping file.
1.To get a list of your source users (DropBox), open your browser, and log into your DropBox account with an admin account.
2.Navigate to the Adming Console option in the left hand tab.
3.Select Members from the left hand tab of the Admin Console page.
4.Select Export Member Data from the right hand menu.
5.Navigate to the Dropbox Business Reports location from the DropBox Home, and locate the CSV file that you created in the previous step.
6.In this CSV file, the column titled "Email" contains the User Accounts
7.To get a list of your target users, you will be exporting your Office 365 users to a CSV. In your web browser, go to Office 365 online portal and login to your Admin account.
8.Select the Admin option from the available apps.
9.On the left hand tab, expand the "User" section and select Active Users.
10.Select the Export Users option. This will create a CSV/Excel file containing your Office 365 active users.
11. The "UserPrincipalName" section of this CSV file will be your target users accounts.
12.You are now ready to manually create your user mapping file, using the user names collected from the 2 CSVs from above. The format will be
SourceUser,TargetUser
|
|
NOTE: Groups does not have an export option, you will be required to search groups manually and map them manually. |
This option allows administrators to create a mapping report, matching the source Office 365 users with Target Office 365 users.
This operation has the following requirements for use:
·The account used to perform the report needs to be a Global Administrator in this Office 365 tenant.
To create a user mapping report, perform the following:
1.On the Migration Analysis tab click Mapping Report.
The Mapping Report wizard opens.
2.In the wizard, select the Office 365 tab.
3.Enter your SharePoint Admin URL for the source Office 365 connection and click Connect. On the Connect to SharePoint popup, enter your SharePoint credentials and click Connect. If you receive any message other than "Successfully connected to SharePoint Admin URL", please double check your credentials or contact support. If you would like to add additional Administrator accounts to this report, click Admin+.
4.Enter your SharePoint Admin URL for the Target Office 365 connection and click Connect. On the Connect to SharePoint popup, enter your SharePoint credentials and click Connect. If you receive any message other than "Successfully connected to SharePoint Admin URL", please double check your credentials or contact support. If you would like to add additional Administrator accounts to this report, click Admin+.
5.Click the Select button to specify a location and a name for this report.
6.Click Finish to begin the analysis.
7.The report generated will folllow the following rule:
userloginname@*.*, userloginname@*.*
8.In order to use the mapping report generated within Essentials, open it in excel, delete the source and target workbook sheets, and the first line with the headers from the user mapping report worksheet. Go to File > Save As> Select file type as CSV UTF-8
9.You can now use the .csv file in the Copy Tenant wizards, and the Copy My Sites to OneDrive for Business wizard, by selecting Load from CSV on the wizard's first page.
Please visit the following link for an overview on how to script and schedule jobs such as User Mapping Report.
The following is a list of steps required to create an OnPrem SharePoint User Mapping file.
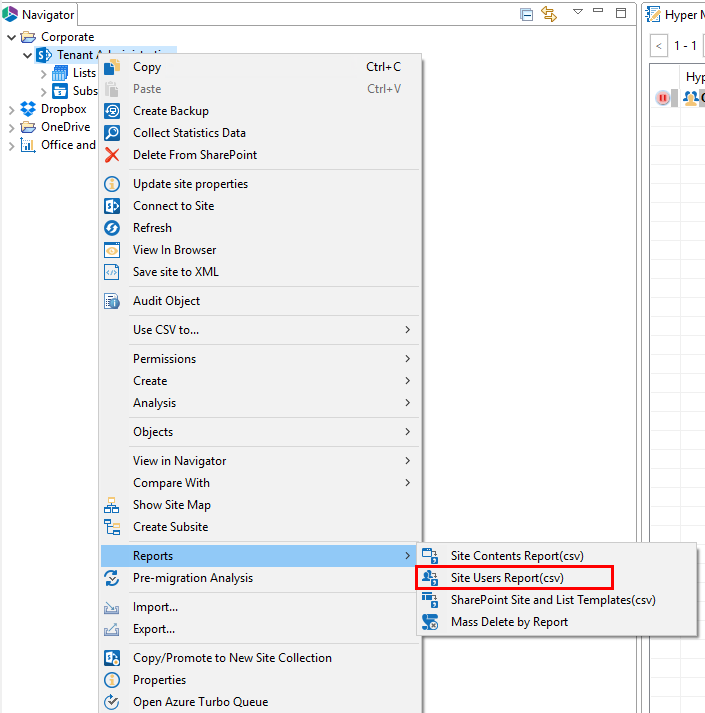
1.To get a list of your source users (OnPrem SharePoint), open Essentials and select a Site Collection in the Navigator section. Right Click and select Reports, and then Site Users Report. 
2.Select a location for the Site User Report, and select save.
3.To get a list of your target users, you will be exporting your Office 365 users to a CSV. In your web browser, go to Office 365 online portal and login to your Admin account.
4.Select the Admin option from the available apps.
5.On the left hand tab, expand the "User" section and select Active Users.
6.Select the Export Users option. This will create a CSV/Excel file containing your Office 365 active users.
7. The "UserPrincipalName" section of this CSV file will be your target users accounts.
8.You are now ready to manually create your user mapping file, using the user names collected from the 2 CSVs from above. The format will be
SourceUser,TargetUser
During an item copy or in-place tagging, users can re-map content types. The new content type must be present in the target library.
1.Drill down into a list and select the items you would like to copy.
2.Drag and drop those items into the target list.
3.In the second screen of the Copy Items Wizard, select the new content type by using the drop-down box. The application will automatically re-map any common fields. You can enter metadata directly or re-map other fields manually. Click Next.
4.Click Finish to start the copy operation.