LiteSpeed helps you restore specific objects from a native or LiteSpeed backup file stored locally or in Cloud storage. You can:
NOTE: Object Level Recovery is only available with the Enterprise license.
You can also restore objects in the command-line or using extended stored procedures. See the following for more information:
Before you can recover objects or execute a SELECT statement, you must read the backup file to create an index of restorable objects. The index is an .lsm file. During the backup process the .lsm file is created in the temp directory and attached to the backup file after the backup is completed.
|
Notes: |
To read the backup files
Select the Object Level Recovery pane (CTRL+3).
Select Object Level Recovery Wizard.
On the Welcome page click Next.
On the Specify Recovery Destination page, select the server instance.
On the Specify Backup Source:
On the Backup File Location window, locate and select the backup file to read. Once selected, the file path and file name are displayed. Click OK. You can browse the network, add, delete, and rename folders.
On the Select Backup Files page, click Next.
|
note: LiteSpeed must be installed on the server instance you select on the Specify Recover Destination page. |
On the Backup Content page, select a backup to recover and click Next.
|
tip: Only disk backups are supported for OLR. |
On the Preview Script page, view the script that will run to retrieve the backup content. Click Next.
Complete the wizard.
After you read the backup file, its contents appear in the Overview tab
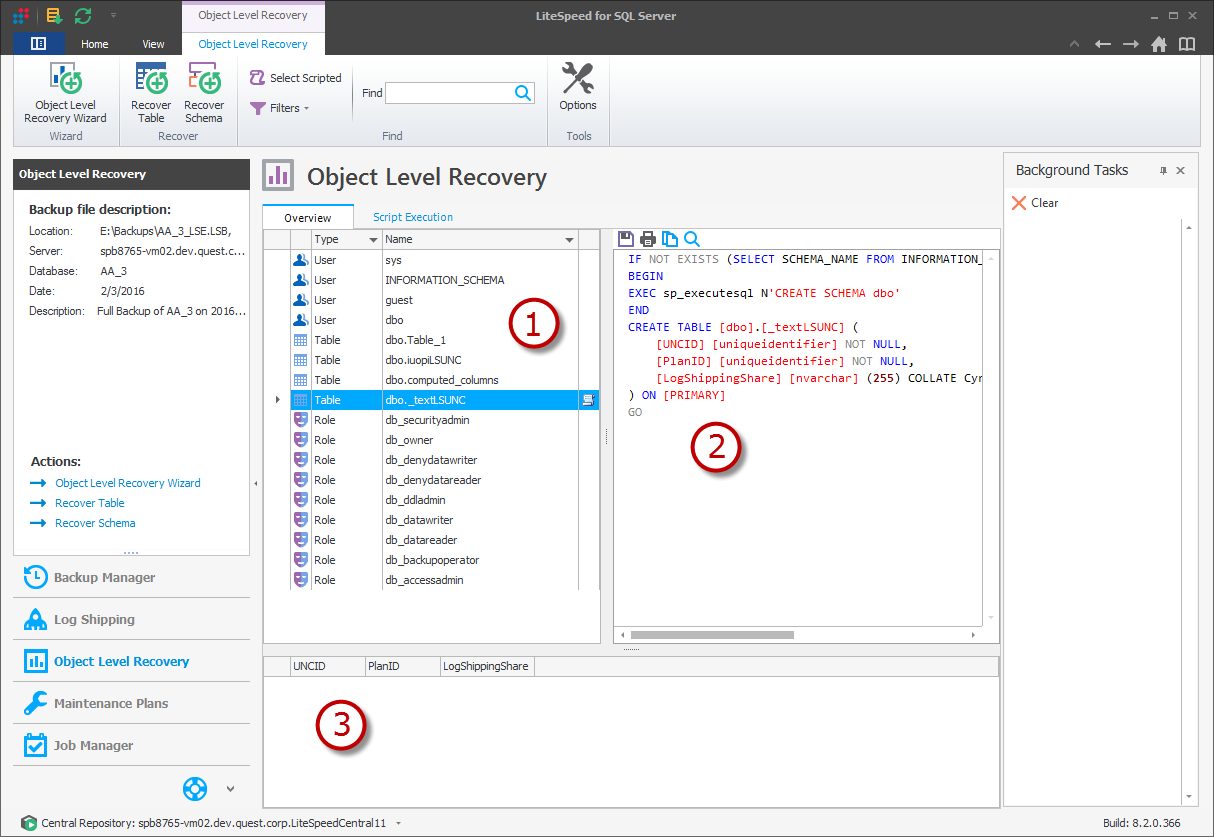
The Overview tab has the following panes:
1. Objects Grid
The grid displays all of the restorable objects in backup file. You can filter the objects that appear in the list by selecting the appropriate options in the toolbar.
2. Script Preview
The script preview displays the DDL script. To script an object, right-click it in the objects grid and select Generate DDL Script.
For tables, you can also include constraints, indexes, and triggers in the script by selecting the appropriate options on the Object Level Recovery tab in Object Level Recovery options. You can script more than one object, and scripted objects have a small scroll icon beside them in the objects grid. To view all of the scripts in the script preview, click the Select Scripted button in the Object Level Recovery ribbon menu.
|
note: You can save, copy, print, and search the script in LiteSpeed, but you cannot edit or execute it in the script preview pane. |
3. Table Data Preview
The table data preview displays the contents of the table. To preview a table's data, right-click the table in the objects grid and select Preview Data. You can only preview the data of one table at a time, and the previewed table has a small chart icon beside it in the objects grid. A table that you preview and script has a small chart and scroll icon beside it.
|
Tip: For panes that have grids, you can sort, group, move, and remove the columns:
|
Restoring a table in the LiteSpeed UI Console restores the table's schema and data.
Tip: CTRL-click objects in the grid to select multiple objects for recovery.
To restore tables
Select a table in the objects grid and click Recover Table.
Complete the wizard. Review the following for additional information:
|
Database |
Select the database. LiteSpeed will not overwrite an existing table. If you select the same server instance and database as the original table, you must use a different table name. | |
|
Ship directory |
Select the ship directory. Enter the path or click This option stores the object at the directory but does not restore it. | |
|
Use table, constraint and index name prefix |
Enter the prefix naming convention in the field provided. Select this option when choosing to use prefix naming conventions with tables, constraints, and index names. | |
|
Use table, constraint and index name suffix |
Enter the suffix naming convention in the field provided. Select this option when choosing to use suffix naming conventions with tables, constraints, and index names. | |
|
Bulk insert |
Select this option to import data into a table using BCP for data recovery. It requires to use a temporary directory for temporary files. The temporary directory is a Windows temp folder by default or you can specify your custom directory. Temporary directory: Enter the path or click This option restores the table and is generally used when the default directory does not have enough free disk space.
| |
|
Direct Mode |
Select this option to import data directly into a table. This alternate data recovery mechanism eliminates the need for temp file space and uses BULK INSERT operations to recover the data. | |
|
Recovery in-memory tables as regular tables |
Select to recover or restore memory-optimized tables as regular tables. | |
|
Filegroup |
Select the filegroup. This option associates the restored object with the filegroup. | |
|
Script options |
Select these options to generate scripts for table-related objects and constraints:
| |
|
Advanced options |
Bypass tail log processing is not selected by default.
|
To restore schemas
Restore schemas can recover database objects - extended procedures, functions, partition functions, partition schemas, roles, rules, stored procedures, tables, memory optimized tables, triggers, types, users, views, indexed views, and XML schema collections.
Click and run the Object Level Recovery Wizard.
Select an object in the grid and click Recover Schema.
Complete the wizard. Review the following for additional information:
|
SQL Server |
Select a server instance or click |
|
Database |
Select a database. LiteSpeed will not overwrite an existing object. |
|
Preview script |
Select to display a preview of the selected script. |
|
OK |
Click OK to initiate the schema restore. |
You cannot do object level restores directly from a TSM backup, because TSM does not allow for randomly accessing the data.
To work around this issue
Do one of the following:
NOTE: To be able to extract TSM backups you need the Extractor tool delivered with LiteSpeed 5.2 or higher. This tool is fully backward compatible.
The SQL Server SELECT statement is used to retrieve records from tables in a SQL Server database.
|
tip: Refer to Restore Objects in the LiteSpeed UI Console for further help with object restore. |
To execute a SELECT statement
Select the Script Execution tab. The available commands are displayed.
 |
Click to save script. |
 |
Click to print script. |
 |
Click to copy script. |
 |
Click to find or replace a script. |
 Execute Execute |
Click to execute the script. |
| Bypass tail log processing |
Click to bypass tail log processing. |
| Save results in Database |
Click to save script execution results in a database. |
Enter the statement.
Click Execute.
|
note: Be sure to use fully qualified names when you write a select statement. |

 to navigate to it.