This article provides details and resources to help bypassing Windows 11 requirements when installing on any VM or Hardware.
The following custom script is offered with no expressed or implied warranty and is to be used at your own risk. KACE does not guarantee the use of this script unless designed by the KACE Professional Services team, nor does KACE guarantee the functionality or existence of this script in future versions of the KACE SDA.
Preliminary checks:
1.) Precheck to detect upgrade issues or blocker in advance.
KACE SMA - Windows 10 / Windows 11 inplace upgrade PreCheck (ITNinja) (4379797)
2.) The exported scripts, report and custom inventory rule can be downloaded from the attachment section.
As dependencies, we have some scripts and files. Keyfreeze is used to prevent user interaction on a client on which the upgrade is performed. The script "LaunchKeyFreeze.cmd" only distinguishes between x64 and x86 and executes the correct EXE.
The script "setupcomplete.cmd" writes the string “SUCCESS” to a file. This script is only executed if the setup.exe was successfully.
The script "UpgradeWinX.cmd" contains the command to execute the inplace upgrade and the error handling if something should fail.
This KACE script is based on the same ISO as the PreCheck script. The first three tasks are similar to those in the PreCheck script. Here we check if the system is upgrade-able and if our temporary folders exist. If these are available, we clean the folders.
The only difference here is that we check the language code in the first task. This is important because we need an ISO file that contains the same language as the base image of the operating system. This means that if a client was installed from an English image and German was installed as additional (or even default) language afterwards, we still need the English ISO file for the upgrade. Otherwise the upgrade will fail.
You must change the language code if you have a different language installed on your clients. I have set the Language Code for English (en_US).
You can find the possible language codes here:
Tip: If you have several languages in your company, it makes sense to roll out an English basic image on all clients. After the deployment, you can install any language package. You will then only need the English ISO file going forward.
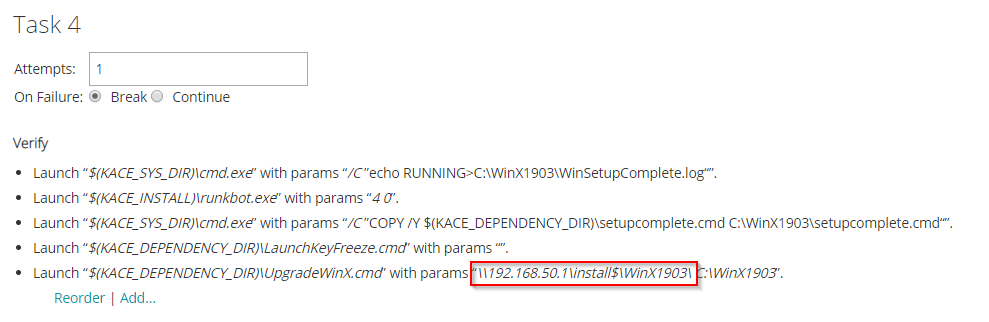
The fourth task in this script is about the upgrade. First, we write the status of the upgrade to a file, which will be checked in the inventory run right after creation.
Then the script "setupcomplete.cmd" is copied. This script is then called by the "setup.exe" as soon as the upgrade was successful. After copying the file, we execute the Keyfreeze. This can be removed if necessary.
As the last step in Verify we run the upgrade script, with the path to the ISO file (can also be local if the files were previously stored) and the path to the log files.
You have to edit the path to the ISO file to your environment similar to the PreCheck script.
If the setup was successful, the log files are collected and uploaded to the SMA. In addition, a restart is initiated to continue the upgrade.
If the setup fails, the log files are also collected and uploaded to the SMA. At the end the Keyfreeze is still terminated, so that an interaction with the client is possible again.
Important: This script must be executed in a task chain. Since the script performs a restart, it would not complete in a normal execution as a script after a successful upgrade. However, the task chain continues to execute the script even after a restart.
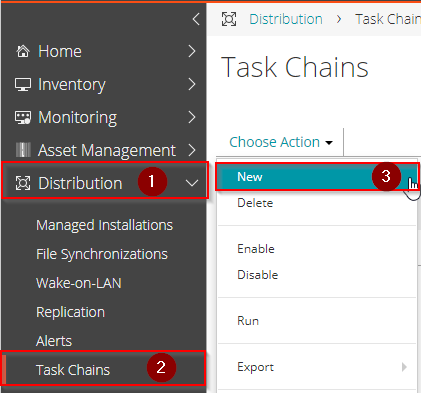
In the following window, assign a name for the Task Chain and assign Clients. In addition, you must deselect the MacOSX and Linux operating systems if they are present in your network.

Then you can define a schedule and a new task can be created.
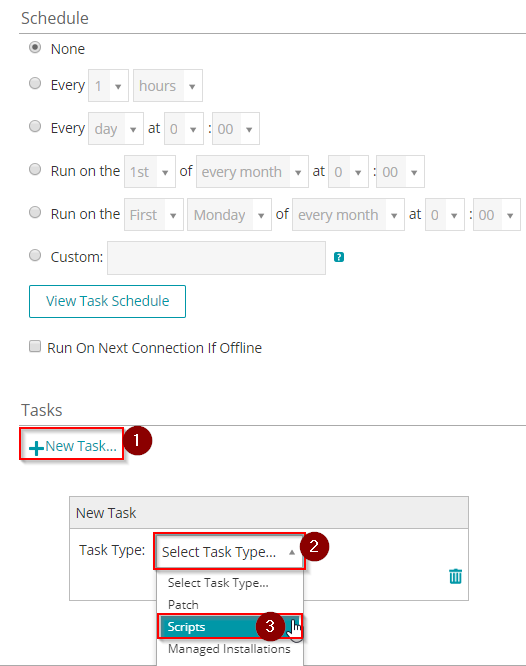
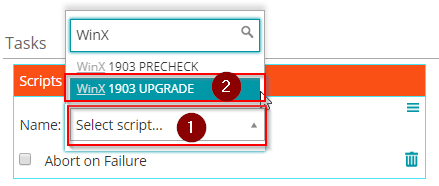
Now we select the Windows 10 Upgrade script. If the script is not in the list, you must activate the imported Windows 10 Upgrade script in our script module.
Finally, save the task chain. Now you can deploy the upgrade.
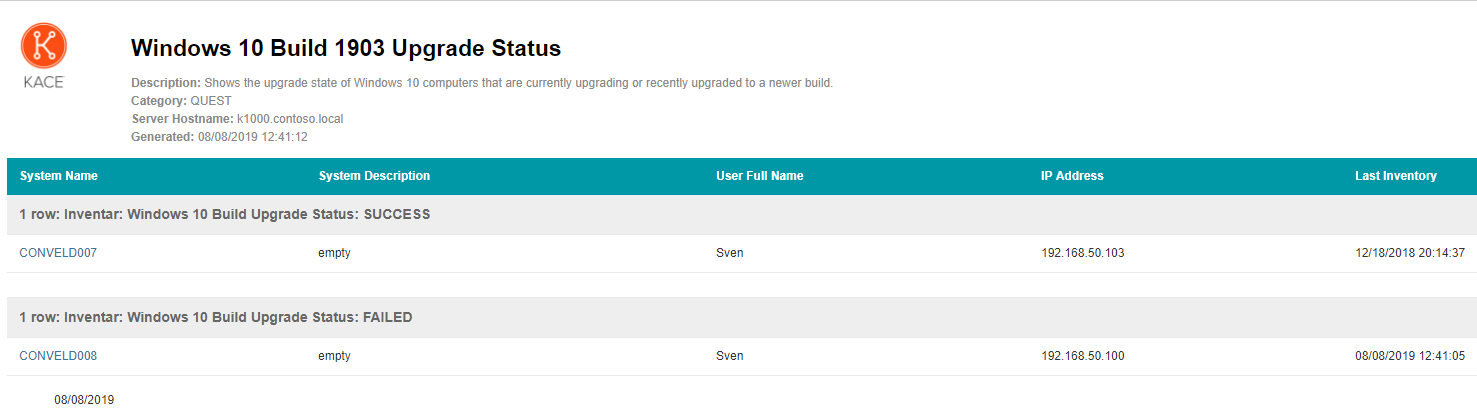
During the execution of the script we will write several states to a file. The states within the file will be reported to SMA by a custom inventory rule.
The CIR have a different ID in your environment, so you need to edit the filter in the report.
To customize the report, navigate to "Reporting / Reports" and search for "Windows 10 Build 1903 Upgrade Status". Then click the report and navigate to "Filters". In the filter you need to choose the CIR and set the operator to equal and type the states in as values.
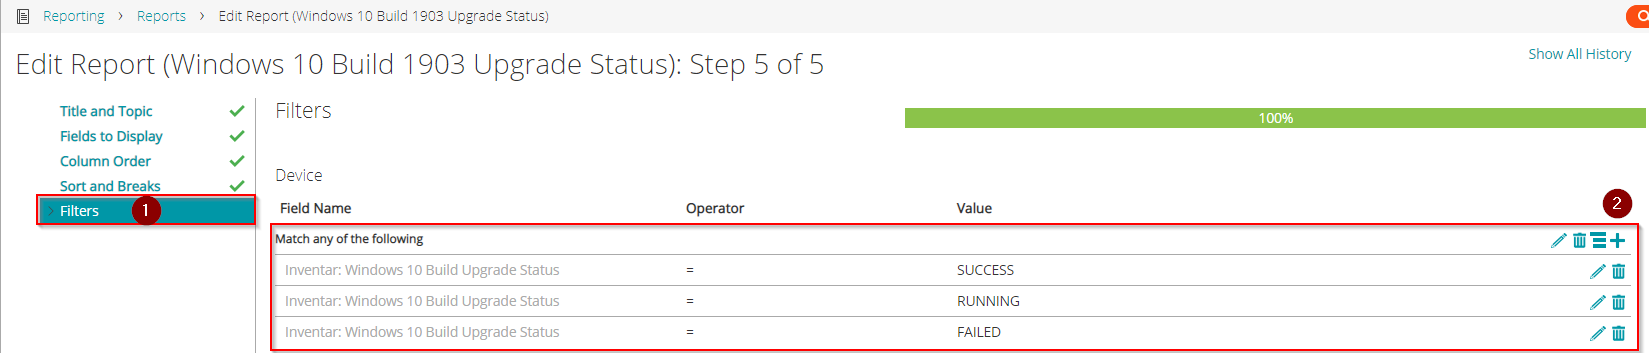
The following is an example of this report: