WARNING: This is mere guideline, we do not enforce it and it should be at your own discretion to apply/follow it.
In this document you will find how to use the Task Scheduler
Steps:
When you first open the Task Scheduler application, you’ll see three panes of information: the left-hand pane with a list of folders in a tree format that is used to organize the list of scheduled tasks, the middle pane that displays the tasks themselves, and the Actions pane on the right that gives you quick access to common menu items.
Don’t be intimidated by all of the things in the interface – it is really quite simple and there aren’t as many options as the cluttered interface make it seem that there are.

Figure 1.
The right-hand pane can actually be disabled using the right-most icon on the toolbar, as all of the actions are also available in the Action menu. If you have a task selected from the list, the menu will change to a task-specific set of items like Run or End, but when you first open Task Scheduler or don’t have a task selected, you’ll see the options to create tasks, display running tasks, and all the rest.
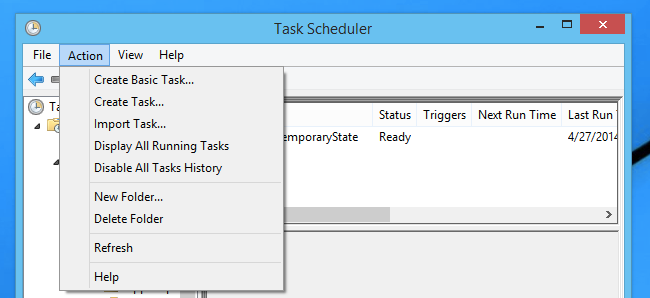
Figure 2.
Here is a brief explanation of some of the options in the list and what they do.
**The “Display All Running Tasks option pops up a really simple list that shows which tasks are currently running, although it never seems to populate the Started or Run Duration columns. In any case, it’s handy to see if things are running.**
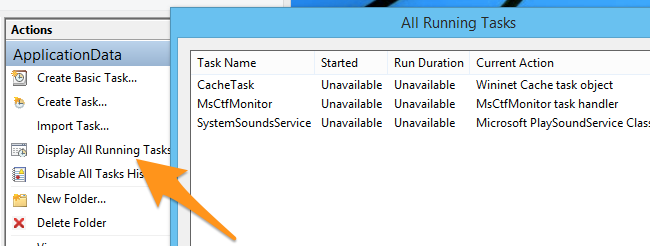
Figure 3.
The Enable / Disable All Tasks History option is really useful because it enables the History tab and tracks almost everything that happens. If you are troubleshooting a problem that involves a Scheduled Task, you should enable this option to get more data to work with – just make sure to disable it again afterward, because that is a lot of unnecessary logging that might slightly degrade performance if you don’t need it.
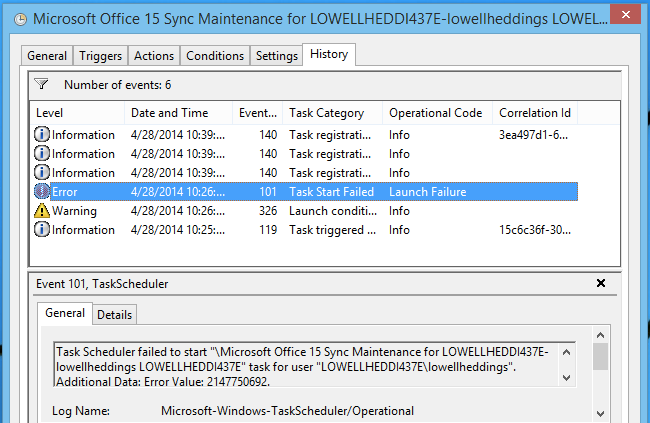
Figure 4.
I will cover the rest of the task detail tabs in great detail shortly, but it is worth looking through many of the folders to see the types of things that are being run with a scheduled task by Windows or third-party software.
For instance, if you head down into the Microsoft -> Windows -> Defrag folder, you’ll see the ScheduledDefrag task in the list. The actions tab shows you what is actually being run behind the scenes, and you can check out what the rest of the options are set to.
**To prevent issues do not adjust any of the options for built-in Microsoft services. Consider them informational only.**
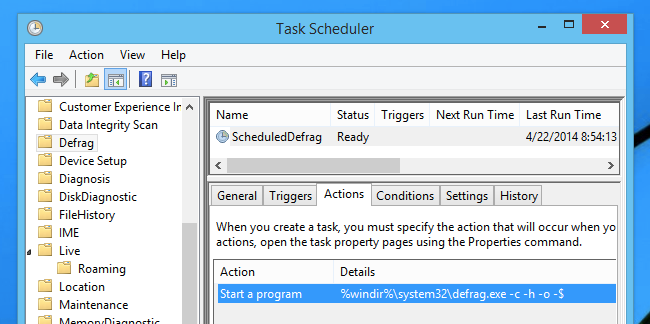
Figure 5.
Another fun example is the Microsoft -> Windows -> ApplicationData folder, which has the CleanupTemporaryState task. Looking at the Actions tab tells us the actual command line, which uses the rundll32.exe component to run the Windows.Storage.ApplicationData.dll file, and calls the CleanupTemporaryState function within that DLL.
**Essentially all .NET applications provide the ability to use the ApplicationData functions to create temporary files or data that are only for the current session. So Windows calls the CleanupTemporaryState function every so often to clear out those temporary files, which are also located in the regular Windows Temp folders.**
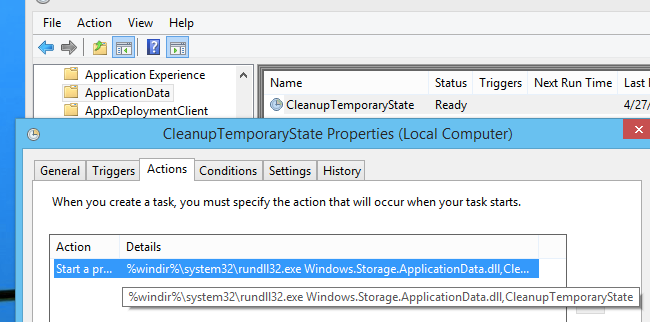
Figure 6.
You don’t need to manually trigger this task to keep your PC clean – if you want to clear out those temporary files, just use Disk Cleanup or something like CCleaner. But it’s fun to learn a little more about how Windows works under the hood.
Speaking of Disk Cleanup, did you know that Windows will automatically runs it in silent mode whenever you are really low on disk space?
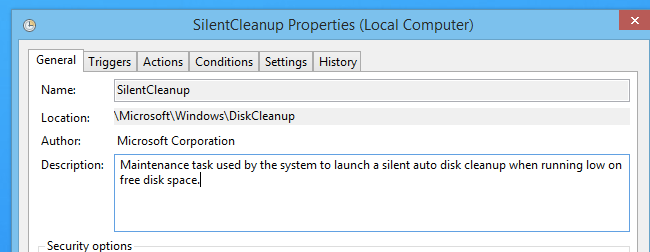
Figure 7.
The command line for this scheduled task shows how it is done – by passing the /autoclean and /D %systemdrive% arguments to cleanmgr.exe, The /D argument tells autoclean.exe to look at the specific drive, removing this argument will clean all drives and partitions.

Figure 8.
You’ll notice with some of these built-in tasks that the Trigger might not be set. That could be for a variety of reasons, including that Windows might trigger the scheduled task a different way.
Creating Basic Tasks with the Wizard
Now that we’ve gone through some of the options in the interface, the only thing remaining is to understand how to create tasks.
The Basic Tasks wizard helps you quickly create a task without needing to understand everything about the interface. It’ll prompt you for a Trigger, which is what Windows uses to decide when to run the task. The trigger could be a time or date, whether daily, weekly, monthly, or just every other Tuesday at 1PM. The options are very powerful once you select one and head to the next screen.
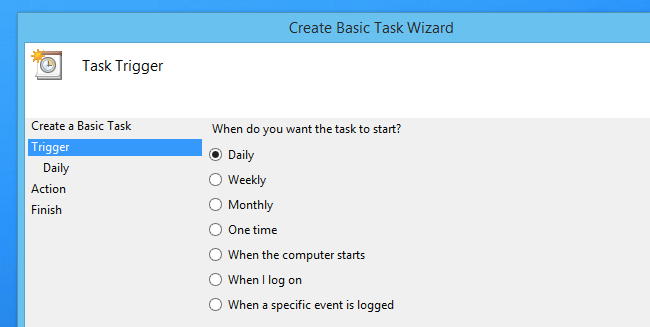
Once you get through the Trigger settings, you’ll be prompted for the Action that you want to perform, which is just a way of saying that you will use this screen to start a program. You can still select to send an email or display a message, but chances are good that the feature will be removed in a future version, since they both show up as deprecated now.
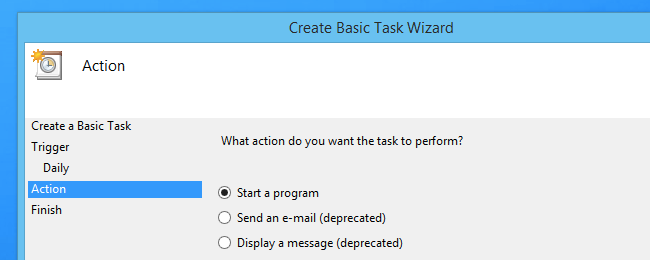
On the next screen you’ll be prompted for a program or script, and you can add arguments to that script as well. The last option for “Start in” is Required if your application or script is looking for a file in the current folder, so you can set the current folder to where the file is.
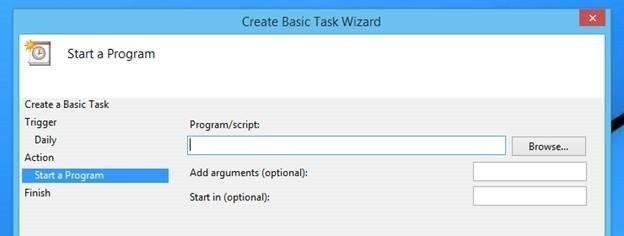
That’s all there really is to it for creating a task using the wizard, but that is just the rookie way to do things.
Creating a Task with the Details View
Once you already know what you are doing, there’s no reason to go through a wizard to create a new task (unless you really like them). Instead, you can just create a new task and fill out the sections with the settings that you want – and naturally, there are more settings available this way.
Note: Everything I am going to mention here also applies to editing existing tasks, so it’s well worth paying attention.
The first and most obvious fields are the Name, Location, Author, and Description, which are informational and self-explanatory. The Name field should be something short but descriptive, and you should really add a description so you don’t forget why you added this task when you are looking at it a year from now.

The rest of the options are better explained with a bulleted list, so we’ll use one of those now.
Run whether user is logged on or not – this option is the alternative to the last one, and it will run the task as your user account even if you are not logged in. This is useful for maintenance tasks that need to run even on a shared computer
The Triggers page gives you a whole bunch of options to choose from, and even more advanced settings once you select one of them.

These options are fairly straightforward – when you choose an option from the list, the other settings on the page will adjust to give you more controls. These are the ones on the list:
On a schedule – this trigger uses a time and date setting to start the task. There are a ton of options in here, and you can also make a task recurring, which is probably the default usage.
At log on – only triggers when you first login. This could be useful to run a task when you login that requires administrator privileges – if you were to stick that into your Startup folder, it wouldn’t work the way you might expect. You can also use this to only trigger when a specific user logs in, rather than when every user logs in.
At startup – this triggers when the computer starts up, rather than after you login. If you wanted something to run on boot but before you login, this would be the way to go (although there isn’t a guarantee that it would run before you login, just that it would trigger earlier).
On Idle – this very useful trigger will only start when your computer is idle and you haven’t been in front of it for a while.
On an event – you can trigger a scheduled task whenever a particular event happens in the Event Viewer logs. So, for instance, every time that event 5133 shows up in the log, run a task that emails somebody.
At task creation/modification – essentially you are creating a task that runs automatically once the task is created. It’s a way for Windows to create a task on the fly to run something only under certain conditions, and then you can even use the option to delete the task automatically once it is complete. You probably won’t use this one much.
On connection / disconnect from user session – you can create tasks that only trigger when you logon or off via Remote Desktop, or when you switch between users on a local PC using fast user switching. This can be useful for running certain tools automatically when you connect to a server, for instance.
On workstation lock / unlock – this trigger starts a task whenever you lock the screen using WIN + L or unlock it with your password.
It’s worth noting that you can have multiple triggers defined for a single task.
Selecting the “On a schedule” option will give you more things to choose from, like which days of the week you’d like to run the task, and what time. You can choose to make it always happen in universal time instead of a time zone if you have servers that span the globe.

But selecting the “On an event” option, for instance, will give you more selectors to choose the log, source, and Event ID that you are filtering for. It’s all relative to what you choose.

The Advanced settings for Triggers give you a bunch of other options to choose from.

The Actions page is much more self-explanatory… the only option is to create a new action that starts a program. You can technically still create an action that sends an email, but they are removing that ability, so if you need to send an email you’ll be better off with a script instead.
The Program/script box allows you to select the application you want to run, the Add arguments box allows you to pass an argument to that application, and the Start in option allows you to set the working directory.
For instance, if you were to use the Browse button and pick your web browser’s .exe file, you could then put https://www.howtogeek.com into the Add arguments box, and this scheduled task would automatically launch How-To Geek in your default browser when run. You could even set it up to run every morning to automatically open your browser when you login. (Not that I am specifically recommending this, but i'm just saying).

The Conditions tab has more options that work alongside the Trigger to decide whether or not the task will actually run. For instance, you could set a trigger to run every day at 1PM, but if you choose to “start the task only if the computer is on AC power”, it will only run if your laptop is plugged into the wall.

The options are pretty simple:
The last tab to understand is the Settings tab, which has a lot more options to choose from. The most interesting one is to allow the task to run on demand, which will let you trigger it any time you want.
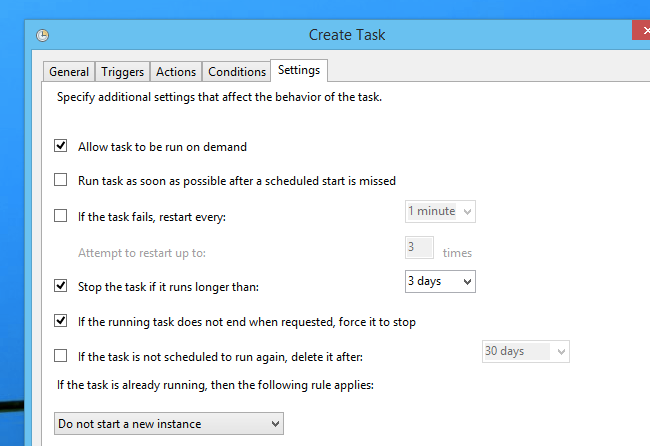
The options include:
Hopefully you’ve got a better understanding of how all these options work at this point. There are definitely a lot of options, and a lot of power at your fingertips. You just need to consider how to use it to your advantage.
Running a Scheduled Task on Demand via a Shortcut
I mentioned before that you can run a task on demand, and that is done using the command-line tool schtasks.exe and passing arguments over to specify which task you are trying to run.
You can also use the schtasks utility to create, delete, query, change, end, or display more information about a scheduled task. In fact, if you just type schtasks at the prompt, you’ll see a giant list of every scheduled task. If you use the /? argument instead, you’ll see the syntax.

The full syntax for using the /run argument, which is probably the most useful one, is this:
schtasks /run /TN “taskname”
You can then create a shortcut to run the scheduled task by pointing at the schtasks launcher utility.
What’s the point? Remember when I mentioned how you can use the “Run with highest privileges” option? You can actually create a scheduled task that runs as if the UAC prompt was already selected, and make a shortcut to run an administrator tool without requiring a UAC prompt.